
Can Jerks When Shifting To Reverse: 7 Causes
Why car jerks when shifting to reverse? A car jerking when shifting to reverse can be mainly caused by low transmission fluid, cold engine starts and faulty solenoid valves of transmission. Low transmission fluid can cause improper clutch engagement, while dirty transmission fluid inhibits smooth gear changes. A faulty torque converter solenoid or shift solenoid may disrupt fluid flow to shift gears. Engine mounts in poor condition allow excess vibration, and a sticking throttle valve maintains excess engine RPM. Worn CV joints provide inconsistent power transfer, and a weak battery unable to power sensors properly. Addressing these potential issues can resolve hard shifts into reverse and restore a comfortable driving experience.
Smoothly shifting car into reverse can be a tricky skill to master. We’ve all felt that sudden, embarrassing jerk or shudder as the car lurches backward or forward right when you put it in reverse. Maneuvering out of tight parking spots or backing gracefully down the driveway becomes an anxious dance.
What causes that herky-jerky motion when you shift to reverse? This frustrating issue can stem from several culprits. Let’s open up the hood and take a closer look at potential sources, then discuss some practical solutions to help restore buttery-smooth reverse gear transitions.
If your car is not shifting in any gear in automatic transmission, you can read my guide on that topic.
- Low transmission fluid can cause harsh shifting as clutches don’t engage properly. Check fluid level regularly.
- Dirty transmission fluid inhibits smooth engagement. Change fluid and filter periodically to flush out impurities.
- A faulty torque converter lock-up solenoid can cause jerking if it fails to unlock the converter when stopping.
- A weak battery may not provide enough voltage for solenoids and sensors to function optimally. Check voltage levels.
- A malfunctioning shift solenoid could disrupt fluid flow and prevent engaging the desired gear. Test solenoid resistance.
- A sticking throttle valve may keep idle speed too high for smooth engagement of reverse gear. Clean throttle body.
- Bad engine or transmission mounts allow excess movement, interfering with smooth gear changes. Inspect for damage.
- A problematic CV joint won’t adjust smoothly to changes in rotation, causing a jerk. Check boots for tears.
My Personal Experience With Car Jerking When Shifting To Reverse
Once my uncle’s 2005 Toyota Camry started experiencing a harsh jerk when shifting into reverse. I checked under the hood and noticed the transmission fluid was low.
After topping it off, the hard shifting continued. I tested the solenoids and found the shift solenoid was sticking. I replaced the faulty solenoid in my Camry’s automatic transmission and adjusted the fluid.
After the repair, the transmission shifted perfectly smooth again when going both forward and backward.
Causes Of Car Jerking When Switching To Reverse
Here are the causes of car shuddering when shifting to reverse:
1. Low Transmission Fluid May Cause Harsh Shifting
Transmission fluid is like the lifeblood for your car’s transmission system. It has some really important jobs:
- Lubrication: Transmission fluid coats all the metal parts and helps them move smoothly without grinding or wearing down. No friction equals no problems!
- Cooling: The transmission generates a lot of heat from all its hard work. Transmission fluid absorbs that heat and keeps things from overheating.
- Cleaning: It picks up tiny metal shavings and other gunk, keeping things running cleanly.
- Hydraulic Power: When you shift gears, transmission fluid pushes on clutches and bands with hydraulic force to smoothly engage the right gears.
But if your transmission fluid level drops too low, you’ll feel it when you try to shift into reverse. Here’s why:
The reverse gear uses a different set of gears than drive and the other forward gears. To slide into reverse nice and easy, the clutch pack needs enough hydraulic pressure from the fluid to mesh the gears together perfectly.
Without sufficient transmission fluid, the clutch pack can’t fully engage. It tries to catch then slips, causing that sudden bang or jerk.
Low transmission fluid causes even more problems:
- Delayed shifting as gears slip and struggle to engage
- Overheating from lack of cooling and extra friction
- Increased wear as unlubricated parts grind together
- Sludge buildup from lack of cleaning
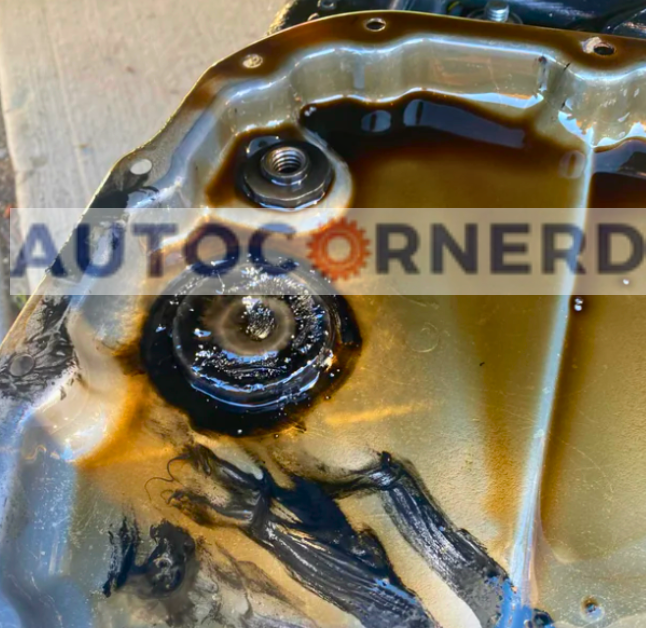
- Possible leaks due to cracks or worn seals
To learn more, you can read my guide on cost to fix transmission leaks.
How to check the level of transmission fluid?
The way you check your vehicle’s transmission fluid level depends on whether your vehicle has a transmission dipstick or not.
If your vehicle has a transmission dipstick, follow these steps:
- Park your car on level ground. Start the engine and let it run for a few minutes until it is warmed up.
- With your foot on the brake, shift through all the gears – Park, Reverse, Neutral, Drive, etc. Then shift back to Park. This circulates the fluid so you get an accurate reading.
- Look under the hood to find the transmission dipstick. It usually has a red or yellow handle. Check your owner’s manual if you can’t find it. Don’t mix it up with the oil dipstick near the front.
- Pull out the dipstick and wipe it clean with a rag or paper towel. Put it all the way back in the tube.
- Pull it out again. The fluid level should be between the minimum and maximum marks. The fluid should look clear and red or pink. If it’s low, dark, or smells burnt, you may need to add or change the fluid.
- To add fluid, use a funnel. Don’t overfill, as too much fluid can damage the transmission.
- Check the level again with the dipstick. Add more fluid if needed.
If your vehicle doesn’t have a transmission dipstick, do this:
- Find the fill plug on the transmission. Check your manual because the location varies.
- Use a wrench to remove the fill plug. Be careful, as the transmission can be hot.
- Stick your finger in the hole to check the fluid level.
- The fluid should be at the bottom of the fill hole.
2. Dirty Transmission Fluid Inhibits Smooth Engagement of Reverse Gear
The transmission fluid is being constantly pumped to keep things in the transmission running smoothly. But over time, all that pumping can grind tiny particles of dirt and friction material into the fluid. Before you know it, your transmission fluid isn’t as clean and slippery as it used to be.
Dirty transmission fluid causes trouble in two main places:
- First, it can’t keep your transmission’s many moving parts gliding freely. The gears aren’t getting the lubrication they need, and you may hear grinding or whining noises as things start to stick and bind up.
- Second, contamination in the valve body is bad news. The valve body is mission control, directing fluid flow to orchestrate smooth gear changes. All its tiny valves and passages get gummed up with varnish and debris. Signals get crossed, and you feel those jerky bangs when shifting to reverse gear.
The good news is, dirty transmission fluid is fixable. A fluid change flushes out all those tiny contaminants and restores clean motion. New fluid brings back cushiony lubrication and lets the valve body work its shift magic once again.
How to check?
The fresh transmission fluid has a dark red tint. If the transmission fluid is dark brown or black, it means you need to change the transmission fluid.
When you drop the transmission pan, also check if metal flakes are attracted to the magnet inside the transmission pan. In that case, you should clean it with this brake cleaner.
Moreover, you should always perform a transmission flush if the transmission fluid color is black.
Lastly, some people forget to drain the torque converter as well. So, you should drain both the transmission pan and the torque converter. A torque converter has a drain bolt from which you can drain transmission fluid.
In the owner’s manual, you will see transmission fluid capacities with and without torque converter. If you drain the torque converter as well, you need to follow the transmission fluid capacity mentioned in the manual.
3. Malfunctioning Torque Converter Lock-up Solenoid
The torque converter lock-up solenoid is a small valve that controls fluid pressure inside the converter. It’s job is to activate a lock-up clutch when needed.
This clutch creates a solid link between engine and transmission. When everything is running right, the solenoid switches the clutch on once the car reaches cruising speed. This gives two big benefits:
- Reduces slippage between engine and transmission. More power makes it to the wheels.
- Improves fuel economy. A direct connection is more efficient than a slipping converter.
But let’s talk about when things go wrong. A common problem is the converter staying locked up when coming to a stop. With the engine and transmission still linked, the driver shifts to reverse and WHAM! – a nasty jerk happens.
The sudden change in torque and direction shocks the car with this rude jolt. The root cause is that solenoid failed to unlock the converter clutch.
To learn how the lock-up clutch of the torque converter and its clutch works, you can watch the following video:
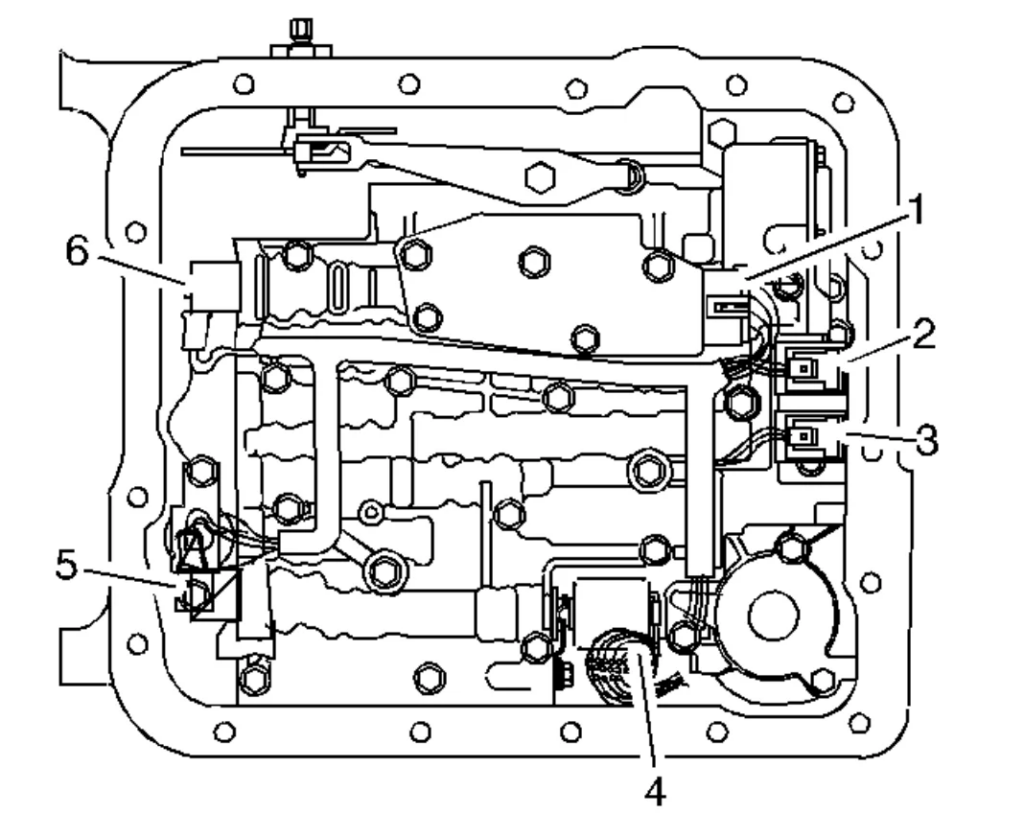
How to test TCC solenoid?
You will find a TCC solenoid on the front side of the transmission near the valve body of the transmission.
A TCC solenoid becomes bad when it is stuck closed or stuck open. This disturbs the flow of transmission fluid through the lock-up clutch due to which it does not disengage when a car comes to a stop.
Here are the steps to perform a TCC solenoid test:
- Utilize a digital multimeter to gauge the resistance of the solenoid valve within the torque converter.
- Attach the leads of the multimeter to the terminals of the valve.
- A resistance measurement falling within the range of 15 to 25 ohms indicates the effective operation of the valve.
An additional way to determine the TCC solenoid valve’s functionality involves the following procedure:
- Apply power from a vehicle battery or a comparable power source to the terminals of the solenoid valve.
- An audible clicking sound should become perceptible, accompanied by observable movement of the valve’s plunger in a reciprocating manner.
- This examination provides confirmation of the appropriate operational status of the valve.
3. Weak Battery Unable to Provide Sufficient Voltage for transmission Sensors
When you shift your car into reverse, some important parts work together to make the transition smooth. These parts are solenoids and sensors. They need steady power from the battery to work right.
Solenoids control how the transmission fluid flows like little switches. Sensors give feedback to the car’s computer. Both need voltage from the battery constantly so they can do their job.
If your car battery is weak, it can’t give the solenoids and sensors enough power. So they might not work at all or won’t work correctly. This causes problems with the smooth shifting. It makes your car having unsmooth transition to reverse gear
With a weak battery, the control solenoids may not fully switch the gears on and off like they should. This could delay the gears engaging or stop them from fully engaging. When you shift to reverse, the gears can clash or grind then. That’s what makes the jerky feeling.
How to check?
You should check the voltage across the terminals of your car’s battery with the engine on and off.
Hook up the voltmeter and measure the battery voltage when the engine is off. The voltage on a charged battery should read around 12.5 volts. Now, start the engine and measure the voltage. It should be between 13.5 and 14.5 volts.
4. Malfunctioning Shift Solenoid Results In Inability to select Clutch Packs
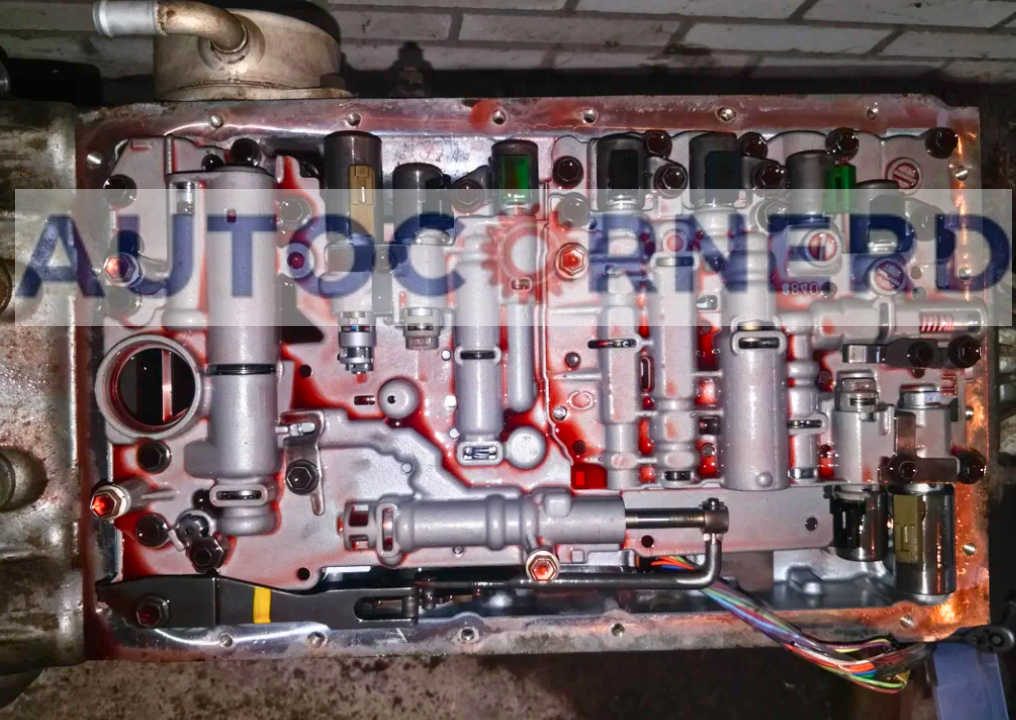
The control center of the automatic transmission is the valve body. It has a complex network of passages, valves, and solenoids that work together so the transmission can smoothly shift gears.
The valve body regulates the hydraulic pressure and transmission fluid flow. With the valve body, gear changes happen seamlessly.
A critical part inside the valve body is the shift control solenoid. It controls how transmission fluid flows to engage specific gears.
The shift control solenoid acts like an electromechanical switch. It gets signals from the engine control unit computer. Then, based on those signals, the solenoid regulates the transmission fluid pressure so the gears can smoothly engage or disengage.
Here’s how control solenoid in a valve body looks like:
- Transmission fluid pressure switch
- 1-2 shift control solenoid
- 2-3 shift control solenoid
- Pressure control solenoid
When you shift your car into reverse, the TCM or ECU sends a signal to the shift control solenoid to open or close a valve that allows fluid to flow into the reverse clutch pack.
This engages the reverse gear and allows the car to move backward. However, if the shift control solenoid is faulty, it may not respond properly to the signal or it may leak fluid.
When the shift control solenoid malfunctions, it may fail to engage the reverse gear mechanism properly. This can lead to a delay in gear engagement or cause the gears to engage abruptly, resulting in a sudden jerk or jolt when shifting to reverse.
The malfunctioning solenoid may also cause the transmission to slip between gears or fail to engage the intended gear altogether.
How to test?
To test shift solenoid, you need to check resistance across its terminals using a multimeter. The resistance should fall in the range specified for that shift solenoid.
You can watch the below youtube video to test the solenoids of an automatic transmission system:
5. Sticking Throttle Valve Makes Idle Speed Too High for Reverse Gear Activation
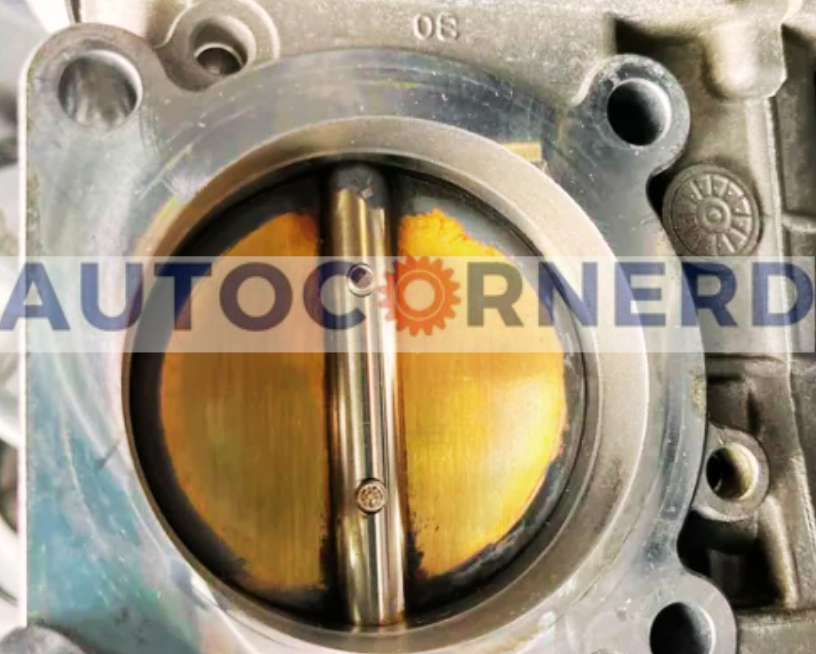
The throttle valve is a butterfly that opens and closes for controlling the airflow entering the engine. When pressing the gas pedal, it opens more to allow more air intake. This increases engine speed and power. Releasing the pedal closes it to reduce airflow, lowering speed and power.
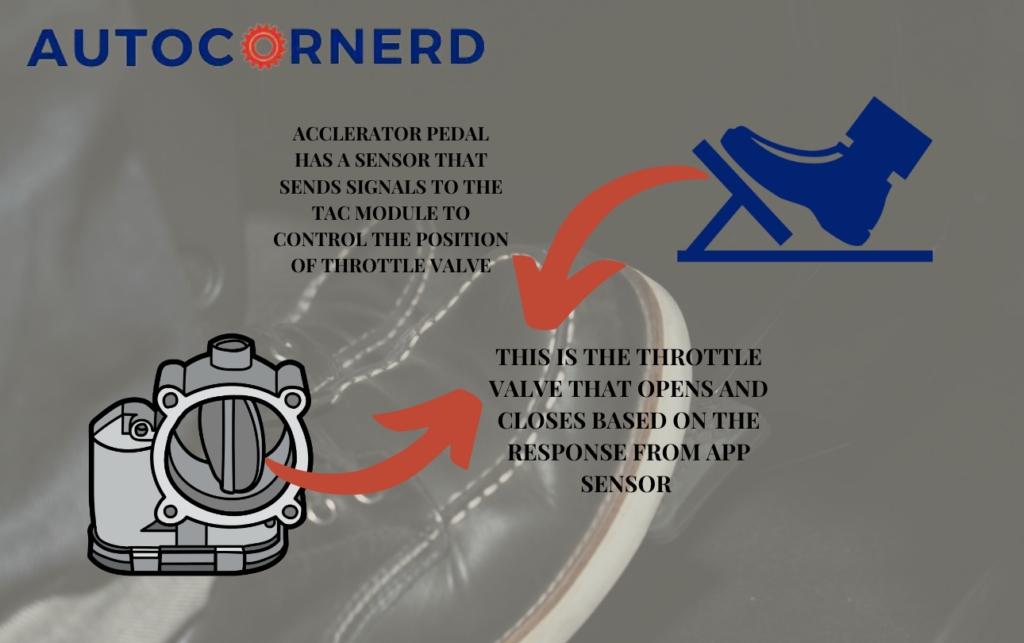
The throttle valve works with fuel injectors that spray fuel into the intake manifold where it mixes with incoming air. The engine computer carefully controls the air-fuel ratio for best combustion and performance. The ideal ratio for most gas engines is 14.7:1 – 14.7 parts of air per fuel part.
Why does a sticking throttle valve cause jerking when shifting to reverse?
Before shifting into reverse, we must stop the car since shifting from drive to reverse while moving can damage the transmission.
At idle, you expect RPM to drop to around 800. If the throttle valve sticks open, too much air enters the engine. This can cause:
- Excessive wear on transmission and drivetrain from sudden torque and direction changes.
- Difficulty engaging or disengaging reverse gear as synchronizers must overcome higher rotational differences between input and output shafts.
- Loud clunks or bangs from the transmission or differential due to shock loading.
- Harsh jerks or lurches as the wheels are forced to rapidly spin in reverse.
Why does the throttle valve stick?
A sticking throttle valve can be caused by:
- Dirt, carbon, oil buildup on the valve or inside the throttle body.
- Wear and tear on valve hinges, springs, seals.
- Damage or corrosion of the cable connecting pedal to valve.
Manually moving the throttle plate back and forth checks for smooth motion. Any sticking or hesitation indicates a throttle body problem.
How to fix?
Use a throttle body cleaner and a soft brush or rag to gently clean the throttle body and remove any buildup.
6. Bad Engine or Transmission Mounts Cause Engine Shaking
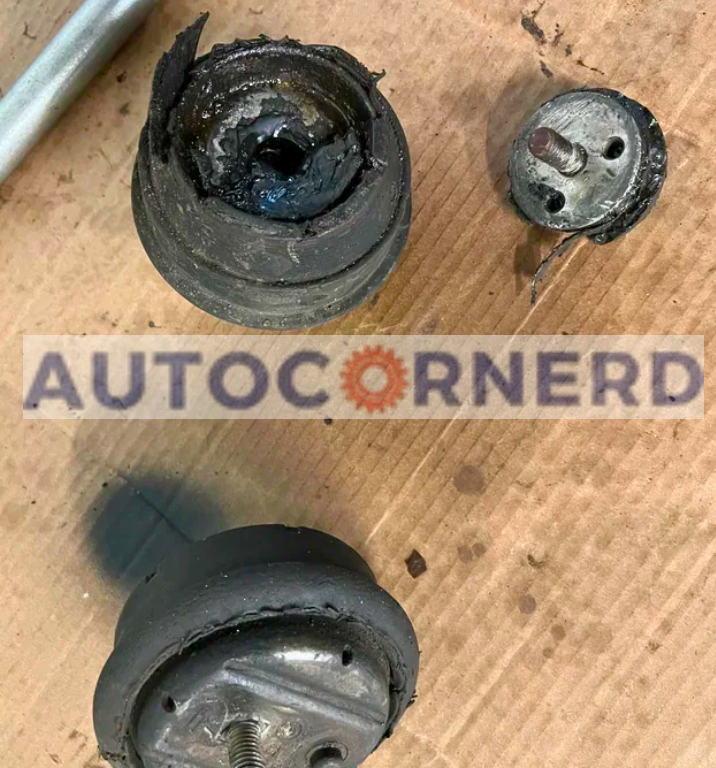
The engine mounts are designed for firmly holding the engine in its place. Their job is also to reduce the vibrations and noise going into the vehicle’s cabin.
These mounts are typically made using rubber or a mix of rubber and metal. This gives them flexibility while keeping things stable.
Strategic placing of mounts helps support the engine weight. This also counters the forces during acceleration, braking, and turning.
Transmission mounts have a similar role. But their specific job is to hold the transmission system in place. They connect the transmission firmly to the vehicle body. This keeps the transmission from moving out of position. The mounts also reduce vibrations and motion.
Like engine mounts, transmission mounts often use rubber or a rubber-metal mix. This gives the best performance.
When mounts get damaged or worn out, they cannot absorb vibrations well. This allows too much engine or transmission movement. It can cause jerky gear shifts when reversing.
Why do mounts deteriorate?
Mounts deteriorate due to:
- Age and use: With time, heat, moisture, oil and dirt exposure damages rubber and metal parts. This reduces their strength and flexibility, causing cracks, tears or breaks.
- Accidents: Major impacts or forces can bend, deform or shear off mounts. This happens with crashes, potholes, curbs or speed bumps.
Testing mounts:
Use an assistant for testing. Keep pressing the gas while shifting between park, drive and reverse. Watch engine movement at each shift. Significant motion indicates a bad mount.
For further testing, drive and listen for odd noises, vibrations or engine motions. These happen more over bumps with worn mounts.
Visual inspection:
- Check mount bolts: Look if any are loose, indicating wear.
- Inspect rubber: Check for cracks and tears needing replacement.
- Assess brackets: See if they show wear or damage that suggests deteriorated mounts.
Your car might also shake at idle but smooth out while driving if mounts are bad.
7. Bad CV Joint Transfers Inconsistent Rotational Power to Driveshaft
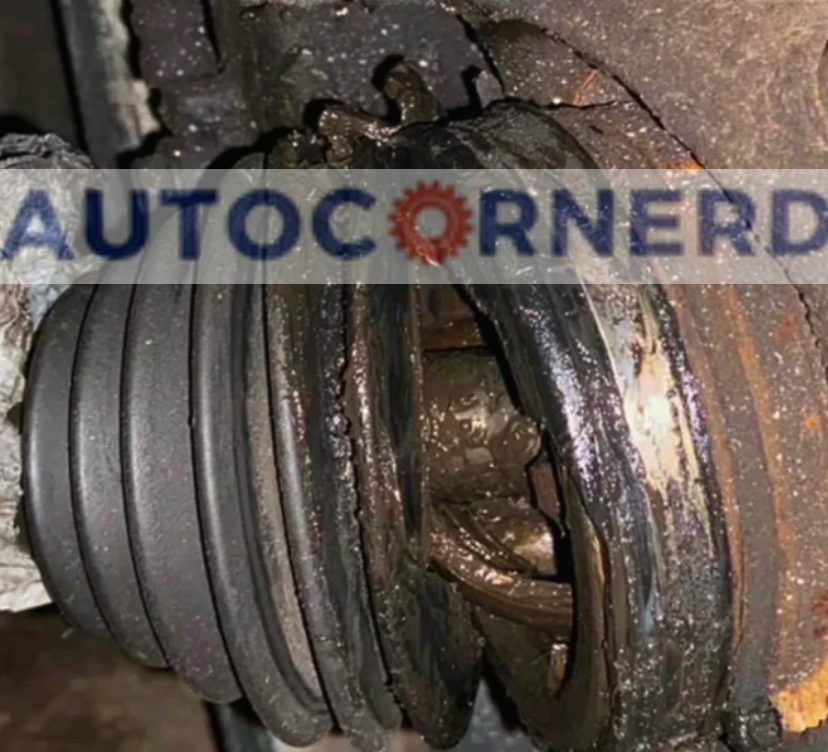
The flexible rubber boot surrounding the CV joint keeps it well-lubricated. Inside this boot are ball bearings allowing smooth spins.
The CV joint’s role is power transfer while permitting up-and-down suspension motion. This flexibility maintains wheel velocity as they hit bumps – ensuring a smooth ride.
Shifting to reverse reverses wheel rotation direction – so CV joints must adjust to the new angles and speeds.
If worn CV joints bind up, it causes a jerky sensation as they snap back.
The rubber boot keeps out dirt and moisture. Any tears or cracks expose the joint to contaminants.
The boot protects the intricate joint from debris. But once torn, water and grit enter to grind down surfaces. Unable to spin smoothly, acceleration suffers.
To learn about CV joint damage risk factors and their driveline role, request my guide: “Can a damaged CV joint affect the transmission?”
Final Thoughts
The car’s transmission helps it shift gears smoothly. Sometimes it struggles shifting into reverse. This “jerkiness” shows a deeper issue needs attention.
A few things could cause this:
- Worn-out mounts that hold parts in place
- Faulty valves that control fluid flow
- Low fluid levels
Low fluid is very common. Transmission fluid cleans, cools, and lubricates the parts. Without enough, shifting gets grindy.
Some First Hand Experiences Shared By Users In Different Communities
Our team conducted research across various online communities, forums, and subreddits to gather user comments and opinions on “car’s abrupt movement during reverse shift.
User 1 says:
Experienced this on my GMC Terrain. It was the clutch within the transmission. Had to get the clutch assembly replaced to fix the jerking when shifting to reverse.
User 2 says:
I had the same jerking issue in my Ford when shifting to reverse. Turns out, it was a transmission fluid problem. I got the fluid and filter changed, and it solved the issue.
User 3 says:
Experienced this with my Crosstrek. After a bit of troubleshooting, I realized the issue was with the transmission mount. Replacing it fixed the jerking when shifting to reverse.
User 4 says:
My Sorento had this jerky movement. It was actually due to a failing solenoid in the transmission. Had to get it replaced and reprogrammed at the dealership.