
Check Engine Light On But Car Runs Fine? [12 Common Causes]
The most frequent culprit triggering the check engine light despite car is running is a loose or faulty gas cap. This allows vehicle vapors to escape, tricking sensors. But a glowing check engine light can also result from a clogged air filter, faulty MAF sensor, oxygen sensors not working properly, or problems with the automatic transmission. Clogged air filter reduces engine airflow, faulty MAF sensor misreads air volumes, malfunctioning oxygen sensors miscalculates fuel trim and automatic transmission issues cause gears slippage. To pinpoint the root cause, utilize an OBDII scanner to promptly retrieve any diagnostic trouble codes. And take note – if you spot the check engine light blinking or flashing, this indicates a misfire in one or more cylinders. Such a misfire necessitates immediate attention, as it can rapidly cause major engine damage if left unchecked.
The check engine light blinking can make you feel unsure. You may think something is really wrong, even if your car is working okay.
But this check engine light light does not always mean there is a big issue. Many times, it is not serious when the check engine light turns on but the car runs fine.
In this guide, I will share some regular reasons for why the check engine light can be on when the car is alright. I will help you know if it is alright to keep driving or if you should take your car to get fixed.
Short on time? Get the answer quickly with my free virtual mechanic chatbot.
I have provided a brief overview of the check engine light below. If you already have a preliminary knowledge, you can skip straight to the causes section.
In the last section, I’ve included comments from forums where users share firsthand experiences with check engine light on but car is running fine. Be sure to check out that section for real insights.
Note: The information I presented in this article is gathered from online automotive forums, OBDII manuals, and repair guides.
If your check engine light is orange/red and blinking instead of being steady, you can read my guide on check engine light flashing and car shaking
My Personal Experience With Check Engine Light On Despite The Car Is Running Fine
Once, the check engine light came on in my wife’s car even though it was running fine. I used an OBD2 scanner to pull the code, which pointed to a bad oxygen sensor.
I ordered an OEM replacement sensor online for about $100 and swapped it out in the driveway in about 30 minutes.
After clearing the code, the check engine light stayed off and her car was good as new! Properly diagnosing codes with a scanner and replacing just the failed part can fix a check engine light without going to the shop.
What Is Check Engine Light and How to Diagnose?
The check engine light is an informer on the control panel blinking when the vehicle’s built-in analysis structure senses a breakdown of various sections under the hood.
The check engine illumination generally lights up if your engine control unit spots a defect in the engine.
When the check engine light comes on, the ECU stores a “trouble code” showing the root of the hassle.
These fault codes have letters and numerals. The characters signify separate kinds of flaws. For example, ‘P’ in the trouble code means the issue connects with the powertrain.
You can diagnose the check engine light and find out what code is associated with the check engine light by using Onboard Diagnostic (OBDII) scanner.
Now, if the 0 comes after P in the trouble code, it means that it is a generic OBD code that applies to all vehicles. You can read more about generic trouble codes in the engine here. If the 1 comes after P in the trouble code, it’s a manufacturer-specific code. In this case, you have to check the owner’s manual to find the source of that trouble code.
In the below YouTube video below, you can see that the guy used the OBD2 scanning tool to find the trouble codes in the engine.
Usually, when a check engine light comes on and it doesn’t change how it’s running, it means the OBDII system has picked up an emissions-related fault.
These types of faults will not hurt the vehicle in the short term. You’d want to get the codes looked at as soon as possible, then get the issue fixed.
If the engine changes how it is running, then there is something wrong beyond emissions. You’d want to get it taken care of as soon as possible or you run the risk of damaging your vehicle further.
I highly recommend reading the PDF on the diagnostic process for engine trouble codes before continuing. It proved to be incredibly useful to me while addressing check engine light problems in my car. It would be beneficial for you to peruse it once you have finished with this guide.
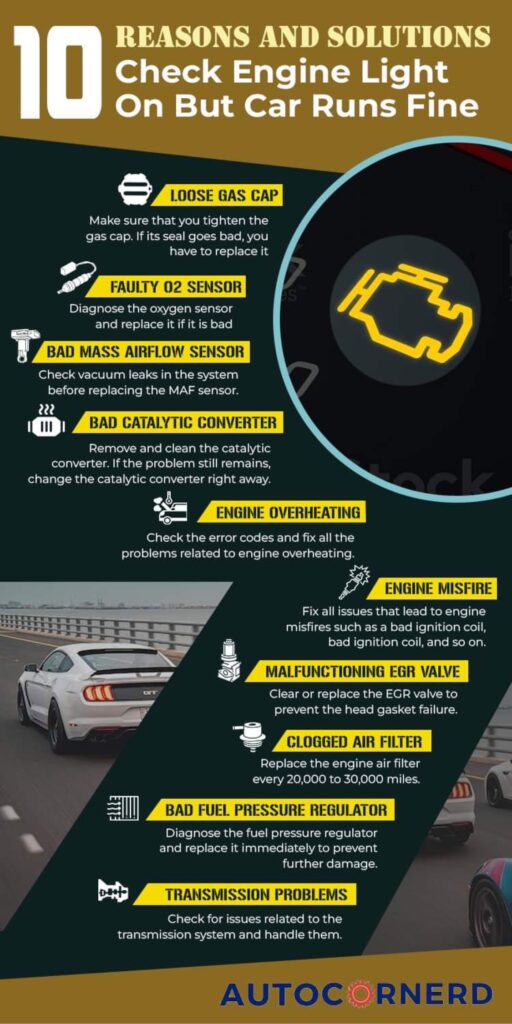
Causes Of Check Engine Light Despite Car Running Fine
Check engine lights can come on for all sorts of emissions-related issues. It can result in trouble codes stored in engine’s memory.
Here are some of the most common causes of illumination of the check engine light even if your car is running fine.
- Loose gas cap
- Faulty O2 sensor
- Bad mass airflow sensor
- Bad catalytic converter
- Engine overheating
- Engine misfire
- Malfunctioning EGR Valve
- Bad fuel pressure regulator
- Clogged air filter
- Transmission problems
1. Loose or Bad Gas Cap Causing Evaporative Emissions Code
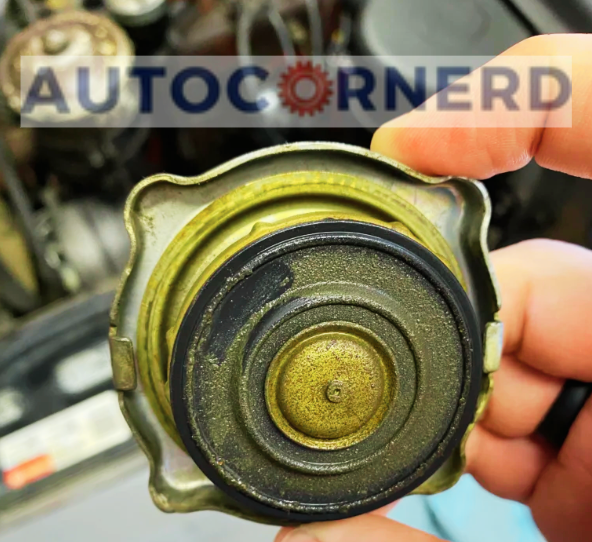
A loose or bad gas cap is the most common cause of lighting up a check engine light on the dashboard.
The gas cap seals up your car’s fuel system. This keeps gas fumes inside and dirt outside. When the cap is loose, too much air sneaks in.
There’s a fuel tank pressure sensor on your gas tank. It watches for leaks. A loose cap can’t keep the pressure right. This trips the sensor, which tells the ECU to flip on the check engine light.
So if your the yellow engine light glows for no clear reason, try tightening the gas cap first.
You can read my guide on P1450 code to learn more about the leaks in fuel system due to gas cap.
How to fix?
When closing your gas cap, turn it clockwise. Listen for three or four clicks to ensure a tight seal. But if the cap seal goes bad, tightening won’t help – you’ll need a replacement.
Check around the gas cap and fuel filler neck for dirt or gunk buildup. Finding any debris or rust means it’s cleaning time. Give the areas a good scrub before replacing the cap.
Inspect the cap seal for cracks. A quick spritz of WD-40 on the seal helps condition the o-ring. But avoid contact with the rest of the cap.
Check the filler neck too. Sand away any rust with sandpaper or a brush. Stuff a rag inside to catch falling particles.
Finish up by lightly greasing the neck seal ring. The lube helps the cap o-ring make a solid connection for leak prevention.
Note: If you need to replace a gas cap, avoid using aftermarket gas caps, as they may not fit correctly and can cause additional problems. It’s recommended to purchase a gas cap directly from the dealership or an authorized retailer for your specific vehicle make and model.
Do you know if your car won’t start after refueling, it may also be due to a loose gas cap? You can read my guide on that topic to learn more.
Important: To learn more, I have found this subreddit and this forum thread really helpful. You can read the discussions and see how these issues were resolved by the car owners.
2. Malfunctioning O2 Sensor Disturbing Air-Fuel Ratio
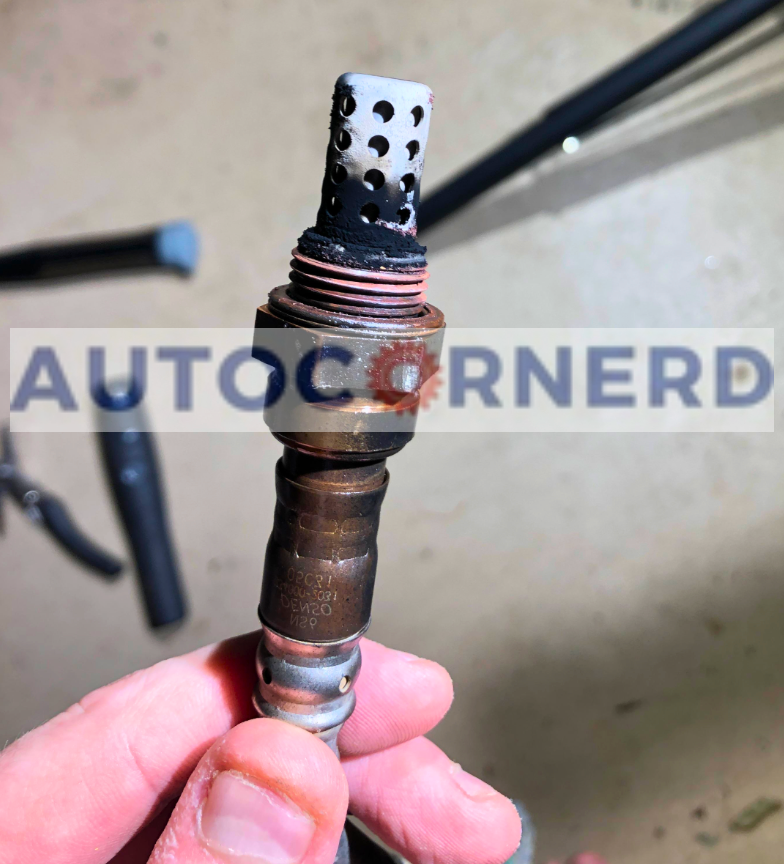
The oxygen sensor checks the exhaust to see if the car’s emission system works right. The sensor is part of the emission controls.
Oxygen sensors work by checking the oxygen amount in the exhaust. They compare it to a standard number. Oxygen sensors also watch the air/fuel mixture by sending exhaust gas oxygen data to the ECU (engine computer) in real time.
Using the oxygen amount in the exhaust, the ECU decides the fuel injection amount.
If the O2 sensor fails and does not record the right oxygen levels, the ECU can’t tell how much fuel is needed. This changes the air-fuel ratio and combustion. It also turns on the check engine light.
A bad oxygen sensor not only lights the check engine light, it also affects engine power. The wrong air/fuel mix means loss of power. It also affects fuel economy.
How to test oxygen sensor?
In a vehicle, there are two oxygen sensors. One is before the catalytic converter and the other is located after it.
You have to diagnose the O2 sensor located before the catalytic converter for the check engine light. Pre-catalytic O2 sensor should show a varying voltage graph if it’s working fine. A bad O2 sensor shows the steady voltage.
The O2 sensor makes voltage move up and down within a range. This matches air and fuel mixing in your engine.
If the O2 sensor malfunctions, there might be a lack of voltage variation which leads to suboptimal engine performance.
In a good O2 sensor, the voltage should jump around every couple seconds. It stays between 850mV to 150mV.
If voltage stays at one reading or makes weird jumps, it means the O2 sensor has failed. The check engine light turns on then.
3. Malfunctioning Mass Airflow Sensor Affecting Air-Fuel Ratio
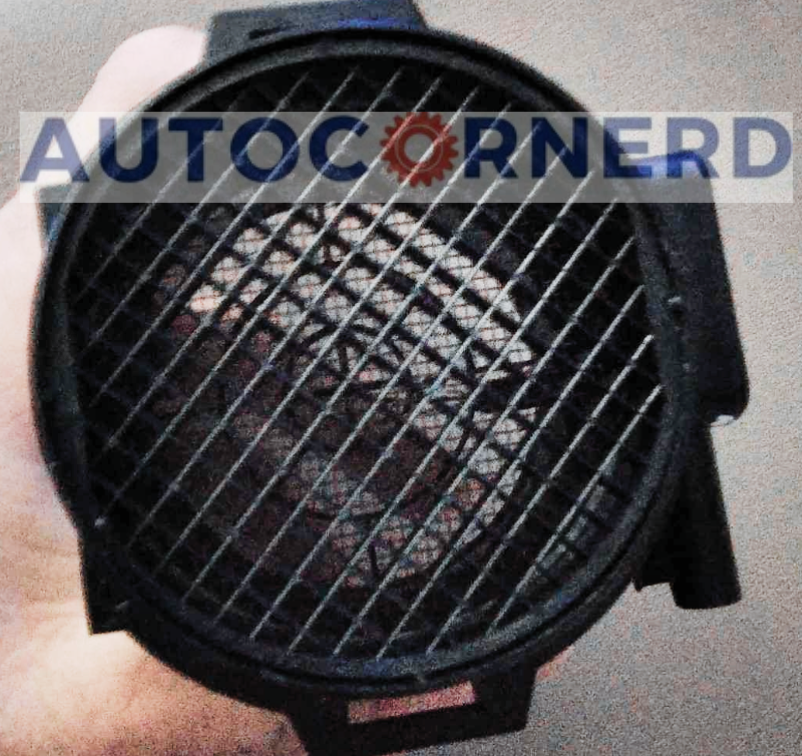
The mass airflow sensor (MAF) is found between the air filter and intake manifold on all modern gasoline and most diesel engines. It is part of the computerized fuel system that measures the airflow entering the engine.
This small sensor has an important job. It uses a heated wire that cools down when air flows over it. The change in temperature changes the wire’s resistance, which is calculated by the engine computer to measure the mass of air entering.
The computer compares this measurement to how much air should be entering. This allows it to adjust the fuel correctly so your engine runs smoothly.
If the sensor gets dirty or fails, it will send inaccurate readings to the computer. This disrupts performance and can turn on the check engine light.
Note: Some engines have a Mass Air Pressure (MAP) sensor instead of a MAF sensor. So, it all depends on your engine. If the MAF sensor is not present, you should check the MAP sensor when your check engine light is on but the car is running fine.
How to diagnose?
If the mass airflow sensor is damaged, it will throw the reports out of range of what is expected which will cause the check engine light to turn on. Codes are generally P0100 to p0104, along with manufacturer-specific codes.
Before replacing the mass airflow sensor, you should also check vacuum leaks in the system as the air leakage through the vacuum hose and air intake manifold gasket can send wrong reports to the ECU, which can trigger the check engine light.
You can check out the below video to get an idea about the vacuum leaks.
To test MAF sensor, you need a multimeter. When the air flows through the MAF sensor at a higher rate, the voltage output also goes up.
So, when you step on the gas pedal, more air passes through the sensor, causing the voltage to rise.
When the vehicle is idling, the voltage reading should be lower than 1.0V. However, as you increase the engine RPM, the MAF sensor produces a voltage output that goes from 1.0V to 1.7V.
How to fix?
If the MAF sensor is dirty or covered in debris and its voltage is fluctuating, you can clean the heated element of the MAF sensor using brake cleaner.
I would recommend this cleaner. If your vehicle has a MAP sensor, it can’t be cleaned. You should replace it.
Here is a short YouTube video explaining how to clean an MAF sensor:
4. Catalytic Converter Failing Emission Test
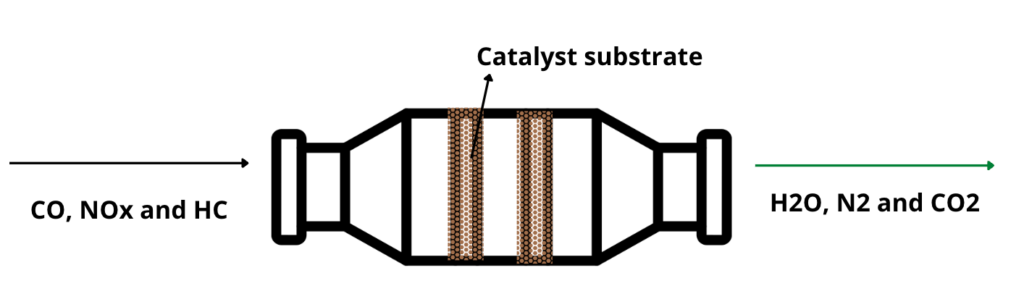
A catalytic converter is installed in engines to remove unburned hydrocarbons (HC) and carbon monoxide (CO) from the exhaust gases.
A catalytic converter gets damaged when raw fuel and oil get stuck in its honeycomb-shaped insides. This happens when unburnt fuel builds up from engine misfires.
When the catalytic converter gets clogged, it blocks exhaust gases. This causes backpressure in the exhaust pipes. The backpressure makes it harder for the engine to push out gases. So the engine loses power.
Also, the catalytic converter uses oxygen in the exhaust to change carbon monoxide into carbon dioxide. It also burns extra fuel. A bad catalytic converter can’t use the oxygen well.
So, too much oxygen stays in the exhaust after the catalytic converter. An oxygen sensor after the catalytic converter detects that extra oxygen. It sends signals to the engine computer. Then the check engine light turns on.
How to test?
If your scan tool is showing any OBD2 code related to bad emissions or catalytic system efficiency, you should immediately check the catalytic converter. This guide on testing a clogged catalytic converter is also quite helpful. You should check that out.
5. Engine Overheating Signs With Coolant Temperature Sensor Faults
Sometimes, overheating can also cause the check engine light to turn on. Overheating of the engine can lead to mechanical failure as the different components of the engine i.e. piston, cam phaser, cams, crankshaft, and connecting are subjected to very high temperatures that can affect the combustion.
Resultantly, it can produce bad emissions, which can turn on the check engine light.
An engine is prone to overheating due to following reasons:
- Water pump has failed
- Oil has become bad
- Coolant level is low
- Blown head gasket
In addition, engine cooling system has ECT (engine coolant temperature) sensor to record temperature of coolant and send signals to the ECU. If the ECT sensor malfunctions, it will turn on the check engine light but it won’t affect your vehicle’s performance.
You can read more about that my guide on P0128 code to understand the cooling system of the engine.
6. Fouled Spark Plugs
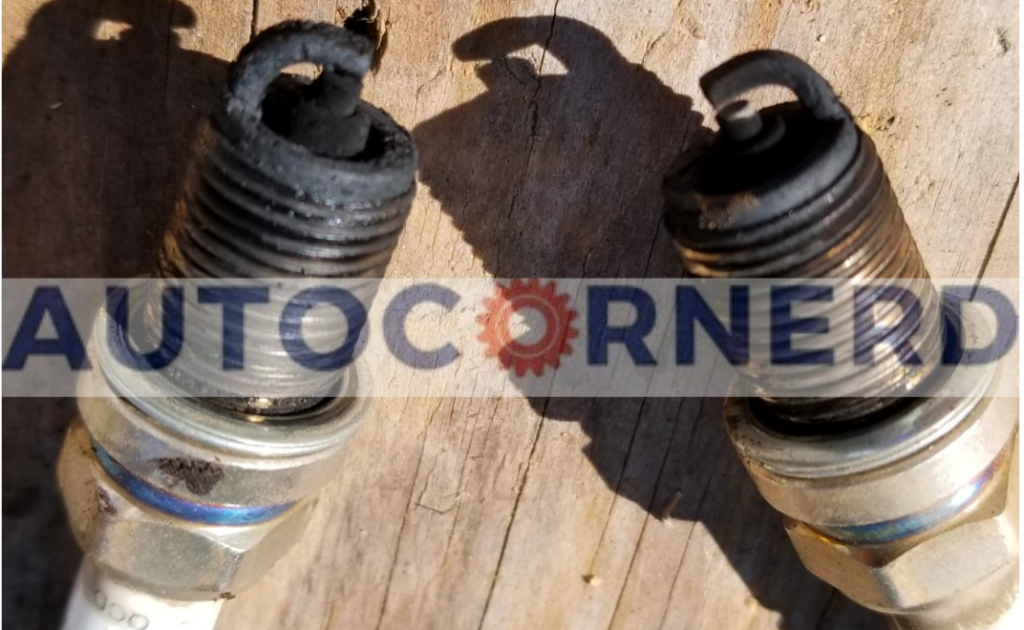
Spark plugs are very important in your car’s engine. They start the fire that makes the engine run.
When spark plugs get dirty, it can turn on the check engine light.
Dirty spark plugs cause misfires. Misfires make the car shake or run rough. They also cause trouble codes to come on, like P0300 or P0301. The P030X codes mean there is a misfire. The X tells which cylinder has the misfire.
There are three common ways spark plugs get dirty.
- Oil-fouled spark plugs happen when oil gets into the cylinder. The oil coats the plug so it can’t make a good spark. Things like bad piston rings or leaky gaskets allow oil to foul the plugs.
- Carbon-fouled spark plugs get carbon stuck on the metal tips. Carbon blocks the spark. Low-quality fuel, short trips, and stop-and-go driving cause carbon buildup. Running at the wrong temperature also leaves carbon on the plugs.
- Coolant-fouled spark plugs happen when coolant leaks into the cylinder. The coolant dirties the plugs and stops them sparking right. Problems like a bad head gasket or cracked cylinder head can cause coolant fouling.
The ceramic part around the metal tip of spark plug can also get fouled. This ceramic insulator acts as a protective barrier, preventing electrical leakage that could damage the engine’s electrical system.
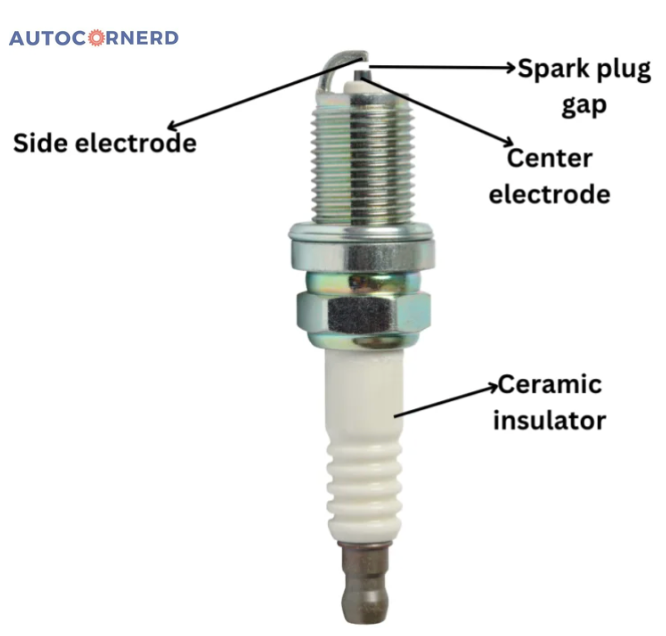
When the ceramic insulator becomes fouled with oil or contaminants, it causes an electrical leak across the insulator. This leads to incomplete combustion of the fuel mixture, resulting in misfires. In turn, this prevents the spark plug from generating the required spark, leading to issues like hesitation, reduced power, and acceleration trouble.
How to inspect?
To determine if your spark plugs are fouled and are causing check engine light, you can follow these steps:
- Use a spark plug socket to remove the spark plug.
- Visually inspect the spark plug for signs of fouling.
- Refer to a spark plug trouble tracer chart (PDF download available) for further guidance.
How to clean them?
The decision to clean or replace spark plugs depends on their condition. If the spark plugs are worn out or damaged, replacement is necessary. However, if they are still in good condition, cleaning and re-gapping can be performed.
The cleaning process for fouled spark plugs involves the following steps:
- Use compressed air to remove dirt and debris from the spark plugs.
- Soak the spark plugs in brake cleaner to wash away any remaining residue.
- Use a nylon brush to effectively loosen and remove debris.
7. Bad Ignition Coil Hinders Spark Delivery and Performance

An ignition coil has an important job in your vehicle’s engine. It takes the low power from the battery and makes it into strong sparks. These sparks light the fuel-air mix in the spark plugs to power your engine.
There are two main kinds of ignition coils:
Coil Over Plug (COP)
Each spark plug has its own coil. COP coils don’t need a distributor. The coils give each spark plug the right power at the right time. This makes the sparks very reliable.
Distributor-Based
Contrarily, distributor-based ignition systems use a single ignition coil to generate high voltage. The high voltage is then delivered to each spark plug through a distributor cap and rotor mechanism.
The distributor cap and rotor work harmoniously to ensure that the correct spark plug receives the high voltage at the precise moment.
To visualize the process, the distributor’s shaft rotates as the camshaft turns. The rotor, connected to the shaft, spins inside the distributor cap. This cap houses a spring-loaded carbon brush that stays in contact with the rotor’s metal part.
As the rotor’s outer edge passes each internal plug terminal in the distributor cap, the spark plugs fire in the accurate sequence. This coordinated firing ensures efficient engine operation.
Signs of a Faulty Ignition Coil and Effects
A faulty ignition coil can cause various issues, including a flashing check engine light. When an ignition coil fails, it disrupts the engine’s firing order whcih leadsto misfires.
If you ignore this issue, it could result in severe damage to the engine and other vehicle’s components due to excessive vibrations.
Coil Pack Ignition System
An alternative to COP ignition systems is the coil pack ignition system. It utilizes a single coil to fire multiple cylinders. The coil pack is mounted on the engine and connected to the spark plugs through individual spark plug wires.
How to troubleshoot?
Now, let’s explore how you can determine if your ignition coil is faulty.
For COP ignition systems, one effective method is to swap the ignition coil from the problematic cylinder with an ignition coil from a different cylinder. Then, observe if the trouble code changes. If it does, it indicates a faulty ignition coil.
Another way to check a bad ignition coil is that if you remove the ignition coil of a certain cylinder and the engine starts to stumble, it means the ignition coil is good. If the engine stays the same, it means the ignition coil is bad.
Troubleshooting Distributor-Based Ignition Systems
In distributor-based systems, it is essential to keep an eye on the distributor cap and rotor.
Over time, the contacts inside the distributor cap can corrode or wear down, weakening the spark. Similarly, the rotor itself can wear down which results in poor contact with the distributor cap’s contacts.
How to troubleshoot bad ignition coil pack?
For ignition coil packs, you can watch the following video:
8. Vacuum Leaks Allowing Unmetered Air
Vacuum leaks occur when unwanted air can enter engine through openings beside throttle body. This air is called “unmetered air” because the MAF or MAP sensor can’t measure it. MAF sensor can only measure air coming through throttle body, not these other openings.
When extra air comes in, the air-fuel mix gets thrown off balance. This can make the engine sputter when accelerating at low speeds.
Size of leak and throttle opening affect incoming air amount. More air comes in through bigger leaks. Also more air comes in when throttle opens wider.
Vacuum happens when pistons move down during intake stroke. This vacuum pulls in air, fuel, and exhaust gases.
At idle, nearly closed throttle plate limits air. So intake manifold has high pressure while combustion chambers have low pressure. This difference makes the vacuum.
When you step on the gas pedal, it opens up a “window” for letting more air into the engine. This air pressure then pushes up against the intake parts. At low engine speeds, strong suction pulls air through.
So if tiny cracks exist, unwanted air easily slips in, messing up the air-fuel mixture. The engine computer sees this and turns on the check engine light, often with code P0171.
Now, let’s check a few places those pesky leaks can hide:
- The main air hose taking in air can dry out and crack over time. Carefully inspect where it connects from the air filter to throttle body for cracks letting air invade. Even tiny fissures disrupt engine operation.
- Another culprit – the intake manifold gasket seals the intake to the engine block. After years of heat and vibration, seals fail, providing access for uninvited air to sneak past into intake ports.
- Vacuum hoses also move air to engine parts. Cracks here too allow extra air where it shouldn’t go. This confuses sensors and affects performance.
- Finally, the throttle body gasket seals the throttle body to intake. If this important barrier fails, a noticeable vacuum leak happens as air gets sucked through new gaps.
When a vacuum leak is present, it is often accompanied by a hissing sound from the engine. You can use carb cleaner to detect vacuum leaks in the engine.
You can watch the below youtube video to diagnose vacuum leaks for check engine light:
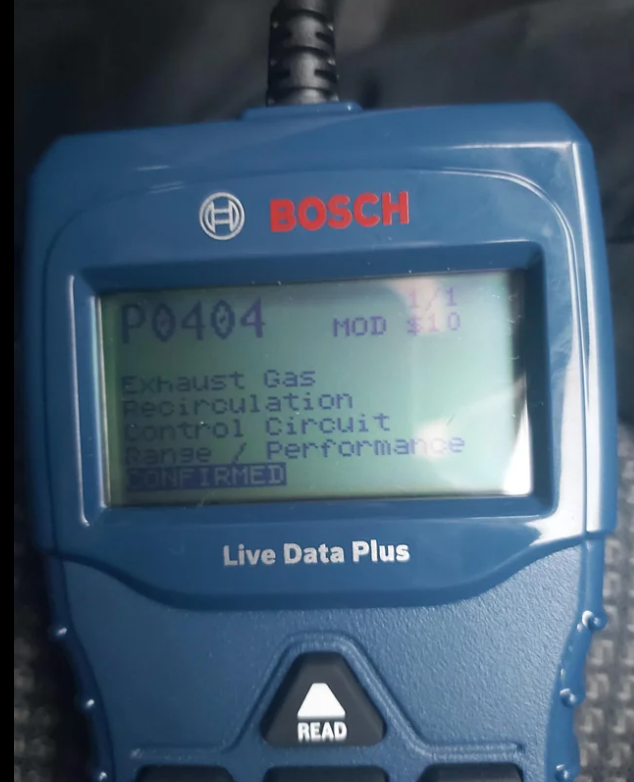
9. Malfunctioning EGR Valve Triggers Emission Codes

EGR means Exhaust Gas Recirculation. The EGR valve sends some exhaust gases back into the engine.
This helps lower the combustion temperature and reduces NOx gases in the exhaust. Less oxygen from air is needed for combustion when some exhaust gas is reused.
The EGR valve can get clogged with carbon. This leaves it stuck open or closed.
If EGR valve is stuck open, the air-fuel mixture will be off. This leads to engine misfires and less power. The check engine light comes on to alert you.
If EGR valve is stuck closed, emissions go up. The engine makes more NOx gases and pollutants without enough exhaust recirculation. This harms the air and can cause test failures.
You can still drive with a clogged EGR valve for a while. But leaving it can make the head gasket fail over time.
How to test?
Remove the EGR valve and perform a visual inspection to check for any cracks or holes in the housing. A cracked or damaged EGR valve will need to be replaced to fix check engine light.
To check if the EGR valve is working correctly, we will now use a hand-operated vacuum pump.
If the EGR valve can hold a vacuum, it indicates that the valve is functioning properly. However, if the vacuum pressure drops off after a while, it suggests a faulty EGR valve that needs to be replaced.
10. Bad Fuel Pressure Regulator Reduces Injector Delivery Precision
A bad fuel pressure regulator can also cause illumination of the check engine light. The purpose of a fuel pressure regulator is to maintain fuel pressure inside the fuel rail so that fuel injectors inject the fuel at a certain pressure.
Keep in mind that Gasoline Direct Injection (GDI) engines have a fuel pressure sensor instead of a regulator.
So, if you have GDI engines, you should diagnose the fuel pressure sensor. You can read my guide on bad fuel pressure regulator symptoms to understand how fuel pressure regulator works, how it becomes bad and how to test a bad fuel pressure regulator.
11. Clogged Air Filter Hinders Proper Airflow
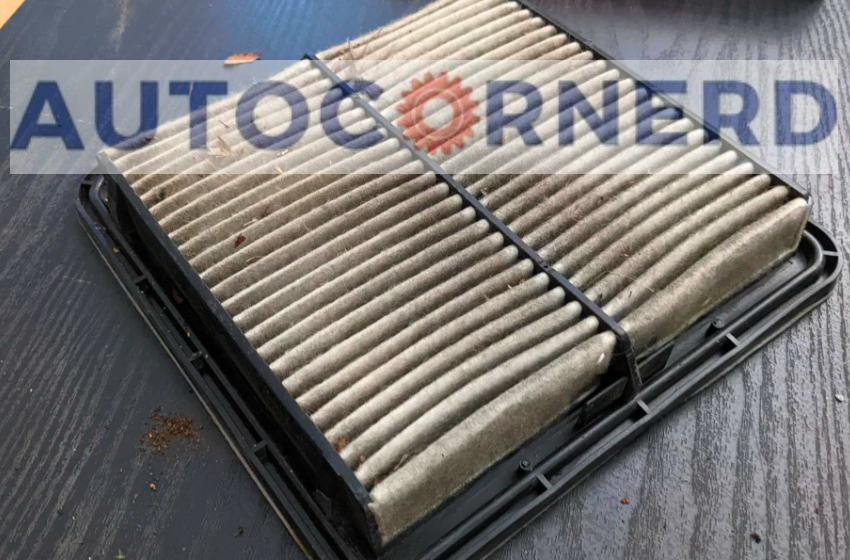
We usually forget to replace the engine air filters. An air filter is an important part of an engine. It catches dust, dirt and debris before they enter the intake manifold. It also helps keep harmful particles out of the engine.
When the air filter gets clogged, the engine can’t get sufficient air for efficient combustion. In that case, your car will still run fine but the ECU will turn on check engine light.
How to inspect?
You can inspect the condition of your air filter by holding it up to a light source. If you see a lot of dirt and debris blocking the pores of the filter, then it is time to replace it. You can also tap the air filter gently on a hard surface to see how much dust falls off.
How to fix?
You should replace the engine air filter every 15,000 to 20,000 miles. Furthermore, as a precaution, blow compressed air through the engine air filter after every 500 miles.
12. Transmission Problems Triggering Multiple Codes
An automatic transmission system engages and disengages gears by supplying current to the solenoid in the valve body of the transmission to allow transmission fluid to flow and clutches to engage.
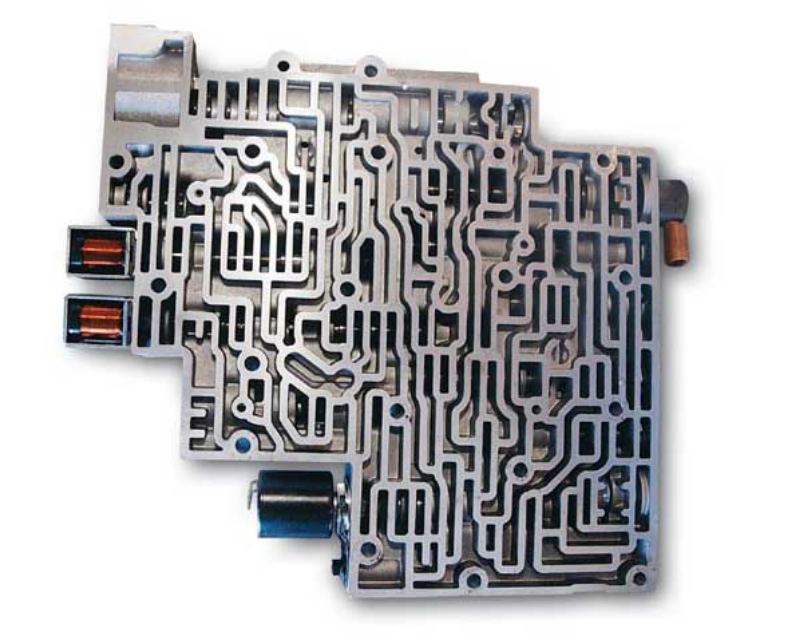
The vehicles also have a transmission speed sensor that determines the speed of gears in the transmission and sends signals to the ECU.
Similarly, the transmission Fluid Temperature sensor measures the temperature of the transmission fluid and sends signals to the ECU.
When the ECU detects any problem in transmission fluid or components of transmission system, it will turn on check engine light.
If there are leaks of transmission fluid, you should fix them. To learn more, you can read my guide on how much it costs to fix transmission leaks.
In addition, a bad automatic transmission can cause delayed shifting in gears which causes your car to jerk and difficulty in acceleration.
Check Engine Light Blinking or Comes On and Off
This warning blink conveys the engine cylinders are misfiring. Such backfires can bend or break internal parts over time. It also guzzles extra fuel, cutting mileage.
Bring the car to a halt right away if you notice the intermittent check engine illumination. More driving can damage other components like the costly catalytic converter.
Have the vehicle towed to a technician straight away. Let them investigate thoroughly. Catching mechanical problems early prevents later damage and saves money too.
Note: The OBDII framework (Onboard Diagnostics 2) employed by the computer should be uniform for all autos after 1996. The codes may differ, but the blipping light usually signals a misfire in the engine.
In one forum, a user commented that when his car’s check engine light was flashing or switching on and off, the culprit was a damaged ignition coil.
The ignition coil is an induction coil in the motor that converts low battery volts into thousands of volts to generate a spark in the spark plug.
Another person remarked the explanation behind the check engine blinking in his vehicle was due to vacuum leaks.
In the engine, a vacuum leak means that a certain amount of air is leaking between the airflow sensor and the intake engine manifold. You can refer to this article about vacuum leaks for more info.
What Are Some Common Reasons for the Check Engine Light to Come On?
There are several reasons why the check engine light may come on, including:
- Engine problems such as low oil pressure, engine misfire, or driving at high speeds for too long.
- Transmission problems like a slipping transmission.
- Faulty emissions equipment such as a loose gas cap or a faulty canister purge valve.
- Ignition system problems like a worn ignition coil or bad spark plug wires.
- Faulty modules and sensors, such as a loose oxygen sensor wiring or a clogged-up mass airflow sensor.
- Overheating caused by degraded engine coolant or a faulty engine thermostat.
Final Thoughts
That ominous glow can send your mind racing when glancing down at the dash. But take a breath and don’t panic. Let’s walk through how to tame the check engine beast, step-by-step.
Here’s what to check first if the light is on solid:
- The gas cap seal – Make sure it clicks 3 times. A loose cap allows fuel vapors to escape, triggering the emission sensor.
- Cooling system – Low fluid or leaks can cause overheating issues and turn the sensor on. Inspect levels and watch for pooling liquids.
- Catalytic converter – Damage here reduces emission filtering effectiveness. Look for new rattling sounds.
- Sensors – Check connectors and wiring for tightness at emission sensors and electronic components. Tugging wires shouldn’t reveal loosening. Proper voltage ensures accuracy. They should supply a proper 5V or 12V to the engine sensors.
If the light starts blinking wildly instead of glowing steadily, that signals a serious engine misfire requiring immediate attention to prevent permanent damage.
Target your diagnostics on these failure points:
- Spark plugs – Replace worn or fouled plugs that cause misfiring. Inspect the ceramic and electrode.
- Ignition coils – Cracked or leaking coils can’t deliver full voltage to the spark plugs.
- Fuel injectors – Clogs from low gas quality or deposits reduce fuel delivery.
- Vacuum leaks – Damage allows unmetered air to disrupt air-fuel ratios. Listen for hissing sounds.
Finally, low oil levels or pressure problems may also trigger the check engine light. Top off oil if the dipstick shows low.
Some First Hand Experiences Shared By Users In Different Communities
Our team conducted research across various online communities, forums, and subreddits to gather user comments and opinions on “check engine light on but car is running fine”.
User 1 says:
My Outlander’s check engine light popped up out of nowhere. Turned out to be a loose gas cap. I tightened it and after a few drives, the light turned itself off. Simple fix, thankfully.
User 2 says:
Had a similar problem with my XC60. It was a failing ignition coil. Replaced it and the engine light went off almost immediately.
User 3 says:
Went through this with my Traverse. It was a transmission sensor issue. Got it fixed, and the light hasn’t come back since.
User 4 says:
Experienced the same issue on my Sorento. Everything seemed normal but the light wouldn’t go off. It was a faulty mass airflow sensor. Got it replaced and no more light.
User 5 says:
Had the check engine light come on, but the Forester was driving just fine. After some digging, I found out it was the O2 sensor malfunctioning. A quick replacement, and the light was off.
User 6 says:
In my case with the TLX, it was a bit confusing. No performance issues, but the light was on. It was actually a software issue that required an ECU update at the dealership.
FAQs about the Check Engine Light
How do I know if the check engine light requires immediate attention?
The check engine light can appear in two ways: a solid yellow/amber light or a flashing light (or red in some cars). A solid light indicates a less urgent issue, while a flashing light or red light indicates a severe problem that requires immediate attention. Regardless of the type of light, it is recommended to have your vehicle diagnosed and repaired as soon as possible.
Can I still drive my car if the check engine light is on?
If the check engine light is flashing on and off, it indicates a severe issue such as an engine misfire. In this case, it is recommended to avoid driving and have your vehicle checked by a mechanic immediately. If the light is steady, you can drive your car to a local auto repair shop, but it’s best to have it inspected as soon as possible.
How is a check engine light diagnosed?
When the check engine light comes on, your car’s computer stores a diagnostic trouble code (DTC) in its memory. It is best to take your car to a service center or mechanic to retrieve the error code using an OBD scanning tool. The mechanic will use the engine codes as a starting point to troubleshoot and conduct additional diagnostic tests to determine the issue. Once the issue is resolved, the check engine light should automatically turn off.
How much does it cost to fix the check engine light?
The cost of fixing the check engine light can vary depending on the underlying issue. Some common repairs and their costs include gas cap replacement ($18 – $22), oxygen sensor replacement ($60 – $300), ignition coil replacement ($170 – $220), spark plug replacement ($100 – $500), catalytic converter replacement ($900 – $3,500), and mass airflow sensor replacement ($240 – $340). It is recommended to consult with an auto repair professional for an accurate estimate based on your specific vehicle and issue.