6 Reasons Your Car Makes Whirring Noise But Won’t Start
When a car makes a whirring or whining noise but won’t start, the most likely causes are issues with the starter, relays, battery and valve timing issues resulting in low compression. The whirring noise indicates the starter is spinning but not engaging the engine to start it. Your car’s starter slips when trying to engage with the flywheel, making whirring noise. Potential faults include a bad starter bendix, faulty starter solenoid, weak battery, worn flywheel teeth, fuses blown from improper battery connections, and an ignition switch failing. Troubleshooting should start with testing the battery voltage and connections, trying a jump start, checking starter relay, and tapping the starter and testing it by hotwiring it directly to the battery. You should also perform compression test and verifying proper valve timing. If the starter spins but doesn’t extend the gear to engage the engine, the bendix or starter solenoid is likely bad and the starter needs replacement. Replacing the starter typically resolves the whirring noise and no-start issue if the battery, alternator and connections check out.
Turning the key and hearing nothing but a whining or whirring sound from the vehicle is so frustrating. Instead of the familiar rumble of your engine starting up, there’s just a sad little whine. The whirring sound when you try to start your car means the starter is failing to connect with the engine to get it going.
There’s a few possible reasons behind this issue. From a worn-out starter solenoid to stripped starter gears, several things could lead to your starter spinning without engaging.
In this short guide, we’ll discuss the common culprits behind a car not starting and trying to make a whirring sound while trying to start.
Here are some examples of whirring noises if car is not starting:
Bonus Read: You can also read my guide on where to tap the starter solenoid if it is stuck.
Note: Before proceeding to the causes, it is important to know how the car starting system works and how the starter solenoid actually functions so that you can troubleshoot problems easily. If you already have preliminary knowledge, you can jump straight to the causes section.
I’ve created an interactive tool for you all, which assists in identifying car issues. It guides you through simple steps. Don’t forget to check it out.
How Does Car Starting System Work?
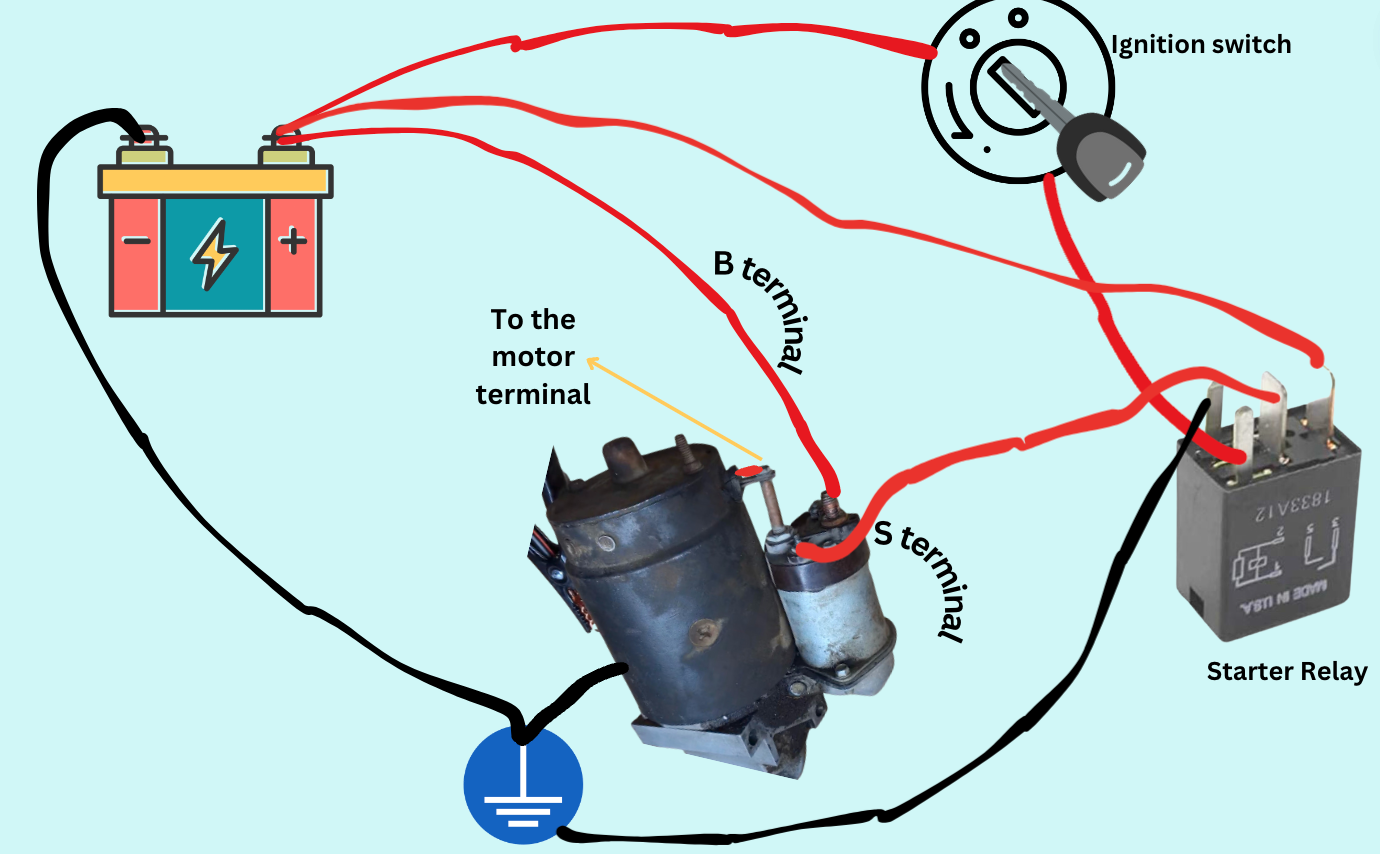
How the Starting System Works The starting system is responsible for spinning the engine over so it can start up. It consists of the following components:
- Battery
- Ignition switch (it activates starter solenoid)
- Neutral safety switch (linked with starter relay and only allows current when car is in park or neutral)
- Starter relay (located in fuse box)
- starter solenoid and starter motor (components of a starter)
I found the following Youtube video really helpful. The person has created a DIY project of a complete starting system of a vehicle.
The starter motor is what cranks your engine to get it going. When you turn the key to start your car, here’s what happens behind the scenes:
- Turning the key completes a circuit between the battery and starter relay. This relay then closes and allows electricity to flow to the starter solenoid.
- The starter solenoid has a pull-in winding that transfers a large burst of current to pull the solenoid plunger in. This closes the main power contacts inside.
- With the contacts closed, several hundred amps can flow from the battery to the starter motor. This cranks the engine.
- You don’t want the pull-in winding using power constantly. So the solenoid has a hold-in coil that takes over. The hold-in coil prevents the pull-in winding from overheating or getting damaged.
- When the starter motor gear engages and the plunger pulls in, there’s 12V supply on both ends of the pull-in winding. This stops current flowing through it.
As a result, pull-in winding will deactivate. This hold-in coil will keep the plunger in place until you release the ignition key.
Here is a difference between a pull-in coil and a hold-in coil inside the starter solenoid:
The starter motor is essentially a large electric motor inside the starter that converts the electrical energy into mechanical rotational energy in order to spin the engine.
The starter motor has a gear on the end that engages with the flywheel to crank the engine. Once the engine starts and gets up to operating speed, the flywheel spinning disengages the starter gear and the starter stops.
Here is a 3d animation of working of a starter:
What are the Causes Of Whirring Noise From Car That Is Not Turning Over?
1. Weak or Dead Battery

A car that makes a whirring noise but does not start when you turn the key usually signals a problem with the starter system.
The most common reason for this symptom is a battery lacking enough power to fully engage the starter motor.
When the battery charge is low, it may have just enough power to partially activate the starter solenoid. But there is not enough current to completely close the main contacts.
This allows some electricity through to the starter motor so it spins a little and makes a whirring sound. However, without sufficient amps it cannot reach full cranking speed needed to start the engine.
How this happens?
The battery may read 12+ volts statically but then drops below 9 volts under load when cranking. This voltage drop indicates a weak battery.
So, when two heavy copper contacts inside the starter solenoid do not fully close, partial current can go to the starter motor through the solenoid contacts arcing together. This makes a whirring noise.
The reduced current prevents the motor from developing enough torque and RPM to properly engage and spin the engine.
How to test?
Use a voltmeter to check the voltage across the battery terminals with the engine off. It should read 12.4-12.6 volts if fully charged. If it reads below 12 volts, the battery may be discharged and need to be recharged or replaced.
Now, check the battery voltage while you are trying to crank the engine. If it reads below 9V, the battery is damaged.
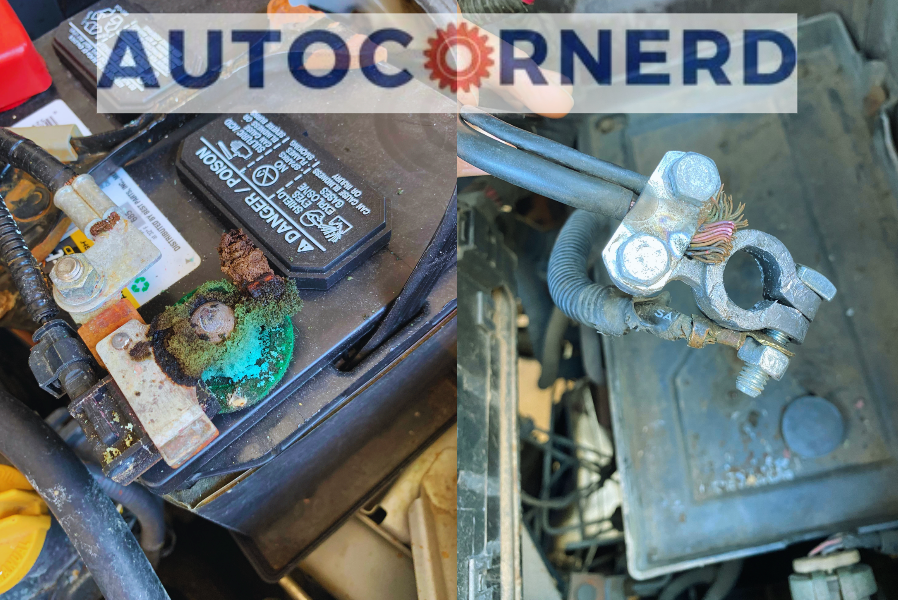
Next, check the battery cables and terminals. Look for corrosion on the terminals and make sure they are tight.
Loose connections can introduce resistance and restrict power flow. Wiggle the cables looking for internal breaks in the wiring that may be interrupting the circuit.
If the battery and cables check out ok, a parasitic current drain test can determine if something in the vehicle is pulling power when it should not be.
This slowly discharges the battery over time. Use an ammeter connected to the battery cables to measure draw with everything off. Draw should be less than 50 milliamps.
The following video is highly helpful for parasitic draw test:
2. Bad Engine Grounds

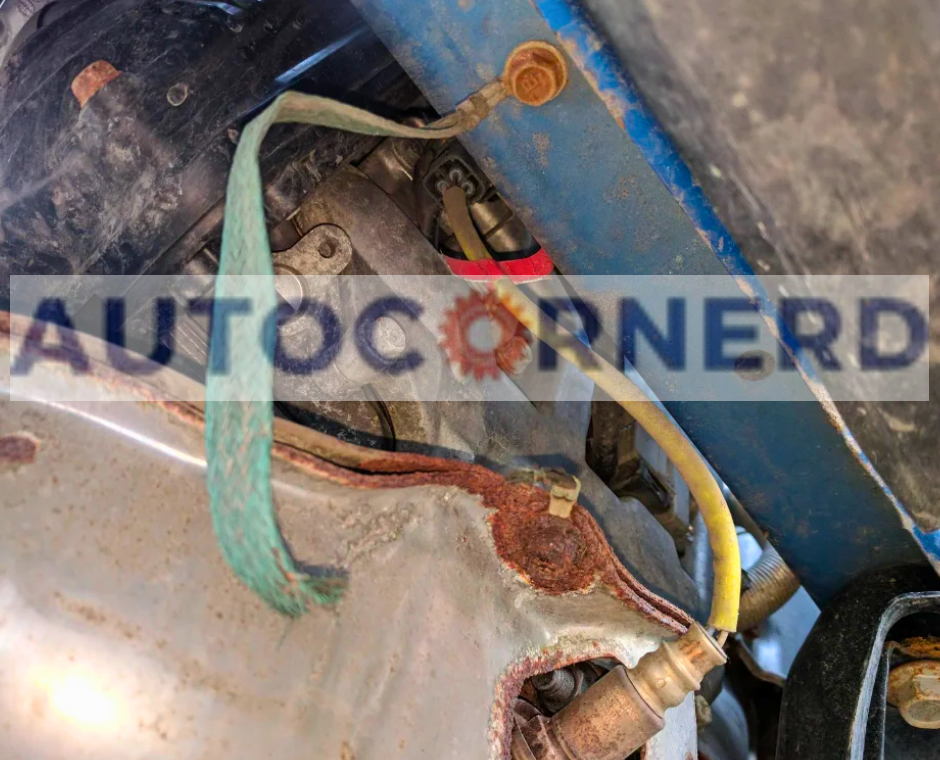
The starter motor casing and mounting bolts are grounded to the engine block. The engine block itself is grounded to the chassis with heavy ground straps.
If one or more of those ground points becomes compromised, it can affect operation. The starter may still receive power from the battery side, but the circuit isn’t fully completed on the ground side.
What happens is you’ll hear the starter motor spinning, but it lacks the torque and strength to actually turn over the engine. This results in a whirring noise from the starter without the engine cranking.
You may even see the starter gear engage and disengage rapidly without the drive shaft moving. This is because, without a solid ground path, the huge amount of current flowing through the starter motor is being impeded.
What ground locations should I check?
Here are some of the most common grounding points that can cause issues if loose or corroded:
- Starter motor casing to engine block: This ground provides the path back to the battery during start-up. It’s critical for delivering the massive current needed. Check that the mounting bolts are clean and tight.
- Engine block to chassis: Heavy ground straps usually connect the engine block at multiple locations to the chassis or body. Make sure the connections are free of corrosion and debris.
- Battery negative cable: This ground cable connects the negative battery terminal to the chassis and needs to be clean and secure.
- Other body grounds: Ancillary grounds like seat mounting bolts, hood latches, and radio harness grounds can also contribute to electrical issues if compromised.
In the below video, you can see all possible ground connections in a vehicle:
How can I diagnose bad ground connections?
If you suspect a bad ground is causing the whirring starter problem, here are some tips to test and diagnose:
- Check all ground points for tightness and clean, bare metal contact. Look for green corrosion or rust buildup indicating a bad connection.
- With the engine off, wiggle each ground point to see if the connection is loose. A loose ground can cause intermittent contact.
- Use a multimeter to measure voltage drop across ground connections. More than 0.2V drop indicates high resistance in the ground path and bad ground connection.
The following video is quite helpful:
3. Bad Starter Relay
The ignition switch and starter relay work together to start your engine. It’s easy to mix up the starter relay and starter solenoid, but they do different jobs.
The starter relay handles a small current from the ignition switch to activate the solenoid. The solenoid then pushes a lot of current to the starter motor to get your engine spinning.
You can find the round starter solenoid attached right on top of the starter motor. But the starter relay is a rectangular box located away from the starter, usually in the fuse panel.
Using a relay avoids running huge currents through the ignition switch. Without a relay, the switch would need thick wires and big components to handle all that current. No fun to replace!
The relay lets a small current flow from the key to the solenoid. Then the solenoid engages the powerful starter motor. This guide on starter relays is really helpful for you to learn more.
How bad starter relay causes problem?
If the contacts inside the relay don’t properly close and complete the circuit when energized, power won’t reach the starter to engage it. This results in silence or a clicking sound when trying to start.
Moreover, damaged contacts or coil failure can cause the relay to buzz, click or vibrate when energized. No power gets through so the starter doesn’t engage.
In addition, corroded or oxidized contacts create resistance in the circuit that hinders power delivery to the starter. It may crank slowly or weakly.
How to test?
There are two things to test in a relay:
- Listen for clicking noise when have a 12V supply to the terminals of the relay
- Check continuity across terminals of the relay when contacts inside the relay are closed
The following video is quite helpful for that:
4. Bad Starter
The starter could be the reason your car won’t start if the battery, connections, cables, fuses and relays are all working properly.
One very common cause for a starter that whines but doesn’t engage is a damaged or worn-out starter drive gear. This small gear is attached to the starter’s Bendix drive. It is responsible for meshing with the flywheel’s ring gear when you first turn the key to start the engine.
If the starter drive gear’s teeth are badly worn down or broken, the gear can spin freely without catching hold of the flywheel to get the engine turning.
So this worn out drive gear may spin very fast from the starter motor whirring, but the engine does not crank over.
Does Bendix drive also cause problem?
The Bendix drive is an internal starter component that actuates the pinion drive gear to engage the flywheel when starting. Issues with the Bendix not properly engaging can also lead to whirring sound.
Problems include worn Bendix rollers, a gummed-up Bendix, or a bent gear shaft. Any of these could allow the gear to disengage or fail to properly mesh with the flywheel upon starting.
Do you know mechanical binding also occurs in starter?
In some cases, the starter may whir or only click due to an internal mechanical problem. If the starter is seized up or otherwise jammed, the motor will still be able to spin. However, the drive gear will not be able to engage the flywheel.
Anything that prevents the starter’s internal components from moving freely can cause this sort of whirring sign.
For instance, if the starter solenoid is bad, it can’t push the gear in starter motor all the way into the flywheel, due to which you will hear grinding, whining or whirring noise while trying to start your car.
Starter motor brushes are also the culprit!
The electric starter motor uses carbon brushes to transmit current to the armature and spin the starter. If these brushes are excessively worn down, the motor may not generate enough torque and speed to properly turn the engine.
Bad brushes could allow the starter to reach high RPMs and whir quickly without engaging the flywheel.
How to test?
First, without removing the starter, have someone try to crank the engine while you gently tap the starter with a hammer.
Tap the starter at three different locations one by one:
- Solenoid part
- Starter motor part (the exact place where carbon brushes and armature are located)
- Gear drive part
If the car still doesn’t start, you have to remove the starter and test with an external source. The pinion gear on the shaft of the starter motor should fully pop out and rotate freely.
You can watch the following video on how to bench test a starter:
If the starter comes out bad, make sure you get the OEM one. Otherwise, the starter won’t fully engage with the flywheel. It will also damage the flywheel teeth in the long run.
5. Worn-out Flywheel Teeth
The outer edge of the flywheel has gear-like teeth that the small pinion gear of the starter motor engages with to spin the engine for starting.
Excessive wear or damage on these flywheel teeth can prevent proper starter engagement and cause whirring or grinding noises when trying to start the car.
How do they become bad?
There are a few potential causes of worn or damaged flywheel teeth:
- Normal wear over time: The flywheel teeth are made of hardened steel but still slowly deteriorate with age and use. After 100,000+ miles, the edges may become rounded or chipped.
- Improper starter installation: If the starter is not properly aligned due to loose bolts or bad starter motor shaft bearing, the pinion gear may grind against the flywheel abnormally, causing rapid wear.
- Overheating issues: Excessive heat from engine or exhaust headers near the flywheel can anneal the metal, softening the teeth.
- Damaged starter: If the starter pinion gear is chipped or has broken teeth, it can chew up the flywheel as it spins.
How to inspect?
Use a flashlight to examine flywheel teeth. Slowly rotate the crankshaft to inspect the entire circumference of the flywheel for damage. Slightly rounded starter teeth are fine. Also, check that the starter pinion gear teeth match and align with the flywheel.
Flywheel replacement can be expensive, costing $500 or more for parts and labor. On some vehicles the transmission or other components may have to be removed for access adding to the repair costs.
6. Timing Belt Has Snapped
Under the hood, hidden beneath a timing cover, is a rubber belt that connects the engine’s crankshaft to its camshaft. This timing belt synchronizes their rotations, ensuring smooth and efficient engine operation.
Here’s why it matters:
The crankshaft powers piston movement, driving them up and down inside the cylinders. The camshaft controls valve timing, opening and closing the intake and exhaust valves at precise moments. Both shafts must turn together, or problems arise.
If the timing belt snaps or slips off track, the connection breaks. The camshaft stops turning while the crankshaft spins freely. With the camshaft stalled, the valves won’t open or close when needed. This prevents proper compression and kills the engine.
Watch For These Warning Signs:
- The engine cranks normally but won’t start up.
- A loud grinding or whirring noise from the front of the engine as the unmatched shafts spin independently.
- No familiar compression sounds of air rushing or valves clicking.
- Electronics and battery work, but the engine doesn’t start or run.
Each crankshaft rotation cycles the pistons with no valve movement. The likely result? Component collisions and serious damage. That’s why a timing belt failure produces loud noises when you try starting up.
How to test?
- Visual damage: Look for any signs of impact between the valves and pistons like small indentations in the valve heads. Also check for valve stems that look obviously bent.
- Valve seal: Check if the valves still sit properly in the closed position by pouring some solvent on the back of the valve and seeing if it leaks through. Bent valves won’t seal right.
- Valve movement: Manually rotate the crankshaft and observe if all the valves open and close smoothly. Any that stick could be bent.
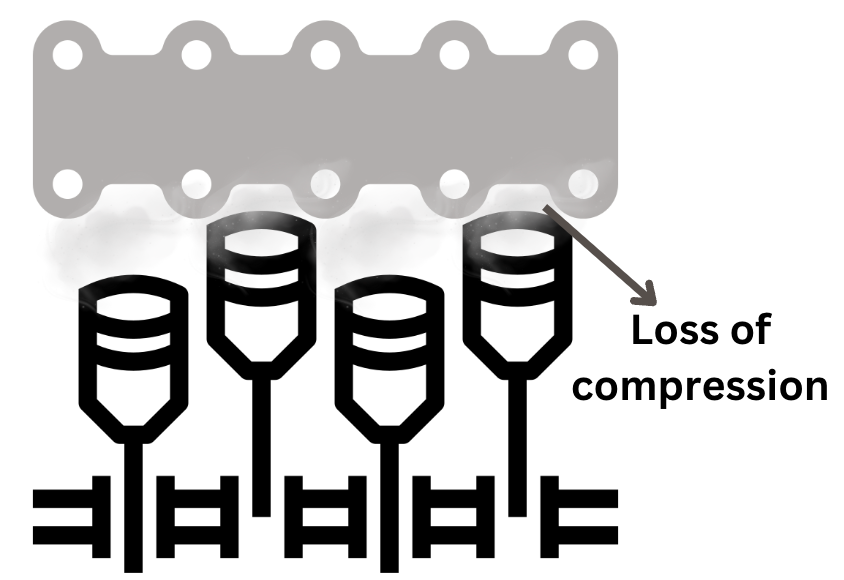
- Compression test: This will identify any cylinders with low compression due to leaking valves.
How To Perform Compression Loss Test?

Doing a compression test is also important if the car is making a whirring noise but not starting. The chances are that the engine is not turning over due to poor valve timing.
- First, disconnect the electric connectors of the fuel pump, fuel injectors and ignition coils/distributor.
- Remove all spark plugs. Use a suitable spark plug socket to remove spark plugs.
- For the first cylinder, screw the compression gauge in the hole where the spark plug goes.
- Turn on the ignition and depress the accelerator pedal fully to keep the throttle plate open.
- Crank the engine up to 5 times or do it until the needle on the compression gauge is peaked and doesn’t climb anymore. If you have a push start/stop button, press brake pedal and push the button multiple times.
- Note down the pressure reading for each cylinder on a piece of paper. If you don’t know how cylinders are numbered in the engine, you can read this guide.
- If one of the pressure readings is significantly lower, it can indicate a problem with that single cylinder.
- If you only have a low reading on one engine cylinder or the cylinders aren’t adjacent to each other, the issue is with the valve seal or piston ring.
- If adjacent cylinders have low-pressure readings, the issue might be with the head gasket.
- When all your pressure ratings inside the engine cylinders are below 100 PSI for gasoline engines or below 275 for diesel, you may have a valve timing issue, or piston rings are worn-out.
- To determine worn-out piston rings, a wet compression test is performed. The wet compression test involves adding a small amount of oil through a spark plug hole to see if the compression reading improves, which can help determine whether the low compression is due to piston rings or valves.
- If the compression reading improves, it suggests that the low compression reading was due to worn-out piston rings. When oil is added to the cylinder, it acts as a lubricant and seals off the gaps between the piston rings and cylinder walls, leading to improved compression readings.

