
Why Is My Car Not Starting After Replacing Crankshaft Sensor? (4 Potential Causes)
If your car is not starting after replacing the crankshaft sensor, it could be due to improper installation of the crankshaft sensor, disconnected battery by mistake, the loose or damaged connector of the crankshaft sensor, and the bad wiring of the crankshaft sensor connector. If, by mistake, the wiring is disconnected from the charging and fuel injection system of your car while replacing the crankshaft position sensor, it may also cause the car to not start.
A lot of car owners are complaining that their car won’t start after replacing the crankshaft sensor. As a result, the engine is either running rough or not starting when you turn the ignition key.
In this guide, I will walk you through the exact causes that can result in rough idling of your car or failure of starting the engine after replacing the crankshaft sensor.
If your car does not turn on after refueling, you can check my guide on the causes of a car not starting after getting gas.
Why Is Crankshaft Position Sensor Used?
Crankshaft position sensor is used to determine the crankshaft rotational speed and measure the exact position of the crankshaft so that the ignition timing can be determined by the engine control module (ECM).
ECM needs signals of crankshaft speed (RPM) to determine the exact amount of fuel needed for combustion and the position of the crankshaft for the ignition timing. Without a crankshaft sensor, the ECM will not be able to determine when to fire a specific cylinder for a power stroke.
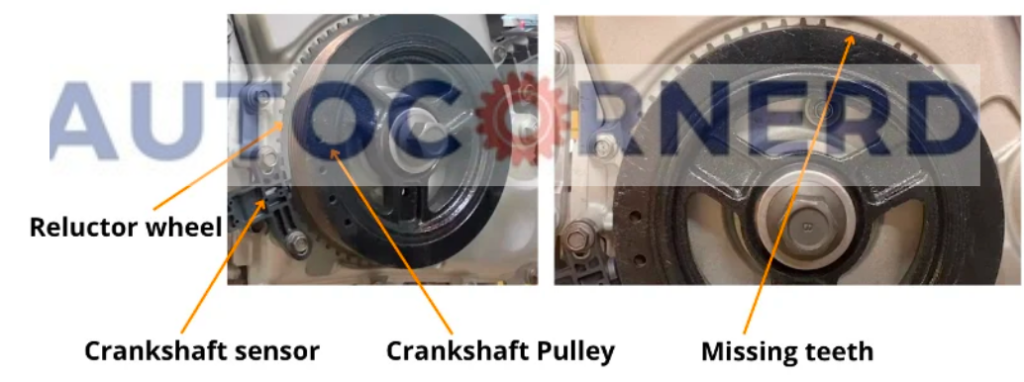
You will usually find the crankshaft sensor in the timing cover behind the crankshaft pulley (also called harmonic balancer).
There is a trigger wheel attached to the crankshaft pulley on which the crankshaft sensor is positioned with a certain air gap.
On the reluctor wheel, you will find one or two missing teeth that are taken as a reference point by ECM to determine the crankshaft position.
The two teeth, that have been removed, are used to determine the TDC (Top Dead Centre) position (a position where the piston reaches the top of the cylinder).
The crankshaft sensor works on a hall-effect principle. It has a permanent magnet and a semiconductor plate through which the current flows. The magnet continuously releases a magnetic field.
When the trigger wheel rotates with the crankshaft, its teeth cross the magnetic field of the crankshaft sensor.
As a result, the magnetic field is disturbed, and pulsating voltage signals are produced with each pulse representing the tooth of the trigger wheel. You can see it in the picture below:

Causes Of Car Not Starting After Replacing Crankshaft Position Sensor
Here are the causes:
1. Faulty or Aftermarket Crankshaft Sensor
Aftermarket crankshaft sensors either don’t work or die quickly. They are usually not designed to handle the tooth frequency of the trigger wheel of a certain engine. As a result, aftermarket CKP sensors fail instantly.
When aftermarket CKP sensors cannot send a desired pulsating voltage signal for each tooth of the trigger wheel crossing its magnetic field, ECM will no longer be able to determine the ignition timing and speed of the crankshaft. Due to this reason, the car won’t start.
Moreover, OEM sensors are passed through a thermal shock test to ensure their performance under all environmental conditions.
Here’s what a user says:
“I have read on here dozens of times that people have had issues with aftermarket crank sensors, cam sensors, and wheel speed sensors. Those sensors are “hall effect” sensors. They work on a magnetic pulse. They are also known as Pulse Generators. All I can tell you is I’ve seen enough people who have tried cheaper sensors and ended up replacing them a few days later with OEM. I won’t ever get anything but OEM when it comes to these.”
Now, since I don’t know which vehicle you own, I can’t recommend you the best aftermarket crankshaft sensor. So, I will recommend you buy a new OEM CKP sensor and see whether your car starts or not.
How to test?
To test a crankshaft position sensor, all you need to do is to connect both leads of the voltmeter with the terminals of the CKP sensor. Set your digital voltmeter to a low range on the AC voltage scale. Ask someone to crank the engine for a few seconds. If the CKP sensor is fine, it will give a pulsating voltage signal between 0 and 5 volts.
You can also measure the resistance across terminals of the CKP sensor. I should be between 250 and 1000 ohms.
2. Improper Installation Of Crankshaft Sensor
Improper installation of crankshaft sensor also causes the car not to start. The CKP sensor is mounted in a bracket that needs to be tightened to a certain torque so that the CKP sensor does not shift from its position.
Manufacturers have already determined the best position of the crankshaft sensor while assembling the engine.
But, when we replace the crankshaft sensor, we do not dissemble the engine and remove the timing cover to install it and adjust the center of a CKP sensor just above the center of a specified tooth of a trigger wheel as shown in the picture below:
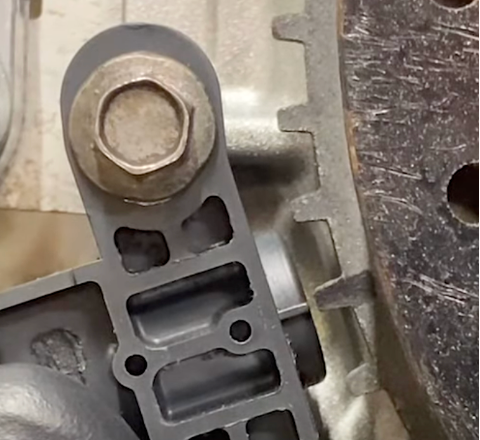
Moreover, while tightening the bracket of the CKP sensor, we usually do not take care of a tightening torque which should be between 7 and 9 N.m (you can consult the owner’s manual for accurate value as it varies with the engine).
If the tightening torque of a CKP sensor bolt is less, it will be mounted loosely and move up and down. As a result, the small amount of radial play in the CKP sensor will not accurately determine the position of the crankshaft and the car will not start.
What is the solution?
Now, before tightening the bracket of crankshaft sensor, make sure that the engine is at the TDC (TOP DEAD CENTER).
For this, there is a timing peg, which is like a bolt but with some extra length than the original one, tightened into the engine block hole close to the crankshaft pulley. There will be a bling bolt on that hole. First, you will have to remove this to tighten the timing peg.

When a timing peg is bolted, rotate the crankshaft to the TDC by rotating it in clockwise direction. As soon as it hits the timing peg, the crankshaft will not rotate above it. At this point, you will get to know that engine is at TDC.
Now, if the trigger wheel in your engine is of 60-2 type, and your engine has 6 cylinders, the 20th tooth counting counterclockwise from tooth#1 after missing teeth should be in line with the center line of the crankshaft position sensor.
The formula is simple: Total number of teeth on trigger wheel (including missing teeth)/spark events per crankshaft revolution
Spark events per crankshaft revolution= 0.5xNo.of engine cylinders
After you align the crankshaft sensor, tighten the bolts of its bracket and fix its position. Make sure that the air gap between the crankshaft sensor and the tooth of the trigger wheel should be between 0.5 and 1mm.

3. Bad Wiring Harness and Connector to the Crankshaft Sensor
Due to flexing and heat cycles, the wiring harness to the crankshaft sensor can damage or the connector of the CKP sensor has some rust in it causing the intermittent connection between the plug and the wires.
In such a case, check for chafed CKP sensor wires. If you did not secure the wire to the CKP sensor properly, it could rub against some metal part and short out
If the connector is rusty, it will not be able to send signals from the CKP sensor to PCM. As a result, PCM will not be able to determine the speed and position of the crankshaft, and thus, it will not send signals for fuel injection and spark plug ignition. So, the car won’t start.
How to test?
If the wiring harness to the CKP sensor is damaged, the circuit becomes short to the ground.
To test this, take a multimeter. Connect its red probe with the positive terminal of the CKP sensor connector and the black probe with the negative terminal of the battery (the negative terminal of the battery is considered the ground terminal).
You can also connect the black probe with any ground connection on your engine.
Similarly, perform the test for another terminal of the connector. If negligible resistance is present, the multimeter will either show 0L or a very small value of resistance.
Similarly, test the connection between the terminals of the harness connector to the CKP sensor by attaching it probe to the terminals of the connector.
This time, set the multimeter to the voltage reading. If the connector is good, it will show a voltage between 4.5 and 5V.
4. Loose Battery Terminals
While doing any engine work, such as replacing sensors, the battery is disconnected to eliminate the possibility of shorting wires. Disconnecting the battery also causes the vehicle to clear the errors stored in its memory.
So, if you have disconnected the battery while replacing the CKP sensor, make sure that you have reconnected the battery terminals properly and they should not be loose.
To learn more, you can read my guide on car not starting after replacing battery.
Final Thoughts
So, if your car is not starting after replacing the crankshaft sensor, make sure that the CKP sensor is OEM and not faulty, the CKP sensor is installed properly, and electrical connections to the sensor are fine i.e. they are not short to ground, and battery terminals are not loose.
If you forgot to disconnect the battery before replacing the CKP sensor, chances are that the short circuit has taken place somewhere in the engine wiring harness.
If your car still does not start after replacing the crankshaft sensor, disconnect the battery again for around 1 hour and see whether it starts or not. The last step will be to relearn PCM for the new CKP sensor with the OBD2 scan tool. Before resetting the PCM, first, clear all error codes with the scan tool and see if the car starts or not. I hope that issue will be resolved.
Some First Hand Experiences Shared By Users In Different Communities
Our team conducted research across various online communities, forums, and subreddits to gather user comments and opinions on “car not starting after replacing CKP sensor”.
User 1 says:
Had this problem with my Altima. Turns out, I had bought the wrong sensor model. Got the correct one, replaced it, and the car started right away.
User 2 says:
This happened to my CX-5. The issue was with the starter motor, not the crankshaft sensor. Replaced the starter motor, and it fixed the issue.
User 3 says:
My Honda Civic wouldn’t start after I replaced the crankshaft sensor. I thought I’d done everything right. I double-checked the connections and found one was a bit loose. Tightening it did the trick!
How Did you Fix Issue Of Your Car Not Starting After Changing Crankshaft Sensor? Please Vote.
[yop_poll id=”9″]