
Engine Coolant Over Temperature Warning Light In Ford
Several common culprits can push coolant temperatures too high including a failing thermostat stuck closed and blocking flow, leaks depleting coolant levels, a worn water pump not properly circulating coolant, a clogged radiator preventing air flowing over its fins, or a faulty temperature sensor providing false readings. Watch for overheating warning signs like a dashboard light, steam rising from under the hood, a burning smell from the engine bay, or loss of power while driving. If noticing these symptoms, act quickly because prolonged overheating risks severe and expensive engine damage or even complete replacement.
The engine temperature warning light is enough to make any Ford owner’s heart sink. An overheated engine is bad news – causing anything from reduced performance to severe engine damage.
But don’t panic. With some diligence, you can get to the bottom of what’s causing your Ford’s cooling woes.
Bonus Read: You may also check out my article on car not starting after overheating
I’ve put together an interactive tool for you all that helps in identifying vehicle problems. It guides you through straightforward steps. Be sure to look into it.
- Engine coolant over-temperature warning light appears when the engine’s computer detects that there is an issue with the cooling system.
- Stuck thermostat prevents coolant from flowing properly, leading to overheating.
- Clogged radiator blocks coolant flow, reducing its ability to cool the engine.
- Faulty water pump impeller circulates less coolant, causing hot spots.
- Defective coolant sensor gives inaccurate readings, triggering warning light.
- Coolant leaks lower fluid levels, disrupting cooling system function.
What are the Causes of High Engine Coolant Temperature?
Here are the causes of engine coolant over temperature warning light:
1. Stuck Engine Thermostat Causing Poor Coolant Flow
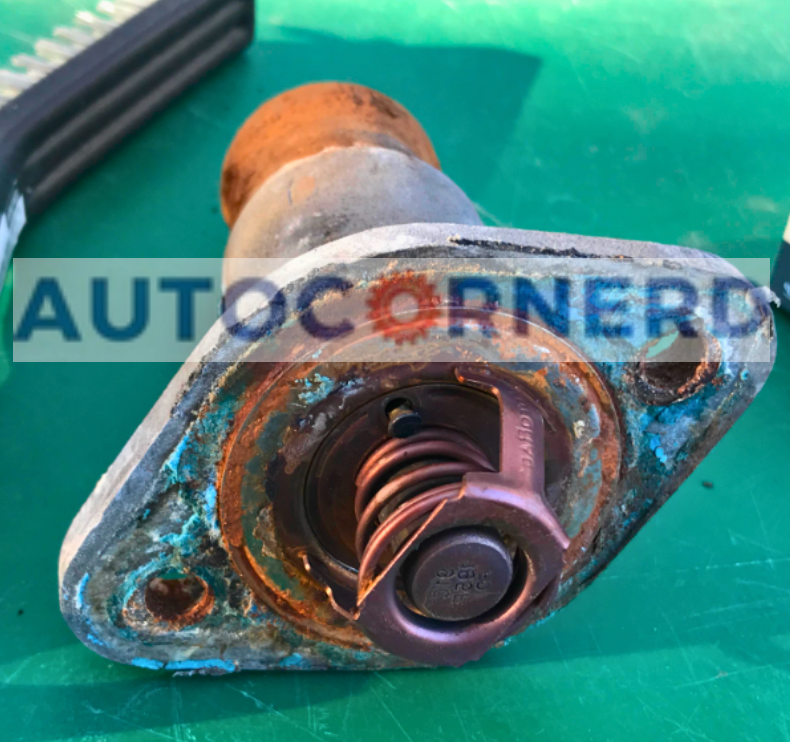
The engine thermostat acts like a valve controlling coolant flow through the engine. It sits between the engine and radiator, usually mounted on the engine block or cylinder head inside a housing.
When the engine is cold, the thermostat stays shut, stopping the coolant circulating to the radiator. With the thermostat closed, the coolant keeps flowing around just the engine. This helps the engine warm up fast.
Once the engine reaches its normal operating temperature, the thermostat opens up. This allows the coolant to flow through the radiator. The thermostat opening helps maintain a steady engine temperature and prevents overheating.
If the thermostat gets stuck closed, the coolant can’t flow through the radiator to cool the engine. So the coolant won’t be able to shed heat to the outside air by flowing through the radiator like usual. This will make the coolant go over the right temperature.
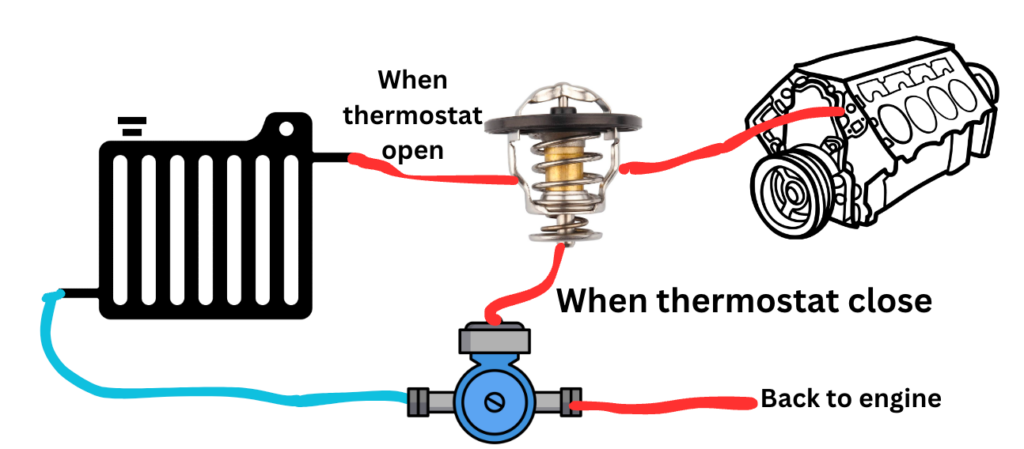
In the below animation, you can see how engine’s thermostat works:
Why does it happen?
One of the most common causes of a stuck thermostat is a buildup of rust and sediment in the cooling system. Over time, rust and sediment can accumulate in the radiator and thermostat, preventing proper thermostat valve operation.
How to spot the issue?
To locate the thermostat, you just need to follow the upper hose of the radiator as its one end is connected to the thermostat. A thermostat is located closer to the water pump.
You can easily a thermostat is stuck in a closed position by touching the hose that connects the radiator to the thermostat. If the flow of water can’t be felt, then it indicates a need for thermostat replacement.
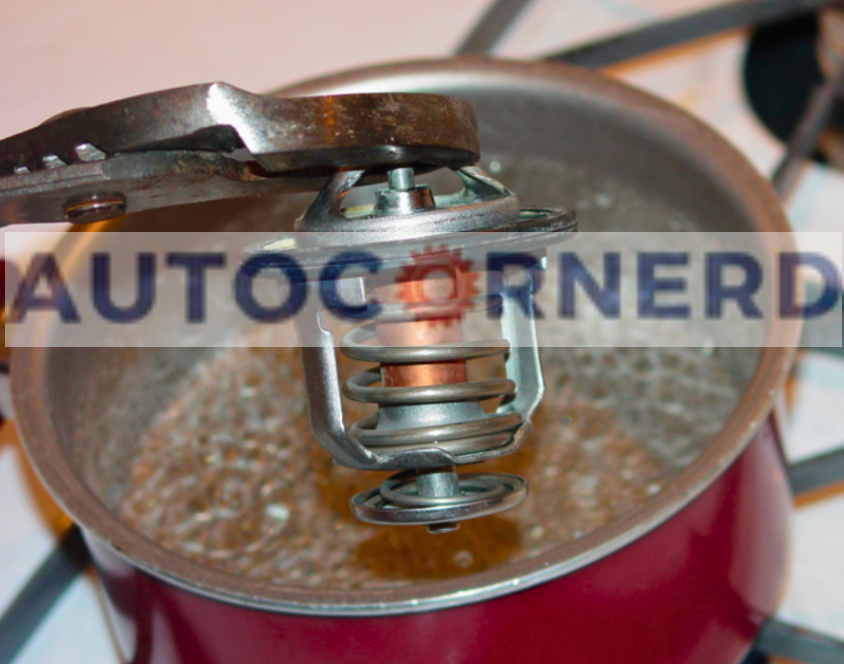
Another way to test a stuck thermostat is by removing it from the engine. You can test a stuck thermostat by boiling it in water in a pot and see if the spring of the thermostat moves. If it doesn’t, it means that the thermostat is stuck. You will have to replace it.
2. Clogged Radiator Restricting Coolant Circulation
The coolant flows in a loop through the engine block, absorbing heat from the engine. After becoming hot, it travels to the radiator. The radiator has fins and tubes that release the heat into the surrounding air. After cooling down, the coolant loops back to the engine block to repeat the cycle.
When the engine runs, the coolant circulates continuously. It passes through the radiator tubes while the radiator fan blows air over the fins. The hot coolant exchanges heat with the air, maintaining its temperature.
What causes radiator clogging?
A clogged radiator blocks the coolant flow through the system. This prevents the coolant from absorbing and releasing heat properly. As a result, the engine can overheat.
Several reasons can clog a radiator from the inside:
- Debris buildup: Dirt, dust, leaves, and other debris accumulating in the radiator over time, blocking coolant flow.
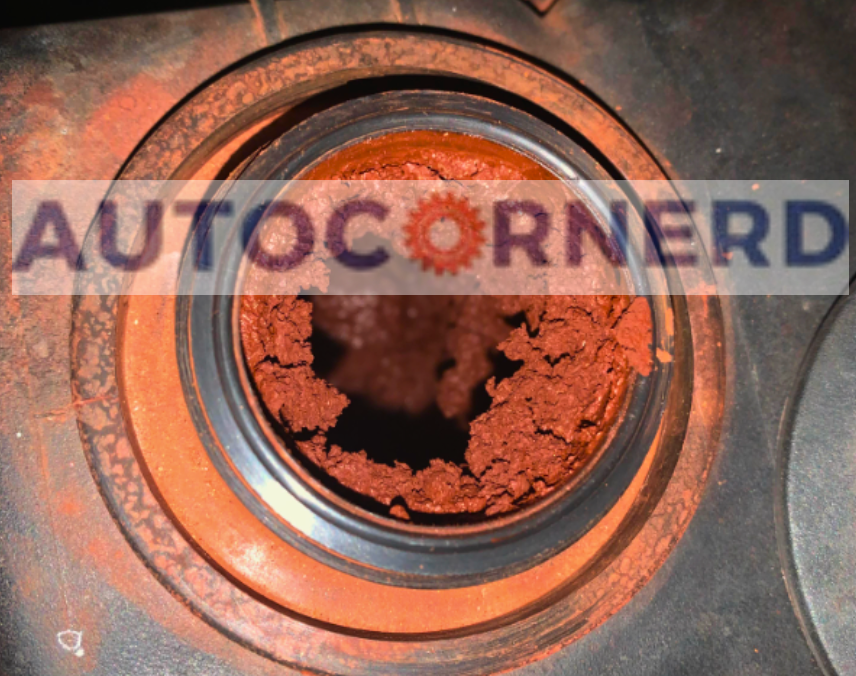
- Rust and corrosion: Metal components rusting and flaking off into the coolant, clogging the radiator.
- Mineral deposits: Hard water deposits accumulating from poor coolant maintenance and breaks down.
Clogging from outside happens when airborne dirt and dust clog the radiator fins. Visually inspect if the fins are bent.
How to identify clogging?
Use an infrared thermometer to measure temperatures at multiple radiator points. Inconsistent readings likely mean obstructions requiring attention.
How to unclog?
The best method is a radiator flush:
- Drain the radiator completely via the valve.
- Plug valve and fill with distilled water.
- Run engine with heater on high for 20 minutes.
- Flush out the water thoroughly.
- Fill with 50/50 coolant/antifreeze mix.
To clean the outside, use a soft brush and cleaning solution. Brush in the fin direction.
Soak the fins in warm cleaning solution first. Then pressure wash the radiator.
3. Faulty Water Pump Impeller Leading to Reduced Flow Rate
The water pump helps the engine stay cool. It uses a belt to turn an impeller which pushes coolant around. The coolant flows through the radiator to shed heat before cycling back to keep the engine from overheating.
If the impeller wears out, it won’t push the coolant well. Hot spots can happen in the engine. The bearings can also wear out, then the water pump might leak or make noise.
The water pump has seals so coolant won’t leak out. But the seals get old and stop working well. Coolant can leak from the water pump’s weep holes then.
One other thing is if the belt is too tight. That adds stress on the impeller and bearings. It makes them fail faster. You should set the belt tension to the specs.
How to fix?
If the impeller of the water pump is damaged, you have to replace the water pump. While installing a new water pump, make sure that you tighten the bolts properly.
If the bolt of the water pump is not properly tightened, it will cause vibrations which will result in bearing fracture.
Moreover, you should install a belt for the water pump with proper tension. If the belt is too tight, the excessive load will damage the water pump body.
4. Malfunctioning ECT or CHT Sensor Producing Inaccurate Readings
Like a nervous parent constantly checking a sick child’s temperature, engine computer uses special sensors to monitor engine heat. This allows precise adjustments to timing and fuel to protect the expensive engine parts from damage.
Ford vehicles rely on the engine coolant temperature (ECT) or cylinder head temperature (CHT) sensors for these critical readings. Checking your owner’s manual is the sure way to confirm which sensor your engine uses.
The ECT sensor sits submerged in coolant, reporting the coolant’s temperature circling through the engine block and heads. Meanwhile, the CHT sensor attaches directly to the cylinder head, providing a reading from the engine’s hot spot.
When either sensor sends inaccurate data, the engine computer gets confused, making the wrong moves like a disoriented chess player. The result can be reduced performance, poor fuel economy, or even catastrophic engine failure if overheating occurs.
That’s why “Check Engine” or “Coolant Over Temp” lights on the dash should never be ignored. The computer may be trying to report an ECT or CHT sensor problem with trouble code P1299. Replacing a faulty unit quickly restores the computer’s ability to maintain proper operating conditions.
How to spot?
The interface between the sensor and engine is the pigtail wiring. Inspect for any signs of heat damage, corrosion, or looseness, as these can cause functionality issues.
If the pigtail checks out, next assess the sensor itself. Remove it from the block to inspect for damage.
The resistance of the CHT or ECT sensor can be measured to test function. Consult a spec chart to compare measured values across operating temperatures. Matching resistance confirms appropriate sensor response.
Here are the steps to test ECT sensor:
- Immerse the tip of the sensor in the water.
- Connect a digital ohmmeter to the two terminals of the sensor.
- Using a calibrated thermometer, compare the resistance of the sensor to the temperature of the water. Refer to the engine coolant sensor temperature vs. resistance
illustration. - Repeat the resistance at other temperatures by heating or cooling the water.
- If the sensor does not meet the specification shown in the temperature versus resistance chart, it must be replaced.
5. Coolant System Leaks Lowering Operating Fluid Levels
Coolant leaks tend to be the main culprit behind this unwelcome warning sign of engine coolant over temperature.
The cooling system relies on maintaining just the right amount of coolant to carry heat away from the hardworking engine. So when the level drops too low, whether through pesky leaks or low reserves, the risk of catastrophic overheating grows.
Radiators, hoses, water pumps, and thermostat housings endure almost as much pressure and wear-and-tear as the engine itself. Tiny leaks can develop over years of driving, allowing precious coolant to slip away unnoticed. Until one day, that dash light flickers to life.
Major failures like a blown head gasket can also dramatically deplete coolant levels. This vital seal keeps combustion and coolant carefully separated within the engine. If breached, the two systems fatally mix, disabling the cooling system.
And when coolant runs too low already, the water pump struggles to work efficiently. Air pockets and flow problems lead to more overheated components. It’s a downhill spiral.
How to spot?
You can check the following areas of coolant leaking from the following components:
- Overflow tank
- Radiator hoses
- Heater core hose
- Thermostat
- ECT sensor
- Water pump
- Head gasket
If coolant is leaking through the head gasket, you can’t spot it as it will burn in the engine. The signs are that your engine will produce white smoke from the exhaust. Furthermore, if you open oil filler and radiator cap, you will observe a brownish texture. This indicates that coolant and oil mix when a head gasket blows out.
Is It Safe to Drive With High Engine Coolant Temperature?
No, you can’t. Don’t ignore the warning symbol of overheated coolant.
Chances are there’s a leak somewhere allowing that precious coolant to escape. Like blood flowing through veins, your engine relies on having enough coolant circulating at all times. Without it, things start to overheat real fast.
So where could this pesky leak be hiding out? Your radiator is suspect number one. Years of bumps and debris can puncture holes allowing fluid to drip slowly away. Rubber hoses also tend to crack over time, creating tiny fissures that eventually erupt.
Even the water pump and thermostat housing have seals that get brittle and fail. Any one of these can sabotage your day by draining your coolant.
Now a more catastrophic cause of fluid loss – a blown head gasket. Yikes! This failure allows pressurized combustion gases to push right into the cooling passages. Coolant gets displaced and you lose power as compression leaks out. If untreated, it’s tow truck time.
Finally, already low levels make things worse. With too little coolant, your water pump cavitates and overheats. Trapped air pockets create hot spots that your cooling system just can’t handle. It’s a downward spiral if you don’t address that coolant warning light right away.
Some First Hand Experiences Shared By Users In Different Communities
Our team conducted research across various online communities, forums, and subreddits to gather user comments and opinions on “engine coolant over temperature warning”.
User 1 says:
Encountered this warning in my Expedition. It was a combination of low coolant and air in the system. After refilling the coolant and bleeding the system, the temperature returned to normal.
User 2 says:
I had this in my Fusion. The cause was a failed radiator fan. The car would overheat in traffic but be fine on the highway. Replaced the fan and it’s been good since.
User 3 says:
My Fiesta had this issue because of a cracked coolant reservoir. I first noticed a puddle under the car. After replacing the reservoir, the warning stopped appearing
User 4 says:
In my Edge, the warning was due to a broken fan belt. I noticed a squealing sound before the temperature warning showed up. Replacing the belt solved the problem.
User 5 says:
My Escape showed the warning last summer. A clogged radiator was the culprit. After a coolant flush and radiator cleaning, the problem hasn’t returned.