

A squeak while your foot is off the brake pedal can still come from a brake, but tires, suspension, driveline, body trim, belts, or steering may also be involved. Identify what the sound follows: road speed, engine speed, a turn, a bump, brake application/release, or airflow.
Stop safely for reduced braking, strong pull, a loose-wheel sensation, severe grinding, smoke, loss of steering assistance, a damaged tire, or a relevant warning. Do not keep accelerating or repeatedly braking hard merely to identify a squeak.
What Information Helps Locate The Sound?
Record the exact vehicle, speed and conditions, cold/hot state, recent service, and whether a light pedal application changes the sound. A change with the pedal is a clue, not proof of a particular pad or bearing fault. Use a safe observation or a qualified diagnostic visit rather than a risky road test.
Eleven Areas To Distinguish
1. Audible Wear Indicator Or Another Brake Contact


A mechanical wear tab can sound with or without braking. Inspect all relevant pads and hardware against the actual criteria. A thick-looking outside pad or silence under hard braking does not establish safe wear.
Use correctly specified parts and resolve the cause of abnormal wear. Correct aftermarket parts can be suitable; select them by fitment, specifications and the condition being repaired.
2. Guide, Piston, Or Pad Drag

Restricted movement can cause rubbing, heat, or uneven wear. A pin is only one possible cause; pad fit, piston condition, hoses/hydraulics, and other faults may need investigation. Do not touch a hot unit to decide which part failed.

Do not enlarge a guide bore, substitute penetrating oil, or use one unspecified grease for every caliper. Confirm the drag cause and the exact repair. The pad-contact guide explains related fit checks.
3. Rotor Surface Or Geometry

Inspect the surfaces and measure relevant thickness, variation, and lateral runout separately. A sound that stops when the pedal is pressed does not prove that a rotor is warped. Scoring, deposits, corrosion, and geometry faults need different assessments.
Do not sand or chemically soak an assembled brake as a generic cure. Use the actual service criteria and verify the cause of any contact or vibration.
4. Debris, Tire Damage, Or Another Contact Point

Visible stones do not prove the sound source. Check safe accessible areas for debris, damage, or a loose nearby component. Do not use hard braking to eject a stone or push a tool deeply into the tread.
If an object is embedded, air is leaking, or the tire is damaged, obtain tire service. USTMA’s repair guidance explains why repairability needs proper inspection; a tread-side glance cannot approve a puncture repair.
5. Pad Retention, Shims, Or Contact Treatment

Do not equate every squeak with dry clips. Some contact points require a specific lubricant; some shim arrangements have different instructions. Keep grease off friction faces and use the specified product only where permitted.
ATE’s Plastilube sheet excludes rubber and friction surfaces. A backing-plate lubricant is not automatically a pin-bushing or hydraulic-seal lubricant.
6. Tire Pressure And Operating Conditions


Measure cold pressure and use the vehicle placard/manual, not another car’s numbers or the tire sidewall maximum as a universal target. Front, rear, and spare values may differ. Pressure differences or a flat spot do not by themselves prove the cause of squeaking.
NHTSA’s tire-safety guidance covers pressure, inspection, wear, and replacement considerations. Investigate repeated pressure loss rather than repeatedly adding air without finding why.
7. Tire Wear, Fit, Balance, Or Alignment
Inspect wear, damage, tire/wheel fit, and relevant suspension/alignment condition. Cupping or uneven wear can have several causes; one appearance does not identify underinflation, balance, or a worn part.
Follow the actual tire replacement and rotation instructions, including directional/staggered-fit restrictions. A universal 6,000–8,000-mile front-to-back swap or a single tread-depth number cannot cover all tires, climates, use, or local requirements. See the tire-wear guide for related patterns.
8. Suspension Joints, Bushings, Or Mountings


Differentiate the actual ball joint, tie-rod end, arm bushing, strut mount, spring contact, or another component. Noise alone does not establish wear, and a dust boot is not the same part as a control-arm bushing.
Do not puncture a sealed boot with a grease needle and glue the hole as a repair. MOOG’s needle-adapter example accesses a designed fitting; it is not permission to pierce any boot. Worn or damaged joints need their specified repair, not grease to conceal movement.
9. Driveline Joints Or Boots

Joint design and axle layout vary, including front, rear, and all-wheel-drive uses. GKN’s CV-joint overview distinguishes arrangements accommodating steering and suspension travel.
Inspect relevant boots, leakage, play, and the load/turn conditions by the actual diagnostic procedure. Grease near a wheel is not automatic proof that the joint itself has failed or that every squeak comes from it.
10. Accessory Belt, Pulley, Or Tensioner
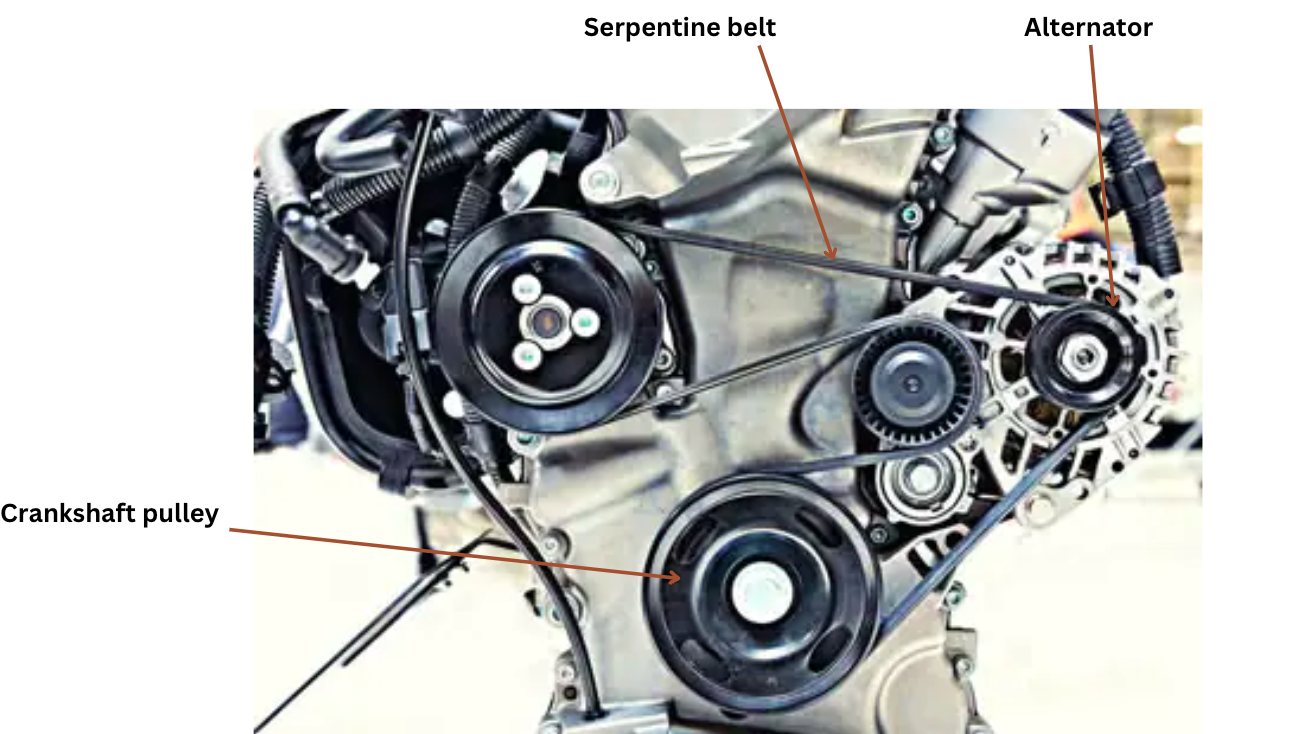
A noise following engine speed may be a different path from a wheel-speed noise. Check the actual belt, alignment, correct length, pulley/bearing, and tensioner condition using the service procedure. Not all systems have the same spring tensioner or belt-driven steering pump.
Gates TT004-15 discusses tensioner/pulley concerns and specifies engine-off/cold conditions for its arm-movement inspection. Do not place a long screwdriver, hand, clothing, or listening tool near moving belts to locate a squeak.
11. Steering Or Column Components
Identify whether the vehicle uses hydraulic, electrohydraulic, or electric assistance. Not every steering system has a pump, belt, or fluid reservoir. A column, intermediate shaft, joint, mount, trim, rack, or assist-system concern can need different tests.
Do not add an arbitrary fluid or lubricant, inject a boot, or disconnect steering/safety components as a trial repair. A change in steering effort, warning, or looseness needs appropriate prompt assessment.
What Should A Repair Be Based On?
Use the sound pattern, actual inspection, relevant measurements, and vehicle-specific information. Repair the confirmed cause and verify operation. A quiet result alone does not approve a previously loose, damaged, or contaminated component.
Experiences With Squeaks While Coasting
A coasting squeak can come from the brakes, suspension, belt drive or nearby contact. Note what changes the sound before focusing on one system.
I drive a 2019 Mazda CX-9 and faced this annoying squeak while driving, especially at low speeds. It was actually the control arm bushings. Realized it when I took a sharp turn and the noise intensified.
I own a Kia Stinger, and I had this squeaking issue when driving, particularly noticeable at higher speeds. It turned out to be aerodynamic noise caused by a loose front bumper. Fixed it by re-securing the bumper.
In my Ford Ranger, the issue was with the leaf springs in the suspension. The squeak was more prominent during suspension movement. A bit of lubrication between the leaves solved it.
Had a similar problem with my 2018 VW Golf Alltrack. The noise was due to a faulty suspension strut. The giveaway was a bouncing sensation over bumps, along with the squeaking noise.
I had this persistent squeaking noise in my 2017 Honda Accord whenever I was driving but not braking. It turned out to be a worn-out serpentine belt. I realized it was the issue after noticing the squeak was consistent regardless of the road surface and got worse with engine revs.
In my 2020 Jeep Grand Cherokee, the squeaking noise while driving was due to a dry U-joint on the driveshaft. I noticed the problem because the squeak’s frequency matched the vehicle’s speed.
Join The Conversation.
No comments yet. Comments are moderated before publication.