
Brake Disc Is Rubbing Dust Shield: How to Fix?
Brake dust shields stop gunk from getting on your brake rotors. But sometimes they bend and scrape against the spinning brake disc. Not fun. It makes ugly noises, steering wheel shakes, and can even damage your rotor. This shield scrape happens a lot after brake work. The shield gets bumped and cozies up too close. It can also slowly bend over time from stress. To fix, carefully push the shield back with screwdrivers or pliers. Make a nice gap between shield and rotor. Check often that they aren’t rubbing. Spacers between the caliper and rotor work too. If you can’t bend it back, you may need to just remove the shield. Or you can grind the inside shield edge. That reduces scrape chances. The wrong sized brake parts can also cause shield scrapes. So if this keeps happening, your parts might not fit right.
The brakes squeal and scrape after a recent servicing. Annoying sounds emerge from the wheels, leaving drivers questioning the cause. In many cases, the brake disc rubs the dust shield behind it.
This friction accelerates wear on braking parts, potentially reducing brake performance. In this guide, we explore why discs and shields collide and properly diagnose and resolve it.
You can also see the following subreddit to observe how dust shield can cause grinding noises if it is so closer to the brake disc.
Apart from the dust shields, loose brake parts and stuck caliper pins can also cause grinding noises from brakes. For this, I have written a detailed guide on the causes of grinding noises from brakes.
My Personal Experience With Dust Shield Rubbing Brake Disc
Once, my Yaris started making a loud scraping noise when braking. I jacked up the car and spun the front wheels to diagnose it. The passenger side brake rotor was visibly contacting the bent dust shield.
Using a screwdriver, I was able to reach behind the wheel and gently pry the dust shield away just enough to restore clearance. The scraping noise was gone. Properly diagnosing and adjusting the dust shield saved me a trip to the mechanic.
- Brake dust shields rubbing on rotors is a common cause of scraping noises and vibration after brake service.
- Bent or warped dust shields can lose clearance from the rotor and make contact, especially on the outer circumferential edge.
- Dust shields get damaged from road debris lodging behind them or improper installation/removal of wheels and brake parts.
- Non-OEM brake pads and rotors that are slightly thicker than OEM spec can also reduce dust shield clearance and cause interference.
- Diagnose dust shield issues by feeling for rotor dragging when spinning wheels by hand, pulsing in the brake pedal, or signs of rust/damage on the dust shield itself.
- Gently pry or bend dust shields away from rotors through wheel spokes. Use hammer and dolly to reshape moderate bends. Replace excessively warped shields.
- Always use OEM spec or high quality aftermarket brake parts and ensure proper fit. Bed pads and rotors properly.
- Lowered vehicles bring dust shields closer to ball joints, tie rods, and control arms. Trim dust shields or add negative camber.
- Use hub-centric spacers to move brake rotors further outboard. Remove dust shields completely if needed.
Causes of Brake Disc Rubbing and Scraping Dust Shield
Here are the causes:
1. Bent or Warped Dust Shield Rubbing Against Brake Disc
The main purpose of a dust shield is to keep rocks, water, and other road debris off the brake parts. This prevents contamination that could damage pads/rotors.
The dust shields are made of very thin sheet metal or plastic. They are not structural components but more like disposable mud flaps.
How Do the Dust Shields Get Bent?
Here are the following ways the dust shields can become warped, bent or damaged:
- Accidental impact from tools or hands during brake work or tire/wheel removal. The thin metal is easy to bend.
- Debris kicked up from the road lodging behind the shield. This puts pressure on the metal.
- Rust and corrosion weakening the panel over time, allowing it to warp. Road salt accelerates this.
- Contact with curbs or objects on the road also flexes the dust shield.
- Improper installation of new pads/rotors allows the shield to get tweaked.
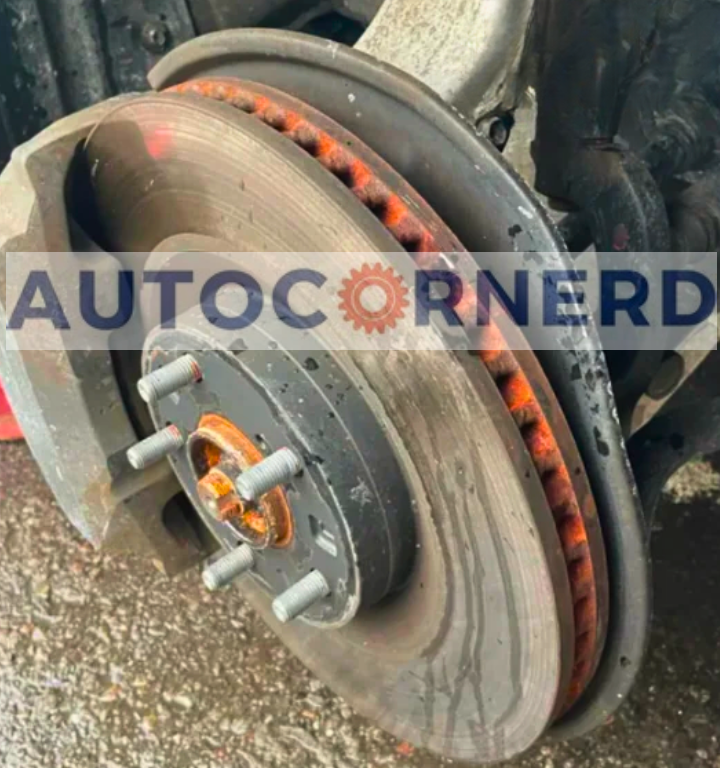
Often the dust shield bending happens slowly over time and goes unnoticed until more severe. The damage usually occurs on the outer circumferential edge of the dust shield behind the rotor that is parallel to the outside diameter of the brake disc.
During brake work, mechanics often accidentally pry against or bump these edges trying to remove/install wheels and brake parts.
How can I spot it?
If the dust shield is bent, you will feel a potential pulsing in the pedal if the shield has worn a groove into the brake rotor surface. Another thing you can do is spinning the wheels by hand to feel for dragging or resistance
Moreover, you should observe the signs of rust, flaking or corrosion that can weaken the dust shield panel.
Lastly, you should check if any debris, rock or pebble is stuck between the dust shield and brake rotor. When there is very less clearance between the brake disc and dust shield, a rock or pebble can be stuck and can score the rotor.
Even small debris getting caught in the dust shields could exert enough localized pressure or force to bend or damage the thin and fragile material of the dust shields.
Symptoms of Bent Shields
When a warped dust shield starts to make contact with the spinning rotor, you’ll typically experience:
- A scraping, grinding or rattling noise when braking, especially at lower speeds. The faster the rotor turns, the louder the sound.
- Vibration that can be felt in the brake pedal or steering wheel when braking.
- Excessive dusting of the wheel rim from increased brake pad wear.
- Visible witness marks or shiny wear spots on the rotor face where the shield has rubbed.
How to fix?
If the dust shield damage is minimal, you can often gently bend it back into shape by hand or with pliers/screwdrivers through the wheel spokes. Take care not to bend it the other way.
Note: It might be difficult with a screwdriver to get under the lip and bend it away from the rotor. If you have something like a dental pick it or maybe a long thin allen wrench, it would make it a bit easier.
Otherwise, you will have to remove the wheel to assess the dust shield.
For moderate bends, use a hammer and dolly block to carefully reshape the warped area. Support the backside when hammering.
Excessively warped, rusted or unrepairable shields should be replaced. Aftermarket replacements are inexpensive. Take proper precautions when removing and installing them.
Be sure to re-inspect the clearance after any repair work. Spin the rotor and listen/feel for any remaining contact. It may take some trial and error to get the spacing right.
2. New Brake Components Not Matching OEM Thickness
When installing new brake components like pads and rotors, it is crucial that the thickness matches original equipment manufacturer (OEM) specifications. Even small deviations can lead to issues like dust shields rubbing and scraping against the rotor.
Using aftermarket, non-OEM specification parts is a common reason for thickness mismatches. Aftermarket rotors and pads are not always manufactured to exactly match the OEM parts they are replacing.
For example, some aftermarket rotors may be slightly thicker than the OEM rotor. Since the old rotor had enough wear to maintain a desired clearance between itself and the dust shield, the non-OEM new thick rotors would interfere with the dust shield.
Moreover, small spring clips on brake pad backing plates can vibrate against the rotor if not seated correctly, causing a scraping or buzzing noise. Damaged clips should be replaced. Ensure they are attached firmly in place and have OEM size.
How to fix?
Swap in OEM-spec or high-quality aftermarket components like pads, rotors, shields, or calipers to restore proper clearances if hardware is damaged or incorrect.
For best results, replace brake pads, rotors, clips, calipers, and shields as a complete set.
In addition, fix any caliper sticking issues and use brake grease on contact points between pads, clips, and calipers to allow for proper sliding and retraction. Make sure to re-torque any loose caliper mounting bolts.
Whenever you install new brake rotors and pads, they require proper bedding through a series of moderate brake applications to evenly transfer material. Uneven pad deposition from improper bedding can cause noise that should diminish with additional driving.
3. Lowered Vehicles Causing Brake Dust Shield Contact with Other Components
When you lower your vehicle, the space between the brakes and suspension decreases, making it easier for components to come into contact.
Stiffened, performance-oriented suspension parts combined with lowered coil springs can aggravate clearance issues by limiting how much the components can compress and move away from each other over bumps. In this way, this brings the dust shields closer to ball joints, tie rods, and control arms.
In addition, installing larger brake rotors, calipers, or brake pads for high-performance vehicles can shift the position of the brakes further outboard. This brings the dust shields closer to the ball joints and control arms.
How to fix?
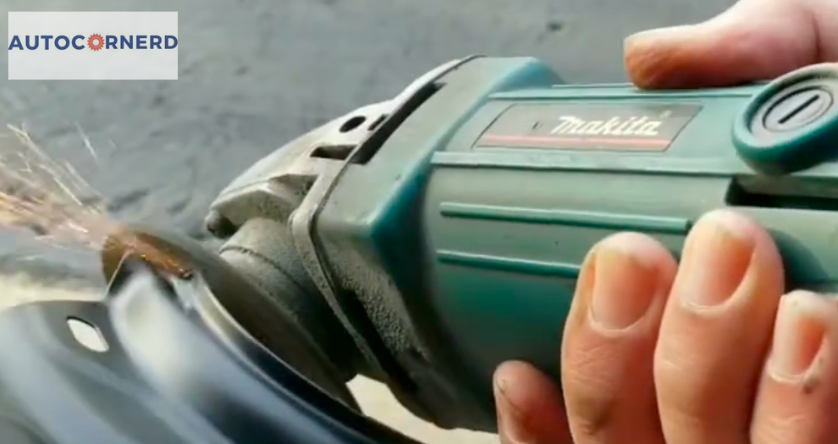
You can fix this by trimming the bottom of the dust shield away from the ball joint. You can use a power cutter for trimming the dust shield.
You can also add more negative camber to tilt the wheels and rotors outward.
In addition, you can use spacers to push the brake rotors further out from interference. The spacer pushes the brake rotor out 3mm from the hub.
Spacers typically go between the wheel hub and the rotor, in the space where the rotor is normally bolted directly to the hub. So, you would remove the rotor, install the spacer on the hub, then bolt the rotor to the spacer. This positions the rotor slightly further outboard.

If no other option exists, completely removing the dust shields may be required to stop the rubbing. This allows the maximum room for dropped suspensions and big brake kits. However, it exposes the rotors and leaves suspension components unprotected.
Final Thoughts
In conclusion, brake dust shields rubbing against rotors is a common issue after brake work. Bent, warped, or lowered shields can reduce clearance. Using non-OEM pads/rotors of incorrect thickness also causes interference.
Diagnose by feeling for rotor drag. Fix minor bends by reshaping shields. Replace damaged parts and ensure proper fit. Lowered vehicles may require shield trimming, more negative camber, spacers, or complete shield removal.
Overall, maintaining proper clearances and OEM component sizes is crucial to prevent shield contact on brake discs. Doing so reduces noise and premature wear.
Some First Hand Experiences Shared By Users In Different Communities
Our team conducted research across various online communities, forums, and subreddits to gather user comments and opinions on “dust shield rubbing brake disc”.
User 1 says:
My Chevrolet Traverse began making a strange scraping sound during low-speed braking. After inspecting, I found that the dust shield was rubbing against the brake disc. This happened after I had my brakes serviced, and the shield was improperly reinstalled. After adjusting the shield and ensuring it was clear of the disc, the noise stopped, and braking returned to normal.
User 2 says:
Recently, my Tucson started to vibrate while braking. After a bit of investigation, I realized the dust shield was in contact with the brake disc. It appeared that corrosion had caused the shield to deform. I removed the shield, straightened it out, and treated it for rust before reinstalling. The vibration stopped, and the brakes worked smoothly again.
User 3 says:
A rattling noise from my Sorento’s front wheel led me to discover that the dust shield was in contact with the brake disc. It turned out that the shield had become loose over time. I tightened the mounting bolts and adjusted the shield to ensure it was clear of the disc. This fixed the rattling noise completely.