
My Car Is Losing Coolant Without Overheating: How To Detect?
The vehicle loses coolant without overheating. What causes this? The cap on the coolant overflow tank likely has a slow leak. Tiny pinholes in the radiator cap or overflow tank also allow coolant to escape. Minor leaks from the radiator hoses happen too. Another issue is the head gasket. Coolant can sneak through it and enter the engine. That makes white smoke. Head gasket leaks let coolant and oil mix together. Then the oil looks brownish and milky. Even with the coolant loss, there is still enough coolant in the system. That coolant stops the engine from overheating.
Have you noticed your car’s coolant levels mysteriously dropping bit by bit, even though the engine shows no signs of overheating? This head-scratching auto issue can leave drivers baffled. Coolant serves a vital job in regulating engine heat, so when it vanishes without a trace, alarm bells ring.
Before panic sets in, take a breath. In this guide, we’ll outline potential culprits behind coolant loss without overheating.
If your car is not starting after overheating, make sure to read my guide on that topic.
In the last section, I’ve included comments from forums where users share firsthand experiences with car losing coolant without overheating. Be sure to check out that section for real insights.
For you guys, I’ve put together an interactive tool to help with car issue diagnosis. It guides you with simple steps. Remember to investigate it.
- Small coolant leaks often go unnoticed at first but can lead to bigger issues if not fixed.
- Cracks in the radiator, hoses, thermostat housing, head gasket, engine block or leaks from the water pump can cause slow coolant loss without overheating right away.
- Trapped air bubbles in the cooling system after repairs can prevent proper coolant circulation, causing the reservoir level to drop.
- A damaged radiator cap may fail to maintain pressure, allowing coolant to escape gradually.
- Regular cooling system flushes help prevent scale buildup and corrosion that can cause cracks and leaks over time.
What is My Personal Experience With Vehicle Coolant Leak Without Overheating?
Once, my cousin’s old Toyota Camry started losing coolant gradually. He asked me to help diagnose it. I inspected his cooling system components and discovered his water pump shaft seal had worn out from age and high mileage, causing a small leak. To fix the issue, I had him replace the leaky water pump with a new heavy-duty unit. The repair stopped his mysterious coolant loss, saving money on more frequent refills.
Why Don’t Small Coolant Leaks Cause Overheating Right Away?
With the cooling system under pressure, even a pinhole leak in the cooling system can allow coolant to escape. However, the system holds extra capacity and it takes significant loss to cause overheating issues.
- The overflow reservoir provides a buffer, allowing the system to lose some coolant before running dry.
- Air pockets in the system take up space, delaying the effects of loss.
- When cool, less coolant circulates so leaks appear slower.
What Are the Causes Of Car Losing Coolant Without Overheating
Let’s discuss all possible causes of depleting car coolant without temperature gauge rise. These include both internal and external coolant leaks.
1. Radiator and Hose Cracks Causing Slow Coolant Loss
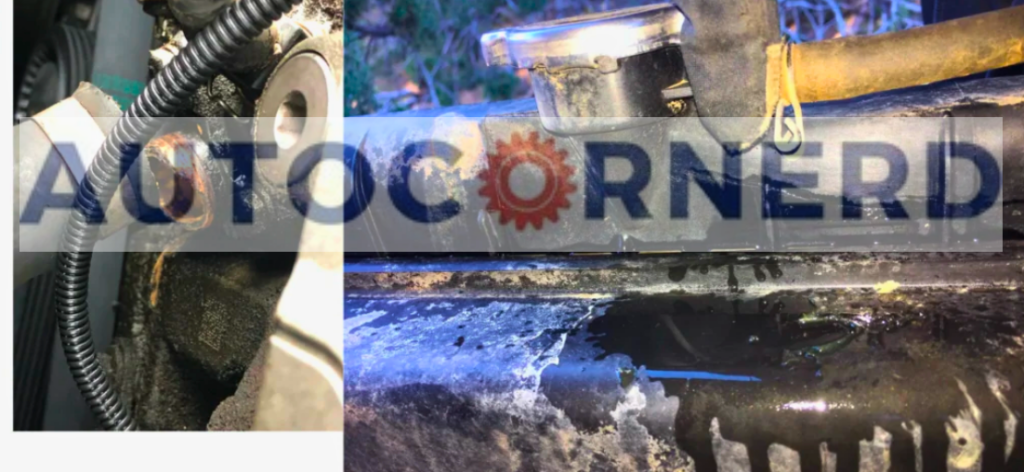
The radiator serves as the cooling system’s key player, bearing responsibility for releasing heat from the engine.
It accomplishes this by permitting coolant to course through its interior tubes, engineered to ease heat transfer to the enveloping air.
The radiator hoses, conversely, are tasked with shuttling coolant between engine and radiator.
The upper radiator hose ferries hot coolant from engine to radiator, while the lower returns the chilled coolant from radiator to engine via water pump.
The coolant arrangement in a automobile is constructed with a fixed capacity to contain coolant. As a radiator cultivates a crack, coolant oozes out bit by bit, diminishing the complete coolant amount.
The cooling framework can still operate sufficiently as long as the outstanding coolant is ample to assimilate and disperse heat. Therefore, a small crack may not prompt overheating straight away, as the coolant can make up for the loss.
Similarly, when radiator hoses evolve cracks or leaks, coolant can get away, culminating in a coolant leak. This can effect in a coolant loss, potentially causing engine overheating if not tackled fast.
Additionally to the radiator hoses, you should also examine transmission cooler hoses. They are accountable for ferrying the transmission fluid to the radiator, where it is cooled preceding returning to the transmission.
The coolant is also responsible for preserving the temperature of the transmission fluid. There is either a separate transmission cooler for heat exchange or it’s a segment of the radiator through which heat exchange between transmission oil and coolant transpires.
Why does it happen?
As with any car component, radiators and hoses face wear and tear. The constant heat cycles strain the materials, eventually weakening them. Inferior quality or flawed manufacturing also creates vulnerability. External factors like accidents and bad motor mount adds more stress as it allows engine to move excessively.
Ultimately, cracks happen when the radiator system can’t regulate engine heat correctly anymore. The high temperatures that radiators and hoses withstand take a toll.
Each time the engine heats up and cools down, the coolant flowing through expands and contracts. This constant fluctuation fatigues the components.
Do you know you can fix small leaks in your radiator with an egg? I have written a guide on this topic.
How to inspect?
You should inspect side seams of the radiator as they will leak when pressurized. Moreover, look along the sides and top for signs of leaks, bulges, or cracks in the plastic or metal radiator tank.
Cracks commonly form at the seams where the side panels join, so be sure to closely examine those areas inside and out.
Another way is to test radiator leak with a soapy water. You can watch the below video for better explanation:
For radiator hoses, inspect along the lengths of the radiator hoses for bulging, cracking, or damp spots.
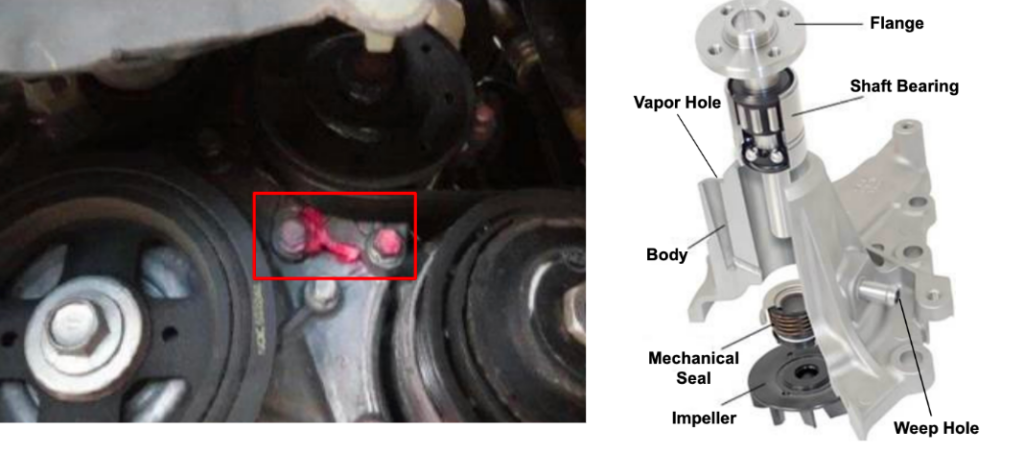
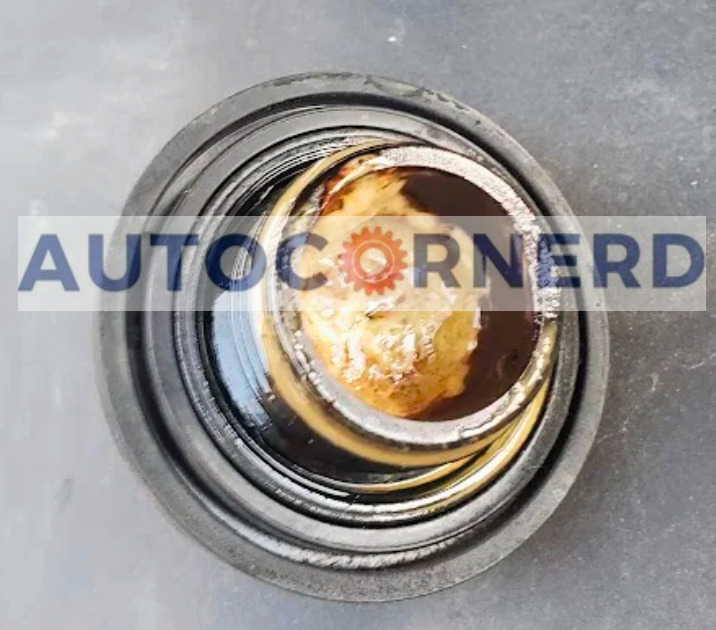
2. Leaks Through Water Pump
Even with a leak, the cooling system can prevent overheating if there is still enough coolant inside.
External leaks don’t cause overheating as easily. When coolant leaks outside from the water pump, it doesn’t mix with oil or leak into the combustion chambers. This allows the engine to keep regulating its temperature properly.
The water pump pushes the coolant constantly. Located on the front of the engine, the pump uses a spinning shaft and impeller. The pulley spins the shaft with a belt connected to the crankshaft.
As it spins, the impeller pushes coolant from the radiator through the block and cylinder heads. Hot coolant flows back to shed heat in the radiator. Then the cycle repeats, keeping the engine at the right temperature.
How water pump leaks occur?
There are two main ways water pump leaks can develop:
- Worn pump shaft seal: There is a seal around the shaft to prevent coolant from leaking where it exits the pump. Over time, this seal can wear out or get damaged, allowing coolant to leak from the weep hole.
- Damaged/worn pump bearings: The shaft spins on a bearing inside the pump that can eventually wear out. This allows shaft wobble, damaging the seal and causing leaks.
- Loose bolts: The mounting bolts of water pump can loosen over time, causing leaks.
Water pump leaks often start out very small but get worse over time. Here’s why:
- At first, just a few drops of coolant may leak from a slightly worn seal or bearing. This minor leak often goes unnoticed.
- But the leak provides a path for coolant to keep contacting the damaged area, speeding up wear.
- So the leak gets progressively larger as the seal and bearing degrade more.
- A leak that was just droplets initially can turn into a big puddle within weeks or months.
Signs of Water Pump Leaks
Watch for these common signs of water pump leaks:
- Wet spots on the ground under the car when parked.
- White streaks of dried coolant on components in the pump area.
- Rust buildup around the pump from leaking coolant.
- Coolant dripping from weep holes on the water pump.
- Low coolant level or need to add more coolant regularly.
Preventing Water Pump Leaks
You can help prevent water pump leaks and failures:
- Replace the water pump based on recommended service intervals, usually around 90k miles.
- Use high quality, heavy duty water pumps for longer life.
- Keep the cooling system clean using flush kits to prevent buildup.
- Ensure correct belt tension to avoid putting stress on the water pump.
- Address any leaks promptly to limit erosion of seals and bearings.
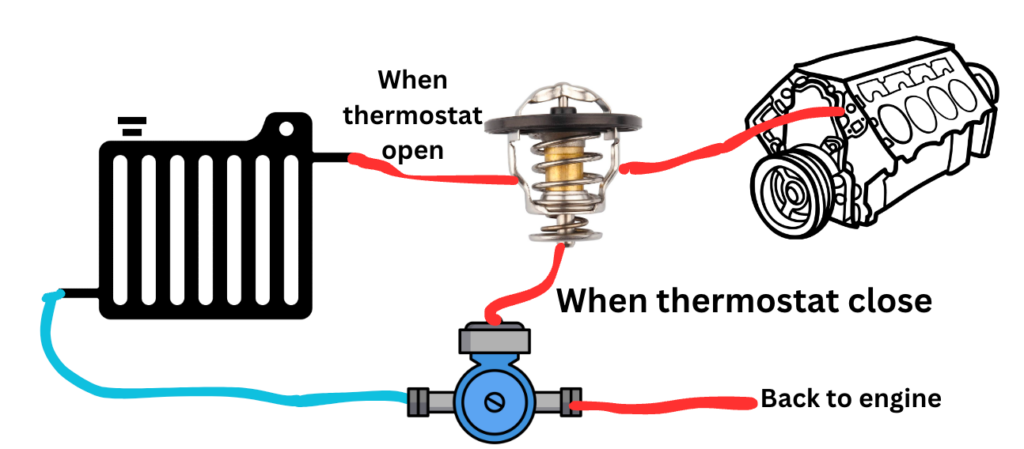
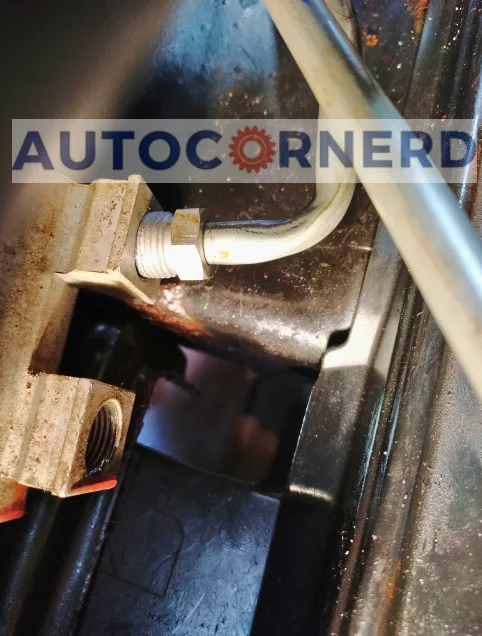
3. Thermostat Housing Cracks Releasing Coolant
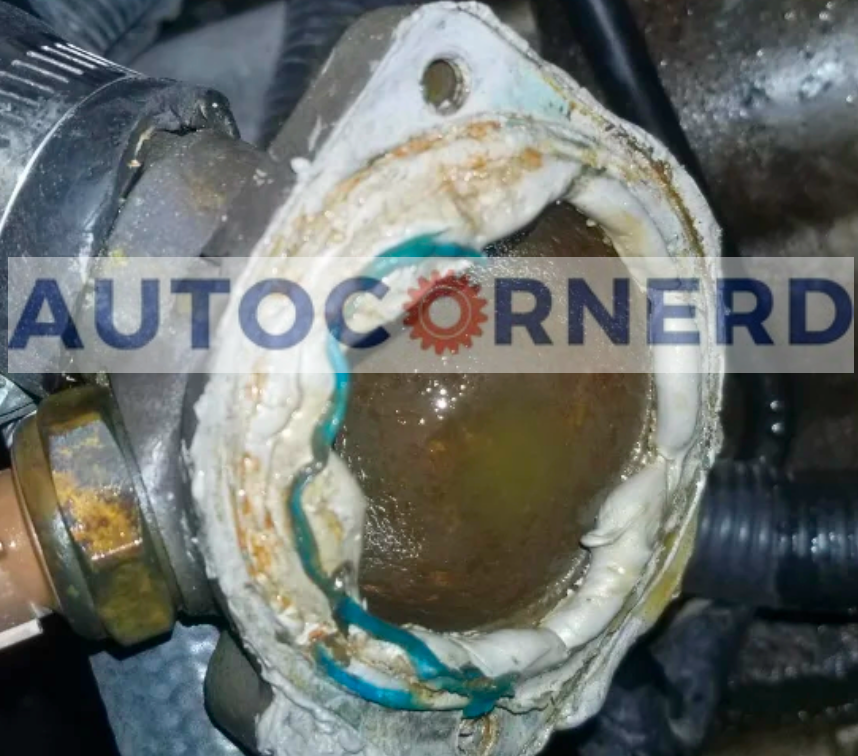
The thermostat housing is the control center that directs the flow of coolant to regulate engine temperature. This key component is typically a metal or plastic casing attached to the engine block via bolts and gaskets.
Inside this vital housing, you’ll find the thermostat – a valve that opens and closes based on engine heat to control coolant circulation.
Here’s how it works: Coolant flows from the radiator into passages in the engine block, then makes its way to the thermostat housing. When open, the thermostat permits coolant to loop back to the radiator where excess heat gets shed.
So what causes leaks in this critical housing? Time and wear take a toll, allowing coolant to seep out slowly due to…
- Cracked Housing: The plastic shell can become brittle and develop fractures. This frequently happens in high-mileage vehicles. Proper maintenance helps prevent cracks.
- Faulty Gaskets: Seals between mating surfaces wear out, creating gaps that leaks use to escape. Replacing worn gaskets commonly fixes stubborn leaks.
- Loose Bolts: When bolts securing the thermostat housing work loose, the housing loses its tight seal and weeps coolant. Missing bolts can also break the liquid-tight bond. Proper torque specifications keep everything snug.
How to fix?
The fix involves removing and replacing the faulty thermostat housing as T-stat housing is usually cheaper to replace. It’s a good idea to also replace the thermostat and housing gasket/O-ring seal for a complete repair.
However, I will also share some steps to fix coolant leaks through thermostat housing.
A few handy tools make the repair a cinch:
- A fine sanding block gently smooths the housing’s surface so the new gasket seals tightly. No need to remove metal, just prep the surface.
- The new gasket forms a leak-proof barrier. Don’t forget this crucial piece!
- A wire brush scrubs away grime and corrosion so the sanding block and gasket do their jobs.
Here are the steps you should follow:
- With the engine chilled to prevent ouchies, remove the housing. Components blocking the way may need detaching first, as shown in video below.
- Once accessible, have at it with the wire brush! Scour surfaces to erase residue and nasty oxidation. The goal is a blank slate for the sanding block.
- Sand lightly and smoothly across the thermostat housing, leveling bumps and pits left from the brushing. The aim is an ultra-fine finish the gasket will embrace.
- Inspect closely that all gunk and roughness vanished before the new gasket’s installation. Any leftover mess risks future leaks.
- If not done already, swap out the worn gasket for a fresh seal. This ensures leaks stay in the past.
- Reassemble carefully, keeping everything neat and straight. Gently tighten bolts to specs. Overzealous tightening causes premature looseness over time.
- With the housing reconnected, attach hoses and parts previously removed. Start the engine, crossing fingers for no coolant drips. Dry means your fix hit the leak’s bullseye!
4. Head Gasket Blown Out Allowing Coolant Escape
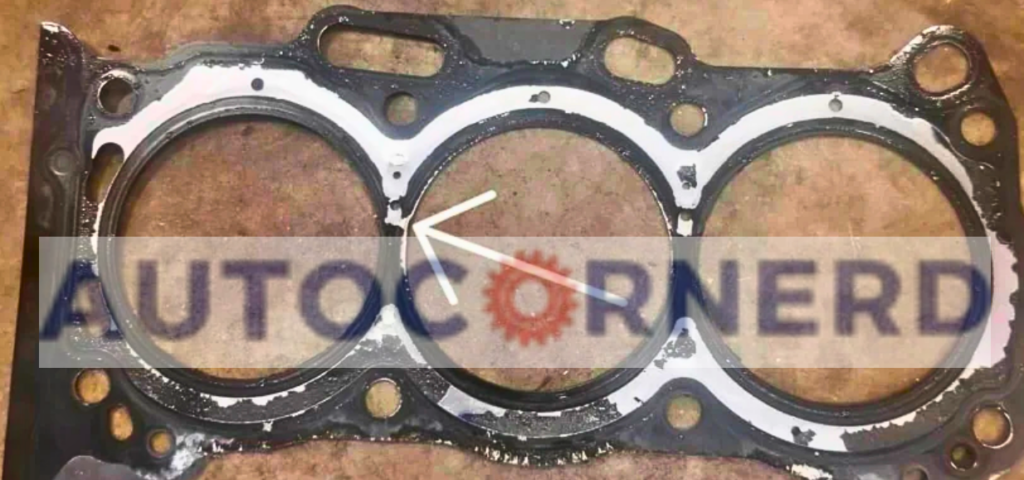
A head gasket seals the combustion chamber in an engine, separating the hot gases and pressure from the coolant passages.
When a head gasket fails, it allows combustion gases to leak into the cooling system or vice versa.
This usually causes telltale signs like engine overheating, exhaust smoke, or coolant mixing with oil.
If the head gasket failure is just a small leak instead of a major rupture, it may allow only a slow seepage of coolant or gases.
This could cause coolant to slowly drip or spray from the cooling system without allowing significant mixing or loss.
Since cooling capacity isn’t drastically reduced, the engine won’t overheat. Think of it like a very slow flat tire – you’ll eventually notice it’s low but it takes a while.
How a Blown Head Gasket Causes Coolant Leaks?
When the head gasket can no longer hold back pressure and seal correctly, several types of leaks can occur:
- External coolant leaks: Coolant may leak externally wherever the seal has failed and find its way through warped surfaces between head and block. This leads to visible dripping or pooling under the engine.
- Internal coolant leaks: Combustion gases can force coolant through the compromised gasket seal into combustion chambers. This pressurizes the cooling system and can lead to coolant being forced out or “blown” externally from the radiator, hoses, reservoir etc.
- Coolant mixing with oil: Instead of leaking externally, coolant can be pushed into the oiling system through the failed seal, leading to a “milky” contaminated appearance in the oil.
- Engine overheating: Compression and combustion gas leaks reduce efficiency. Coolant loss leads to hot spots and overheating damage. Further warping can worsen leaks.
Signs of Blown Head Gasket Without Overheating
If you suspect a blown head gasket but your engine isn’t overheating, watch for these signs:
- Coolant spraying or dripping from seams and gaskets around the cylinder head.
- Rapid coolant loss with no visible leaks (combustion or oil mixing).
- Exhaust smoke at startup but not when warmed up (intermittent leak).
- Oil contamination like coolant in the oil or milky deposits.
- Needing frequent top-offs of the coolant overflow tank.
How to test?
Because a head gasket failure usually cannot be detected visually, special tests need to be done to confirm the fault:
- Compression test: Checks for low compression in cylinders due to gasket leaks
- Combustion leak test: Checks for presence of exhaust gases in cooling system
- Oil analysis: Checks for coolant contamination in engine oil
You can watch the following video for engine compression test:
5. Engine Block/Cylinder Head Cracks Losing Coolant
The engine head sits on top of the engine block. Together they make the combustion chamber, where fuel and air mix to create power.
Coolant flows through little channels in the engine head and block to keep the temperature right.
If the engine head or block gets a crack, it can break the cooling system.
Cracks let the coolant leak out. With less coolant, the engine can’t work its best.
Why does it happen?
There are a few key causes of cracked heads and blocks:
- Overheating: This puts tremendous stress on the metal components. Repeated overheating episodes can warp and crack the cast iron or aluminum.
- Improper Head Bolt Torque: If the head bolts are overtightened, it can crack the head or block at the bolt holes. Undertightening allows movement that leads to cracks.
- Freeze Damage: Freezing coolant can expand and crack engine components. This is most common with aluminum heads.
- Manufacturing Defects: Imperfections in the casting process can lead to inherent weak spots prone to cracking.
- Excessive Engine Load: High performance applications produce greater pressures that can crack weaker castings.
Where Cracks Occur?
Some common cracks locations in engine head and engine block include:
- Between the head bolt holes/threads
- Freeze plugs and casting core holes
- Cylinder head combustion chambers
- Cylinder walls in the block
- Coolant passages
How to fix?
Fixing an engine head or engine block is quite complex and expensive task that can only be done by a professional mechanic.
For cracked heads, fixing options include:
- Head Repair: A good machine shop can drill out minor cracks at the end, then pin or weld them closed. This repairs localized cracks.
- Straightening: Warped heads can be machined flat again, removing cracks in the process.
- Replacement: Severely damaged heads should just be replaced with remanufactured or new heads. This is the best option for extensive cracking.
Cracked blocks have fewer repair options:
- Pinning/Welding: Only very minor cracks can be pinned or welded closed. This is a temporary fix at best.
- Sleeving: Cylinders with cracks or excessive wear can be sleeved to repair damage.
- Engine Replacement: Full engine replacement is the only sure fix for a cracked block. Used engines or engine rebuilds are options.
6. Air Pockets in The Cooling System Preventing Circulation
Air pockets or air bubbles trapped in the cooling system is a common culprit behind the frustrating issue of losing coolant without any obvious leaks or overheating issues.
This problem typically occurs after cooling system related repairs or maintenance when the system is not properly bled of trapped air.
What Causes Air Pockets in the Cooling System?
There are a few common ways air pockets sneak into the cooling system:
- After Draining and Refilling Coolant: New coolant added to an empty system allows air bubbles to enter. Proper bleeding is required to remove the air pockets. After draining and filling the cooling system, it’s normal for coolant levels to drop over 2 to 3 drive cycles as the system bleeds air.
- Cooling System Parts Replacement: Any repair involving removal of cooling system components like the radiator, water pump, thermostat can introduce air when refilling.
- Loose Hose Connections: A loose clamp or damaged hose allows air to continuously enter the system.
- Poor seal or gasket: A worn-out valve stem cap gasket allows air to enter. A blown head gasket also allows air to escape.
- Coolant Leaks: If your vehicle has a coolant leak, it can introduce air into the system as it draws air to replace lost coolant.
How Air Pockets Lead to Coolant Loss?
The air trapped in the cooling system interferes with proper coolant circulation in several ways:
- Air Pockets Block Coolant Flow: Coolant cannot properly flow into areas containing large air bubbles. This leads to localized overheating.
- Coolant Reservoir Cannot Return Coolant: The air pockets prevent the reservoir from drawing back engine coolant when cooling down. This causes the reservoir level to drop.
- Higher Pressure Allows Coolant Loss: The air pockets increase system pressure, pushing coolant out through loose connections and minor leaks.
Signs of Trapped Air in Cooling System
Watch for these common indicators that point to trapped air reducing coolant:
- Fluctuating Coolant Level: Reservoir level drops significantly then returns back up later once air pockets move.
- Gurgling Noise from Engine: Often heard at idle as air bubbles pass through system.
How to fix?
Bleeding the air from your cooling system is crucial before a fun-filled test drive. But ensure your engine is stone cold first – no one wants blistering burns.
- We’ll begin the process by parking pointed uphill, allowing air bubbles to naturally float up toward the radiator cap.
- Remove the radiator cap to grant access inside.
- Consider using a specialty funnel, designed to prevent messy spills.
- Gently squeeze the radiator hoses, both top and bottom, to help trapped air escape.
- Slowly pour coolant into the funnel’s mouth, enabling air to exit as liquid enters.
- With funnel still attached, start the engine. Crank the heater to high heat/low fan to circulate that coolant and purge air pockets.
- Maintain about one-third funnel fill, monitoring for bubbles surfacing – signs of evacuation success!
- Allow a good 15-20 minutes for normal operating temperature, ensuring the thermostat opens for systemwide flow.
- Check the gauge stays steady and consistent heated air flows from the vents.
- Once confident of an air-free, functioning system, turn off the engine. Squeeze the upper hose to release pressure before carefully removing fittings. Reinstall the cap tightly.
- Funnel any leftover coolant back into its container for later use. Finally, take a test drive and check reservoir levels after cooling. Top off if needed to keep properly filled.
You can also watch below YouTube video to learn more:
7. Damaged Radiator Pressure Cap Unable to Hold Coolant

A radiator cap plays a critical role in maintaining proper pressure and coolant flow in a vehicle’s cooling system.
When functioning properly, the radiator cap forms a tight seal that allows coolant under high pressure to flow to the radiator while also preventing coolant and pressure from escaping.
In a nutshell, the radiator cap has two main jobs:
- Allow excess coolant and pressure to escape: The cap has a pressure release valve that opens to route coolant to the overflow tank once system pressure exceeds the cap’s pressure rating, usually around 15 to 16 psi. This prevents over-pressurization.
- Maintain pressure when closed: The cap’s sealing gasket forms a tight seal against the radiator fill neck when closed, allowing the system to build up pressure. Higher pressure raises the coolant’s boiling point, improving efficiency.
How Can a Faulty Cap Cause Leaks?
There are a few ways a problematic radiator cap can start to cause coolant leaks:
- Weakened pressure rating: Internal wear may cause the pressure release valve to open at lower pressures than designed. This prevents building up enough pressure for optimal efficiency.
- Leaking gasket seal: Small cracks or deformation of the rubber gasket can allow coolant to slowly seep out without opening the pressure valve.
- Loose fitting: If the cap does not fit snugly and correctly on the radiator fill neck, pressure can leak past the defective seal.
- Clogged pressure valve: Dirt and debris can block the pressure release valve from opening fully, again limiting pressure.
- Over years of heating and cooling cycles, the cap components can corrode and degrade, compromising function.
The end result is the cap is unable to maintain the intended 15+ psi system pressure when closed. But because the effects are gradual, this may not cause obvious overheating.
Why Fix a Leaking Radiator Cap?
While a leaking radiator cap may not directly cause overheating, it’s still important to replace it if you suspect problems:
- Prevent bigger leaks: A cap on the verge of failure can suddenly start leaking rapidly, leading to major coolant loss. Better to be proactive.
- Improve efficiency: Proper pressure improves heat transfer and the coolant’s boiling point margin.
- Reduce risk of overheating: As degradation worsens, overheating becomes more likely especially under high engine loads.
- Avoid damage from low coolant: Running low on coolant can damage components like the radiator, water pump, head gasket, and heads.
- Extend coolant life – Loss of coolant through leaks shortens maintenance intervals.
- Minimize costs: Cheaper to replace a $10 to 15 cap now versus a $1,000+ engine repair later if failure eventually causes overheating damage. Make sure that the radiator cap matches the recommended pressure rating for your vehicle.
How To Detect Coolant Leaks?
Let’s discuss several techniques that can help track down hard-to-find coolant leaks.
1. Visual Inspection
The first step is a thorough visual inspection of the engine bay, hoses and components. Look for any white or green residue, drips, splatter marks or crustiness that would indicate dried coolant. Pay close attention to:
- Radiator and hoses: Inspect for wetness, white streaks or stains. Wiggle hoses to check for cracks or soft spots.
- Water pump: Look for crusty buildup or green staining around the water pump and housing.
- Thermostat housing: Check for dried coolant deposits or cracks.
- Head gasket: Look between cylinder head and engine block for leaks.
- Intake manifold gaskets: Coolant can seep externally or mix with oil.
- Oil filler cap and dipstick: Milky oil indicates coolant mixing.
Also, check under the car on the ground for any new stains or puddles that could point to drips. Look along front frame rails, near oil pan and transmission cooler lines.
Note: Keep in mind that coolant/antifreeze comes in orange, pink and green color. Depending on your vehicle, the color of coolant spots can be different.
2. Pressure Testing
If no leaks are visible, rent a cooling system pressure tester from auto parts stores which connects to the radiator or expansion tank. Pressurize the system and watch for pressure drops indicating a leak.
3. Combustion Leak Testing
A combustion leak tester checks if coolant is leaking into the combustion chamber through a blown head gasket or cracked head.
Add the tester fluid to the radiator, run the engine and check for color change indicating exhaust gases in the coolant.
4. UV Dye
Adding UV fluorescent dye to the coolant makes leaks glow under a UV light. Operation is similar to pressure testing to pinpoint the leak source externally.
Glowing stains will be visible with a UV flashlight.
5. Monitor Coolant Levels
Check coolant levels regularly over a period of days or weeks. Mark the level and recheck it after driving. Rapid loss of coolant indicates a leak. Note if heat or A/C performance is affected.
6. Checking Oil Color
Milky oil or coolant sludge contaminating the oil points to coolant getting past seals and mixing internally. Have used oil analyzed to check for coolant remnants.
What Can I Do To Prevent Coolant Loses?
Flushing your cooling system at regular intervals is the key to prevent coolant loses.
Over time, rust, scale buildup and gunk can accumulate inside the engine block, radiator, and heater core. A full cooling system flush can clean all this out:
- Flush at least every 5 years/60k miles, more often for high-mileage vehicles
- Use a radiator flush chemical and distilled water to thoroughly clear out contaminants
- Flushing improves coolant flow and may reveal leaks hidden by deposits
- Can help engine efficiency and heating performance too
The cleaner your cooling system, the lower your chances of corrosion and deposits that can lead to cracks and leaks.
Moreover, always dilute coolant with distilled water for ideal mix and performance. Here’s why:
- 50/50 ratio of coolant to distilled water is recommended for most vehicles
- Distilled water avoids mineral deposits that tap water can leave
- Too much water reduces anticorrosion abilities
- Too little water causes coolant to freeze at higher temps
In addition, coolants come in different colors and formulations. Make sure to use the specific coolant recommended for your make and model.
- Check owner’s manual for your vehicle’s required coolant type
- Using the wrong type of coolant/antifreeze can damage the engine
- Common types: Inorganic green, organic/OAT red/pink, hybrid yellow, European blue
- Mixing different coolant types is a bad idea and can cause gelation
Some First Hand Experiences Shared By Users In Different Communities
Our team conducted research across various online communities, forums, and subreddits to gather user comments and opinions on “dropping coolant levels despite normal engine temp”.
User 1 says:
In my 2014 Jeep Grand Cherokee, the issue was with the coolant temperature sensor housing. It had developed a small crack, probably due to age and heat cycles. This crack was leading to a slow but steady loss of coolant. I found it when I saw a small puddle under the vehicle after it was parked overnight. Replacing the sensor housing stopped the coolant loss.
User 2 says:
My 2017 Hyundai Sonata had a similar issue. After noticing the coolant level dropping, I inspected the hoses and found a small pinhole leak in one of the radiator hoses. It was so small that it would only leak under high pressure and heat, making it hard to spot. Replacing the hose fixed the issue for me.
User 3 says:
I own a 2016 Nissan Pathfinder. The issue with mine was a bit tricky – it turned out to be a leaking intake manifold gasket. The coolant was slowly leaking into the intake manifold, causing a slow drop in the coolant level without any signs of external leaks. A mechanic conducted a pressure test and found the issue. Replacing the gasket solved it.
User 4 says:
I drive a 2013 Subaru Outback and faced a similar issue. After checking for leaks and finding none, I suspected the heater core. There was a slight antifreeze smell inside the cabin, and my windows would fog up without reason. It was a small leak in the heater core. The repair was a bit extensive due to the location of the heater core, but it fixed the coolant loss.