
Car Keeps Killing Alternator: How It Goes Bad?
A car’s alternator repeatedly failing likely indicates an underlying electrical issue like a strained battery not holding charge, wiring faults causing shorts, excessive add-on loads from too many accessories overworking the system, loose drive belts that can’t properly spin the alternator, fluid leaks near the alternator shorting it out prematurely, or worn parts like brushes, diodes and voltage regulators that need fixing or replacing in the alternator itself which is simply wearing out from mechanical failure.
Having car trouble again? An alternator that continually fails can leave you stranded and facing expensive mechanical bills. This alternator burning has some simple fixes to try before spending money. In this guide, we’ll walk through possible culprits like loose connections and failing diodes behind the repeatedly burning alternator to get your ride back on the road.
If you have got new alternator but it is not charging battery, you can read my guide on that topic.
For smooth operation of the alternator, the voltage across battery terminals should be between 13.5 and 14.2 while the engine is running at idle and the lights are off.
If the voltage across the battery is less than 13.5V wih lights on, it means the battery will be undercharged. If the voltage across the battery is greater than 14.2V, it means the alternator is overcharging the battery. Either case will kill or burn out the alternator.
To promptly discuss the causes of a persistently burning car alternator, I will directly present them in the next section. However, I strongly advise visiting the subsequent section of this guide before that, which provides an explanation of the alternator. This is crucial to comprehend the underlying physics involved, such as the excitation of the alternator’s field coil to generate electricity and the various components including the diode rectifier, voltage regulator, stator, and rotor.
- A car repeatedly burning out its alternator often indicates underlying electrical problems like bad battery, loose connections, overloads, leaks, bad grounds, or worn components.
- Proper diagnosis requires methodically checking battery health, electrical connections, wiring, loads, grounds, tension pulleys, fluid leaks near the alternator and components like the voltage regulator and rectifier diodes.
- Fixing leaks, cleaning connections, replacing damaged wires, adding grounds, adjusting accessories, and tensioning belts can help prevent alternator failure.
- Understanding excitation principles and role of components like the rotor, stator, regulator and rectifier helps troubleshoot root causes of failure.
What is My Personal Experience Car Repeatedly Burning Out Alternator?
My cousin drives an older model Toyota Camry. It started having trouble starting up and the battery light came on. I helped him troubleshoot by testing the alternator with a multimeter. It was only outputting 11 volts, way too low.
We replaced the alternator but that didn’t fix it. Turns out the battery cable connection was corroded. Cleaning the connection and securing it tightly solved the problem. Proper diagnosis and checking all system components is key to finding the root cause.
What are the Causes of Repeated Failure of Alternator in a Car?
Here are the causes of vehicle keeps destroying the alternator:
1. Weak Battery Overloading the Alternator
The battery in your car works like a storage tank, holding electricity made by the alternator.
The alternator makes electricity to recharge the battery. The battery helps control how much electricity flows from the alternator.
When the battery is old and weak, it can’t hold much electricity. So it can’t limit the electricity trying to fill it back up.
A healthy battery gets full and stops more electricity from going in. This makes the amperage output from the alternator will drop to close to zero, while the voltage will remain at 13.5 to 14.5.
What Happens With a Weak Battery?
A weak battery can’t hold a charge well. So it can’t give the car backup electricity when needed.
The alternator has to work extra hard to make up for the weak battery. It sends lots of electricity to recharge the battery. All this extra work overheats the alternator, and sometimes it breaks down.
Pumping out so much extra electricity is hard on the alternator. Parts inside wear out faster than normal.
The voltage regulator can also get damaged from pushing too much power through the system. This leads to unstable electrical flow, harming the alternator and other parts.
In simple terms, think of the alternator as a water pump, and the battery as a tank. If the tank leaks and drains quickly, the pump strains to keep refilling it. That’s what a weak battery does.
How to tell if a vehicle battery is weak?
- If your car does not start at all or makes a clicking sound when you turn the key, it is likely that your battery is dead or very weak.
- If your car starts fine but dies after running for a while, especially when you turn on more accessories, it is likely that your alternator is failing or not charging your battery enough.
- If your car’s interior lights dim or flicker when you rev up or idle down your engine, it is likely that your alternator is not producing enough power or has a loose connection.
- If your car’s dashboard shows a red battery warning light or a check engine light, it is likely that there is a problem with your electrical system, either with your battery or your alternator.
- If you have access to a voltmeter or a multimeter, you can measure the voltage of your battery and your alternator to check their condition. A fully charged battery should have around 12.6 volts when the engine is off, and around 14 volts when the engine is running. An alternator should produce between 13 and 14.5 volts across the battery when the engine is running. If these values are lower than normal, you may have a bad battery or a bad alternator.
- Look for any signs of corrosion or damage on the battery terminals. Corrosion appears as a white, powdery substance on the terminals. If you notice extensive corrosion or loose connections, it could be affecting the battery’s performance.
2. Corroded or Damaged Battery Cables Hindering Proper Power Transfer to Electrical System
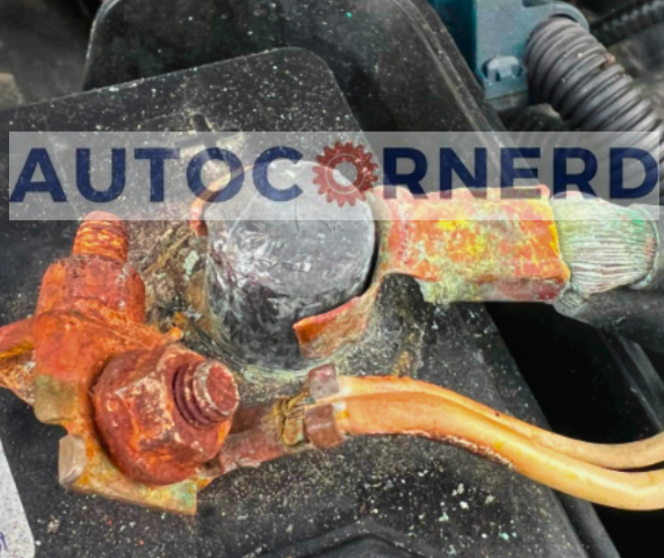
Battery cables supply the electric current for your car’s many components. A high-quality cable ensures even flows without resistance so the alternator isn’t overburdened trying to compensate.
Faulty cables cause fluctuating voltages that overwork and eventually kill the alternator. Overcharging overheats it; undercharging drains the battery until it fails.
Loose battery clamps cut power intermittently, creating spikes and dips. Frayed insulation exposes wires to shorts and electrical arcing. Both ultimately damage electrical systems.
Overloading draws more power than the alternator puts out. Excessive current overworks the alternator beyond capacity. Like an overpacked backpack, eventually it breaks down.
How to test a bad battery cable or connection?
By performing a quick voltage drop test, you can check for issues along the electrical pathway from your battery to avoid headaches down the road.
The key is using a multimeter to measure voltage directly at the battery and compare it to the reading at the other end of the cable. Any significant difference indicates the wire or its connection is allowing voltage to leak – similar to a worn hose dripping water before it reaches your spigot.
To start, connect the multimeter leads directly to the battery posts and note the reading – likely around 12.6 to 12.8 volts for a fully charged 12-volt battery. This gives your baseline measurement.
Next, keeping one lead on the battery terminal, touch the other to the contact point on the cable’s connector. If properly mated, it should show nearly identical voltage as the baseline. But corrosion or loose fittings create resistance that lowers the voltage before it even leaves the battery.
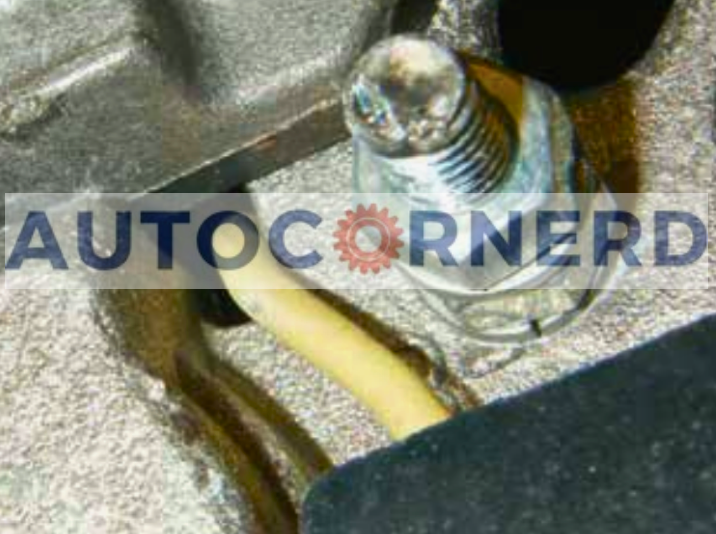
Note: Don’t forget to also check the cable that goes form the B+ terminal on the alternator to the positive terminal of the battery.
3. Faulty Ground Connections Resulting in Voltage Irregularities and Alternator Failure
The electrical loop starts at the point where the battery’s positive cable connects to the alternator or device circuits. It then passes current through the various electrical components before returning to the battery’s negative terminal. This completes the circuit loop.
A quality ground connection serves multiple crucial functions:
- It enables smooth operation of electrically-powered components. Without a ground return path, the alternator and devices would simply not work.
- It prevents disruptions, spikes, noise, and strain on the charging system. Proper shielding and grounding directs electrical current along the intended paths.
- It provides a reference point, allowing components to detect and react to voltage changes. The ground connection facilitates this by giving a baseline 0V reading.
In automotive electrical systems, the chassis and body components often double as convenient grounding points.
A main ground cable can simply be run from the battery’s negative terminal to any bare metal section of the frame or engine block. This leverages the conductive properties of the vehicle structure itself to complete the loop.
Typical ground connection points in a vehicle include the engine block, chassis, transmission casing, and firewall. But the exact locations vary across different makes and models. Always check the factory service manual for ground cable routing diagrams showing the required ground bolt locations.
Notably, the alternator grounds through its mounting points to the grounded engine block. So you may not find a dedicated ground wire for the alternator itself.
In the below video, you can see all possible ground connections in a vehicle:
How bad grounds affect the alternator?
The alternator may struggle to work properly without the right amount of current. Weak ground connections can stop it from getting what it needs.
What happens with bad grounds? The alternator can get damaged in a few key ways:
- Voltage Drop Without enough voltage, the alternator won’t produce electricity well. Like a tired runner, it slows down. This steady strain wears it out over miles of driving.
- Too Much Heat: A loose ground connection forces the alternator to overwork. It’s like sprinting every minute of a marathon. All this extra effort generates extreme heat inside. Key parts get damaged bit by bit.
- Unsteady Charging: Bad ground connections give the battery irregular charges. It might get overfilled or run low at random. This back-and-forth strains both the battery and alternator.
How to spot the bad ground that is killing the alternator?
Firstly, the bad ground might show a burning sign on the ground bolt. Furthermore, you can also see signs of corrosion and rust around the ground bolt area.
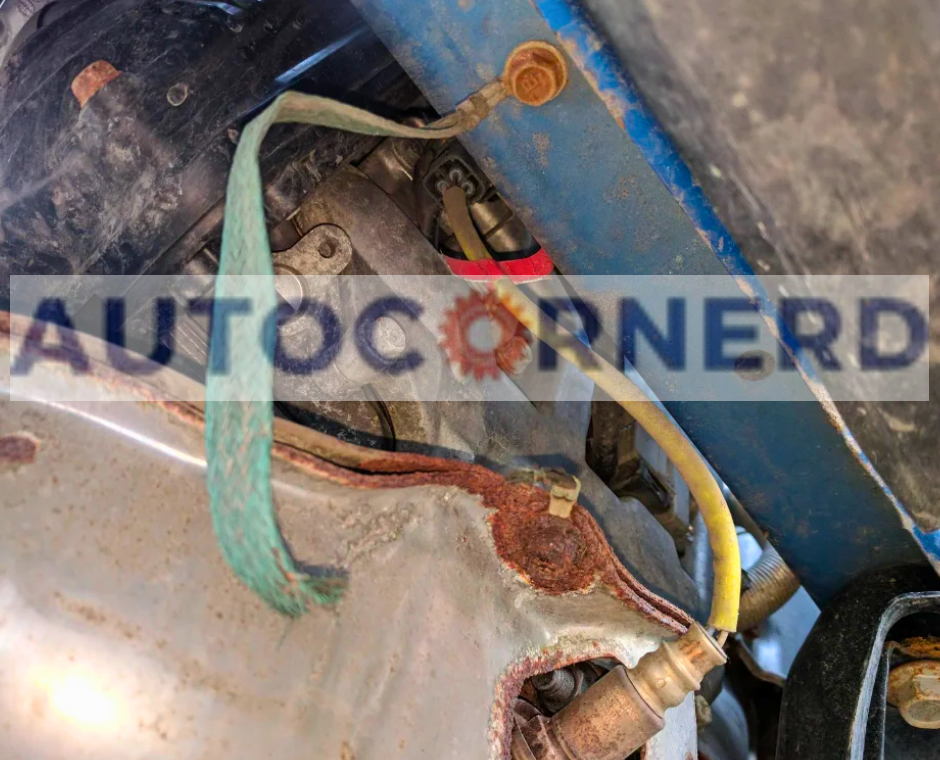
Vehicles also have a ground strap that bridges the gap between various parts of the vehicle’s chassis, ensuring a continuous ground connection.
A disconnected ground strap won’t deliver power where it’s needed. Let’s check your ride’s grounding health in 3 simple steps.
- First, locate your alternator’s ground bolt, typically connecting it to the engine block. Clean any grime to ensure solid contact. We’re troubleshooting, not mudding!
- Next, with engine off, attach the multimeter’s negative lead to the ground bolt and positive lead to battery’s positive terminal. Note the voltage reading – it should match battery’s resting potential.
- Now fire up your engine. Voltage rises thanks to that handy alternator, usually 13.7-14.7 volts. Retest voltage at the ground bolt. A 0.4+ volt drop could mean issues in that ground zone.
- Inspect all straps and ground bolts between chassis parts for fraying or looseness. Any faults found must be uprooted and replaced.
How to fix?
Corrosion and debris can build up on the surfaces where ground bolts and ground straps connect. This blocks the flow of electrical current. Use a wire brush or sandpaper to clean the connection points. This will allow electricity to flow freely.
When putting the electrical parts back together, tighten the ground bolt screws fully. Loose screws lead to resistance. This can cause the alternator to fail over time.
After cleaning and tightening, put a thin coat of dielectric grease on the metal. The grease blocks corrosion and aids conductivity.
Replace any ground bolt that is damaged or burned.
Sometimes it helps to add extra ground straps. This spreads out the flow of electricity better.
In some cases, adding additional grounding points can help distribute the electrical load more evenly. This can be achieved by installing an extra ground strap.
4. Fluid Contamination of Alternator Windings Compromising Insulation and Short-Circuiting Components
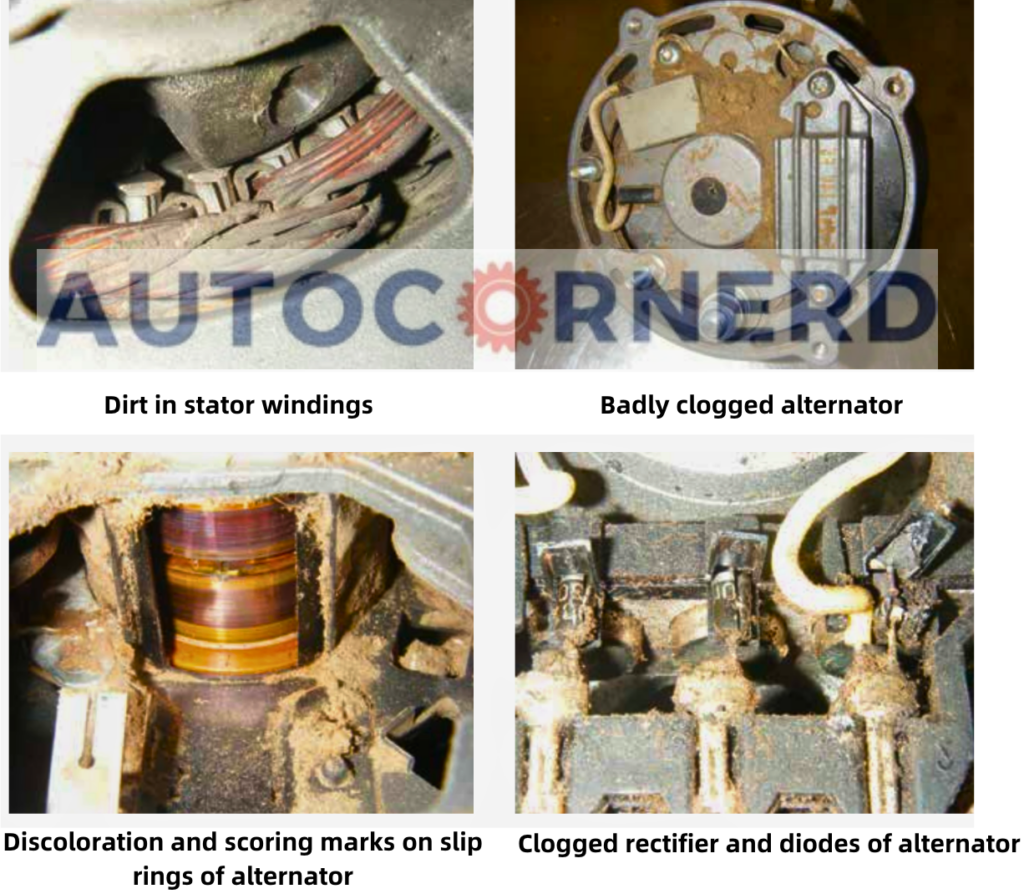
The mix of foreign substances both outside and inside alternators is called contamination.
When fluids from outside sneak into the alternator, they can cause all sorts of troubles, making the car repeatedly burn out and kill its alternator.
Firstly, the fluids can lead to rusting and corrosion of the inner alternator parts. This increases resistance and lowers efficiency. It strains the alternator, making it work harder until it eventually fails.
Additionally, external fluids can cause electrical shorts. Their conductive properties mess up the flow of electricity inside the alternator.
This can lead to irregular voltage output and fluctuations. As a result, the car’s electrical system malfunctions since the alternator can’t provide the power needed. This leads to repeated failures and a dead battery.
Spotting contamination in an alternator is key to avoiding big issues. Here are some common signs of a contaminated alternator:
- No or insufficient output: Contamination disrupts electricity flow, decreasing power output or causing complete failure.
- Odd noises: Heavy contamination can cause mechanical friction and abnormal sounds.
- Rough ball bearing operation: Contaminants interfere with ball bearing lubrication.
- Discolored windings: Poor heat dissipation leads to discolored copper windings and cables.
- Worn carbon brushes and slip rings: Contaminants quicken wear on these parts, shortening their lifespan.
- External dirt: An encrusted or visibly dirty outside points to contamination.
You should especially check the power steering fluid as the alternator lies closer to it. One person found that the steering fluid of his vehicle was continuously leaking which was burning out its alternator.
Why does alternate contaminate and how contaminated alternators are impacted?
Here is how alternators are contaminated and they are affected:
- Dust and environmental contaminants: Dust and debris from the environment can accumulate on the alternator, hindering its performance.
- Liquid ingress: Leakage of oils, fuel, coolant, power steering fluid, or bearing grease can lead to increased adhesion of dust and contaminants, exacerbating the problem.
- Reduced heat dissipation: Contamination obstructs the cooling airflow around the alternator, causing thermal overload and damage to its components.
- Ball bearing thermal overload: Contaminants can reduce the bearing’s load-bearing capacity, leading to potential damage to the ball tracks.
How to fix?
Check if any coolant is continuously leaking from the engine, especially engine oil and coolant. If yes, then you have to fix the leak first before replacing the alternator.
5. Misaligned or Loose Alternator Pulley Assembly Errors Increasing Mechanical Resistance
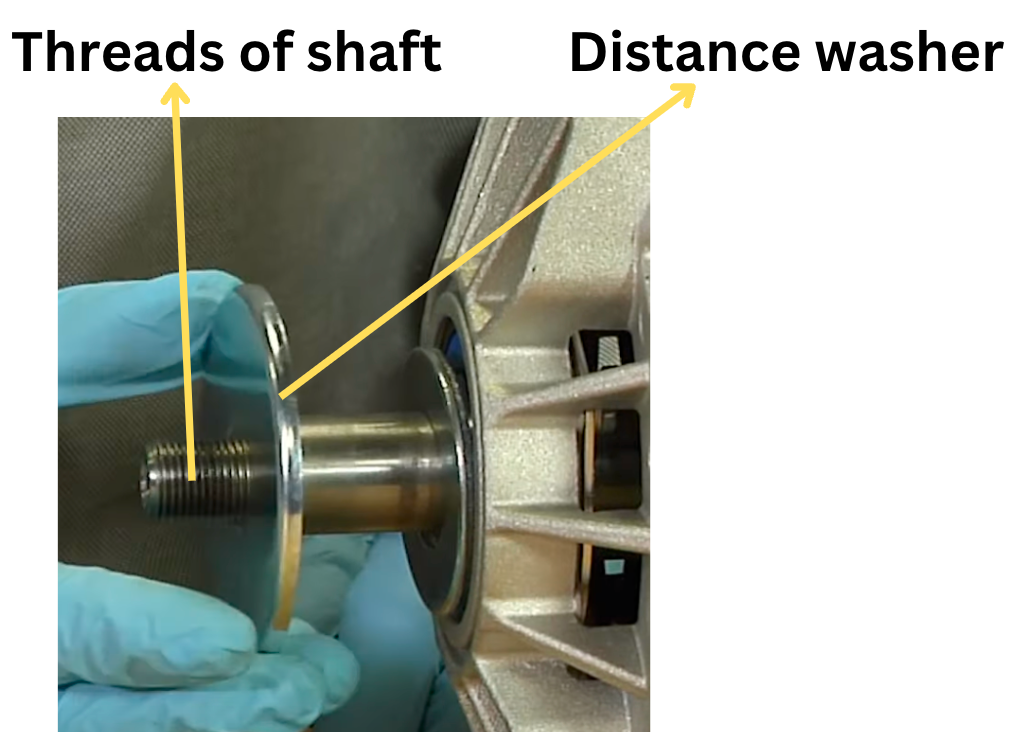
One possible reason for your car’s alternator repeatedly failing is assembly errors related to the alternator pulley.
Some findings suggest that the thread of the shaft may become damaged or torn off, leading to issues with the alternator’s performance. This can occur when the belt pulley nut is tightened with excessive torque or using an impact wrench in an uncontrolled manner.
Visible wear of the shaft near the ball bearing and grinding marks on the stator can be observed when the nut of the alternator pulley is loose.
This can result in the alternator providing no output, noise, battery charge indicator lights illuminating, loose belt pulley, and wear on the thread and rotor.
How to fix?
When you install an alternator pulley over a shaft, never use a hammer to push the pulley as it will damage the shaft threads. Always slide the pulley by hand. Ensure that the shaft is fastened properly with the prescribed torque for the belt pulley nut using the impact wrench.
Moreover, if you don’t install a distance washer while installing the pulley over the shaft, the alternator bearing will not fasten tightly to the shaft.
This will increase play between the alternator shaft and the bearing on which the alternator is supported and rotating. This will cause the rotor to rub against the stator. The laminations of the stator will damage and cause a short circuit which will burn out the rotor.
Note: Alternators designed for a particular engine require the correct pulley to be installed. These pulleys may possess multiple grooves or a solitary V-type design.
6. Defective Silicon Diode Rectifiers Hindering Proper Voltage Regulation in Alternator
A vehicle’s electrical system relies on the alternator and rectifier working in tandem. The alternator generates alternating current (AC) electricity which the rectifier converts to direct current (DC) to charge the battery.
In older vehicles, these components were separate. When the rectifier’s diodes fail, the alternator takes the brunt of issues like:
- Surging Voltage Ripple: Healthy diodes ensure smooth DC output from the alternator to electronics and battery. Bad diodes cause voltage spikes and dips that strain delicate car parts.
- Battery Overcooking: Excess current overcharges the battery, accelerating wear and fluid loss. An extremely hot battery resists proper charging, risking the alternator.
- Battery Starvation: Weak rectifier diodes can’t fully convert enough electricity to sufficiently charge the battery. This dwindling energy source strains the whole system, especially the hardworking alternator.
In addition to the above, a bad diode in the rectifier of the diode can also drain the battery when the engine is off, which will cause additional strain on the alternator.
How a bad rectifier diode causes current leakage from the battery?
A diode ensures current only flows from the alternator to charge the battery, not backwards. This prevents parasitic battery drain when the engine turns off.
Within each diode is a special barrier made from positively-charged (P-type) and negatively-charged (N-type) semiconductor materials. This PN barrier blocks any reverse current flow, like a solid wall.
However, defects can damage this vital diode wall. The barrier breaks down, providing an open passage for reverse leakage. Current now drains from the battery, zapping your starting power. This backward flow also hurts the sensitive alternator parts.
In short, a single failed diode destroys the one-way valve effect, enabling current to sneak backwards. The resulting battery and alternator damage emphasizes why diodes serve such an indispensable role – when functioning properly, they are the gateway guards of your vehicle’s electrical flow.
How to test a bad rectifier of the alternator?
To test a rectifier of the alternator, you have to basically check whether a diode is allowing current in the reverse direction i.e. from B terminal on the alternator back to the alternator casing. If it is, it means the rectifier is bad.
For better understanding, I found the following youtube video of testing an alternator rectifier really helpful.
7. Bad Electrical Connection Of B+ Terminal Of Alternator Causing Erratic Voltage and Overheating
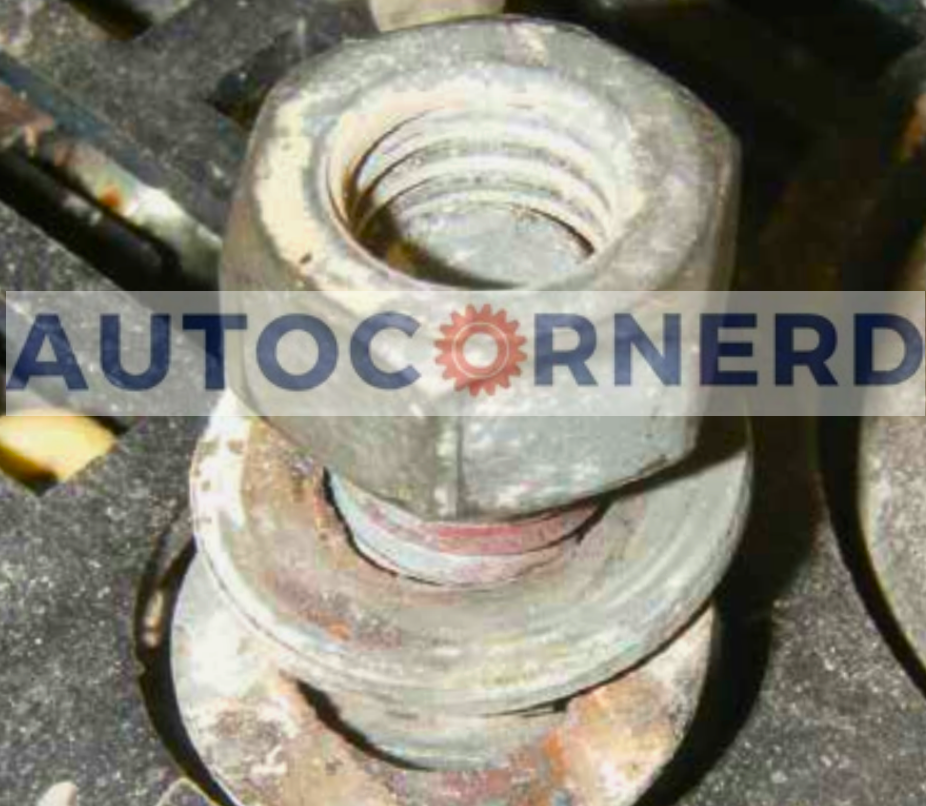
The ‘B’ terminal is the biggest terminal on the alternator that is directly linked to the battery to transfer the current and charge it.
A loose nut at connection B+ can cause burning marks and melting on washers, nuts, and terminal studs. Insufficient charging of the vehicle battery and discoloration/burning of terminal stud B+ may also occur.
Incorrectly tightened or loose nuts can result in contact resistances, increased component temperatures, and electric arcs. Ultimately, this will cause repeated burning of the alternator.
8. Damaged Voltage Regulator unable to Control Alternator Output as Per System Demand
Like a rectifier, a voltage regulator (discussed in the later section) can also be separate or built-in, depending on the make and model of your vehicle.
Usually, the voltage regulator has the following three terminals:
- S terminal: This terminal is connected to the B+ terminal on the alternator to sense the battery voltage
- IG terminal: This terminal is connected to the ignition switch to get an initial DC current from the battery to excite the field coil of the rotor
- L terminal: This is optional and for the battery lamp on the dashboard
A faulty voltage regulator can cause your alternator to fail in two ways:
- By undercharging the battery: If the voltage regulator does not send enough voltage to the battery, the alternator will have to work harder to keep up with the electrical demand of the car. This can cause the alternator to overheat and wear out faster.
- By overcharging the battery: If the voltage regulator sends too much voltage to the battery, the alternator will also overheat and may produce sparks or smoke. This can damage the internal components of the alternator and cause it to stop working.
You can watch the following video to test the voltage regulator of the alternator:
9. Worn Out or Tight Serpentine Belt Increasing Mechanical Resistance and Overworking Alternator
A flexible serpentine belt loops around several spinning pulleys, transferring power from the crankshaft to critical systems like the alternator, power steering, AC compressor and water pump. Also called the drive belt or accessory belt, the serpentine belt keeps your engine’s heartbeat pumping.
The serpentine belt relies on a device aptly named the belt tensioner – a spring-loaded pulley that ensures the belt has just the right tension.
Get that tension too loose and the belt slips or squeaks in protest. Too tight and it stresses pulleys and bearings – potentially leading to overheating issues or premature wear. Like any mechanical component, the tensioner can fail or be incorrectly set.
Much like an overly tightened guitar string, an excessively taut serpentine belt strains more than it should. The amplified tension taxes the alternator pulley and bearings in particular.
Signs something is too snug include:
- Incorrect Belt Size/Type: Using a belt that is too short stretches it tightly across pulleys. Each engine has serpentine belt length specifications.
- Faulty Installation: Skipping pulleys or disregarding the routing diagram over-pulls the serpentine belt. Proper diagram following avoids this issue.
How to spot the cause?
When installing a new serpentine belt, start by verifying you have the manufacturer-recommended size. An improperly sized belt can lead to slipping and wear.
Next, inspect the tensioner pulley for damage or play. If the pulley bearing is worn or the spring is compromised, replace it. A faulty tensioner pulley causes inconsistent belt tension.
Also, confirm the tensioner pulley nut torque matches specifications. Overtightening strains components leading to premature failure.
Once installed, check belt tension with the engine off. Use the 90 degree twist or 1/4 inch depression tests between pulleys to confirm tension is within tolerance. Proper tension prevents slippage and enables smooth performance.
10. Recycled or Inferior Alternators with Substandard Components Causing Premature Failure
When that ominous battery light flickers on the dash, many car owners face the prospect of an expensive alternator replacement. However, there may be a more budget-friendly option: aftermarket alternators. But are these cheaper replacements truly a wise investment for your vehicle? Let’s examine the pros and cons.
Aftermarket alternators promise substantial cost savings over pricier OEM parts. Many are refurbished units, with only worn components like brushes and bearings replaced. Unfortunately, this selective repair means underlying issues may persist, prompting premature failure down the road.
Inferior build quality also plagues some aftermarket models, constructed with subpar materials prone to overheating, poor voltage regulation, and rapid wear. Such unreliability frequently leaves drivers stranded with defunct electrical systems.
Additionally, dubious compatibility with your car’s intricate electrical network threatens proper performance. If the alternator’s amperage rating differs from the original, persistent malfunctions often result. This mismatch may also damage connected components across this intricately linked system.
11. Overuse of Power Hungry accessories Overloading the Alternator Capacity
Adding cool accessories like loud speakers, extra lights, or power gadgets can strain your car’s electrical system. These amped-up add-ons draw extra juice from the alternator. Like a marathon runner pushed past the limit, the alternator gets overworked and may fail early.
Even as your ride ages naturally, the wires can fray and insulation break down. Connectors come loose. Resistance increases throughout the electrical system. This makes it tough for the hardworking alternator to deliver power efficiently.
When tricking out your ride, proper installation is key. Use the right wiring, fuses, and relays to handle the electrical load. Otherwise, you’ll be stuck on the side of the road with a smoked alternator.
Upgraded stereo? Ground it properly so the system doesn’t go to pieces.
Bumping up the volume? Choose an alternator with enough amps to pump up the power. Match the power output to the stereo demands, or risk blowing it out.
When upgrading your stereo, calculate the wattage available to avoid fried equipment:
- Alternator amps x charging voltage = total available watts
For a 65 amp alternator charging at 14.4 volts that’s: 65 amps x 14.4 volts = 936 watts
- Subtract 40% from available watts for standard vehicle components:
936 watts x (100% – 40%) = 561 watts for audio
- Factor in amplifier efficiency (often 80%):
561 watts x 80% efficiency = 448 watts safe stereo power.
Exceed your electrical system’s limits and you’ll face fading music, excessive heat, and eventual failure as your battery and alternator cry uncle.
Principle Of Excitation In Car Alternator
The production of a magnetic field by the rotor in an alternator can be a somewhat intricate process.
As the alternator’s main objective is to generate electricity, it may be puzzling to comprehend how the rotor manages to create a magnetic field. Well, the rotor of the alternator needs to be initially excited to produce a magnetic field.
“Exciting” the alternator means starting the process of producing electricity. It’s like waking up the alternator and saying, “Hey, it’s time to work and make some power for the car!”
An initial electric current flow (also called magnetizing current) is needed to excite the field coil of the rotor and produce a magnetic field when you turn on ignition switch.
If no electric current is provided to the field coil, it will not generate a magnetic field and induce a voltage in the stator. In order to shed light on this matter, I will delve into the intricacies and provide a comprehensive explanation.
The alternator gets “excited” when we send a little bit of electricity (from the car’s battery) in the form of DC current to this rotor. We can consider this rotor like a little magnet that spins around really fast.
As you turn on the ignition, initially, the DC current from the battery flows to the carbon brushes. When the rotor of the alternator rotates and slip rings pass by the carbon brushes, a small amount of DC current flows to the rotor. This energizes the rotor, due to which it produces a magnetic field.
Once the rotor of the alternator starts producing a magnetic field, the current to the field coil i.e. excitation is regulated by the voltage regulator.
Note: You might be thinking why car alternators don’t use permanent magnets as a rotating field coil of the rotor inside the magnetic field of the permanent magnet produces electric current as well, so, there won’t be a need to excite the field coil.
The answer is that alternators with permanent magnets are difficult to regulate as there will be a constant supply of the same current and voltage due to permanent magnets.
Understanding The Working Of Alternator
The alternator is an electromechanical component in vehicles that is responsible for charging the battery while the engine is running. The alternator is run via a serpentine belt which transfers power from the engine’s crankshaft to the alternator pulley.
As a result of mechanical energy from the engine, the magnetic coil inside the alternator rotates that generate electrical energy. This electrical energy is responsible for charging the battery.
An alternator consists of several crucial components, each playing a specific role in the generation and regulation of electrical power. The main components are as follows:
- Rotor Assembly
- Stator Assembly
- Rectifier or Diode Trio
- Voltage Regulator
Rotor Assembly

The rotor, driven by a belt pulley system, contains an electromagnet known as field windings. The field windings are wound on an iron core. The field winding is surrounded by claw-type iron poles.
Each end of the rotor field winding is attached to slip rings. Stationary brushes are conductive carbon or copper parts that make direct contact with slip rings. These brushes are stationary because they do not rotate with the rotor but remain fixed inside the alternator.
Stator Assembly
The stator is where the induced voltage from the rotor is collected. The stator’s three coil windings are spaced evenly around the iron shaft, producing three AC voltages that are 120 degrees out of phase from each other. This is also called three-phase AC voltage.
Rectifier
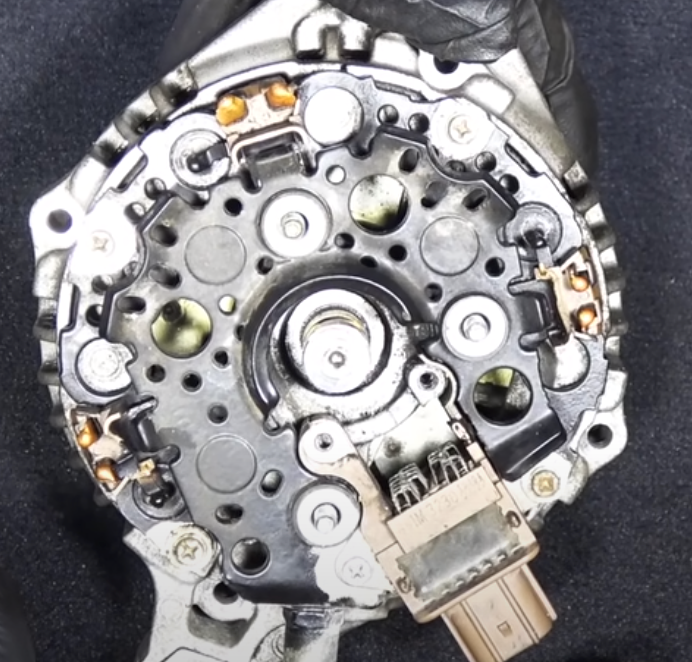
In the above image, the circles you see are diodes of the rectifier of the alternator. The AC voltage from the stator is converted into DC (direct current) voltage using a rectifier that consists of a series of 6 diodes. This ensures a stable and constant power supply to charge the battery.
After the current is converted to DC by the rectifier, it flows to the positive terminal of the battery from the B terminal on the alternator.
Voltage Regulator
A voltage regulator an eye on the battery’s voltage level. Its job is to adjust the alternator’s output to prevent overcharging or undercharging the battery.
Let me explain how the voltage regulator monitors and controls the alternator in simple terms:
The alternator generates electricity using motion of rotor and current flowing through the field coil of the rotor. As its inner rotor spins faster, it creates more voltage. The stronger the magnetic field from the rotor’s coil, the higher the voltage too.
When you accelerate the engine, the alternator’s rotor spins faster, boosting the voltage. After initial excitation from the battery, the alternator powers its own coil through diodes.
The diodes act like a rectifier, converting the alternating current into direct current to energize the rotor coil.
Here’s where the voltage regulator steps in to oversee the charging. If the battery voltage drops below 13.5V, it switches on the current to the alternator coil to ramp up charging.
Conversely, if the voltage climbs over 14.5V, it cuts off the power to prevent overcharging the battery.
Some Tips for Maintaining the Alternator
An alternator has many moving parts that can wear down over time. Regular inspection during routine maintenance allows you to spot any signs of damage early. Address issues promptly to avoid bigger problems down the road.
Proper cooling prevents the alternator from overheating, which is a common cause of premature failure. Ensure the car’s cooling system is in good working order. The serpentine belt is critical for powering the alternator, so confirm it is correctly tensioned. Belt slippage robs the alternator of efficiency.
The battery and alternator have a symbiotic relationship. Caring for the battery equals caring for the alternator. Inspect battery terminals periodically and clean as needed. Keep the battery fully charged at all times.
Electrical connections must be clean and tight. A loose connection causes voltage drop that strains the system. Avoid overloading the electrical system when the engine is off, as this also taxes the alternator and drains the battery.
Symptoms Of Repeated Failing Alternator
- Battery voltage drops suddenly while driving.
- Alternator emits a whining noise.
- Car remains drivable for a short period before dying at idle.
- Dashboard functions stop working when voltage drops to 9 volts.
- Engine eventually dies out for good.
Final Thoughts On Car Burning The Alternator
An alternator that constantly fails can leave you stranded and quickly drain your wallet. Tracking down the real culprit takes time and determination.
Many gremlins can cause an alternator to fizzle out again and again. Battery problems, faulty wiring connections, busted components – all can play a part.
Carefully testing each section of the system with a multimeter and scrutinizing for issues like corrosion uncovers valuable clues. In the end, sticking with it and methodically troubleshooting solves the mystery.
Grasping how the alternator and electrical system work together is your best weapon against repeat failures. With understanding and grit, even the sneakiest alternator troubles can be uncovered.
Some First Hand Experiences Shared By Users In Different Communities
Our team conducted research across various online communities, forums, and subreddits to gather user comments and opinions on “car’s alternator keeps needing replacement”.
User 1 says:
n my case with a Subaru Outback, the alternator was failing due to a leaky power steering fluid hose that dripped onto it. Replacing the hose and the alternator solved the problem.
User 2 says:
My Jeep Grand Cherokee had a similar issue. It was caused by a weak ground connection to the alternator. Improving the grounding fixed the alternator burnouts.
User 3 says:
Chevy Equinox owner here. Found out my alternator issue was due to a failing idler pulley. It wasn’t spinning freely, causing excess wear on the alternator. Replaced the pulley, and no more issues.
User 4 says:
On my Hyundai Santa Fe, the alternator kept dying. Turns out, the serpentine belt was too tight, putting extra strain on the alternator bearings. Loosening the belt fixed it.
FAQs
What are the signs that indicate my car’s alternator is failing?
Some common signs of a failing alternator include dimming or flickering lights, a dead battery, strange noises, and electrical failures.
How long does an alternator typically last?
The lifespan of an alternator can vary depending on various factors, including the make and model of the car, driving conditions, and maintenance. Generally, alternators can last anywhere between 80,000 to 150,000 miles or 7 to 15 years.
Why does my car keep killing the alternator?
There could be several possible reasons for your car repeatedly killing the alternator. Some common causes include a faulty voltage regulator, a short circuit in the electrical system, excessive electrical load, or a defective alternator itself.
How can I determine if my alternator is being killed by my car?
If your alternator keeps failing frequently, you may notice warning signs such as dimming headlights or interior lights, a dead battery, difficulty starting the engine, or the battery light illuminating on the dashboard. These symptoms indicate potential issues with the alternator.
Can a faulty battery cause the alternator to fail?
Yes, a faulty battery can potentially cause stress on the alternator and lead to its premature failure. If the battery is not functioning correctly, it may not hold a charge or may draw excessive current from the alternator, putting unnecessary strain on it.