
New Battery New Alternator Still Not Charging (Quick Fix!)
New battery new alternator still not charging? Here are the reasons why a new battery of the car is not being charged by a new alternator:
- Check the battery terminals for corrosion and loose connections.
- Check the continuity of cables connected to the battery
- Check the fuse of the alternator
- Check the voltage regulator to see if there are problems with the charging system.
- Check the alternator belt and pulley for proper fit.
So, you just managed to install a new alternator and a new battery in your car. But still, your car’s battery won’t charge.
If the battery has a low charge, then your car will not start. In this guide, I will share some useful tips that can help you solve the problem of a new car battery not being charged.
What are Causes of Car Battery Dying Quickly Despite of New Alternator and Battery?
Let’s discuss the causes and solutions of vehicle not being charged after installing new alternator and battery.
1. Blown Fusible Linkage Causing New Alternator Not Charging Battery
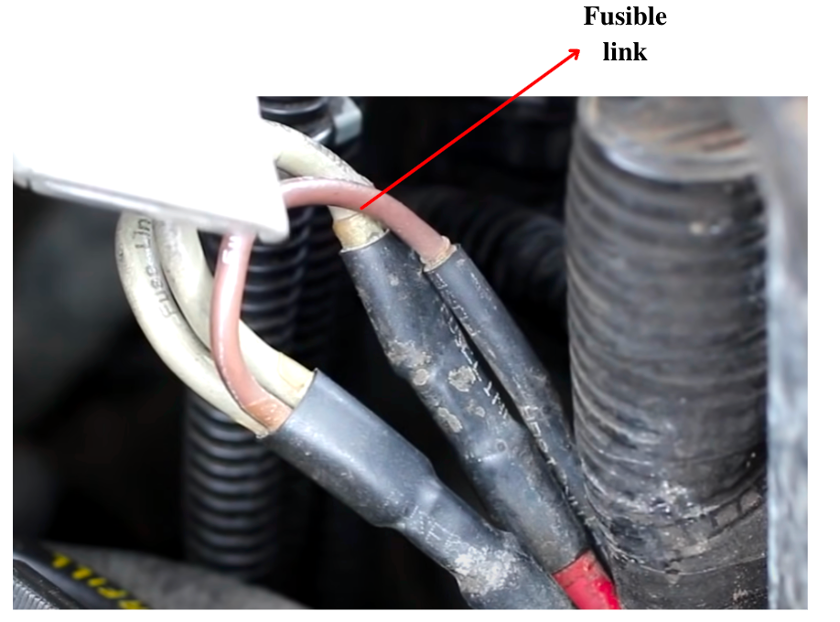
Some vehicles have a fusible link found under the hood of your car between the battery and alternator.
The fusible link is made of wire that is four gauges higher (smaller) than the rest of the circuit. It is usually red or green in color. Due to a thin wire, a fusible link will not be able to transfer a large current, and thus, it is used as a safety device in the vehicle’s electrical system. In the picture below, the green color wire is a fusible link.
A fusible link is a wire that protects electrical wiring from damage due to overload or short circuits. The fusible link protects the wiring from the battery to the alt and other fuses.
The fusible link consists of large strands of a wire wrapped in a fireproof covering. They are thinner than the vehicle’s wiring harnesses they’re connected to.
Fusible links are placed inline between the delicate wiring harnesses and large sources of electrical current in your car i.e. between the battery and alternator.
When a fusible link goes out, it could mean that there’s a short circuit somewhere in the car. The fusible link will melt and disconnect the battery from the rest of the car.
How to detect?
A melted fusible link can be a bit tricky to detect because the wire will melt, but the insulation may appear unaffected.
Follow these steps to test the blown fusible link:
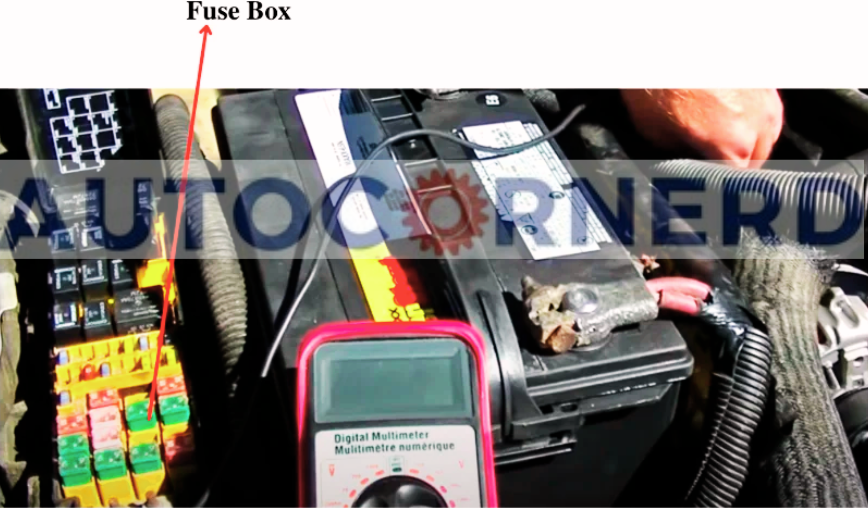
- Open the bonnet and find the fusible link with the help of the schematic diagram in the vehicle’s service manual.
- Put positive probe of ohmmeter on the B post on the alternator and the negative probe on the plate on the fuse box. The reason for putting the second probe of the ohmmeter on the fuse box is that it comes after the fusible linkage system i.e. right before the battery. So, if fusible linkage has no fault, the resistance on the ohmmeter will be close to zero.
- Also, measure the resistance between the battery negative post and the engine block. It should also be close to zero. If it is more than 1, chances are that the fusible link has blown out.
- Lastly, visually inspect that the wiring to the fuse link is not corroded or shitty.
Note: When doing ohms, make sure there is no k or M showing on the display because a reading of say 0.276 with the M showing means 276,000 ohms.
To replace the fusible link, check out the below video:
2. Blown Fuse Causing Battery Not Charging
Much like a circuit breaker in your home, the car fuse box is an essential protective device, located under the hood near the battery. It shields vulnerable components like the engine control unit, cooling fans, and battery from excessive current flows that can damage their sensitive electronics.
When a fuse blows, it breaks the current path to the battery, preventing any charging. So if your car won’t start, check the fuses connected to the starter and alternator first. A blown alternator fuse interrupts charging, while a bad starter fuse cuts off power to the starter motor.
Here are the following types of fuses”
- Micro2 (5-30 amp)
- Micro3 (5-15 amp)
- Mini & Low Mini (2-30 amp)
- Regular ATO/ATC (1-40 amp)
- Maxi Heavy Duty (20-100 amp)
How to test?
To identify and replace a faulty fuse in the car fuse box, you can do the following steps:
- Turn the ignition off and disconnect the battery.
- Find the fuse box in your car. The fuse box in a car can be situated in any number of different places. In some instances, you’ll be able to find the fuse box under the bonnet of the car. But in others, you might have to look underneath a seat or in a compartment underneath the steering wheel in your car.
- Get your vehicle’s manual to analyze the fuse box diagram. This will tell which fuse is powering the component of your vehicle.
- From the diagram, check which fuse is linked with the alternator and starter. The location of the alternator fuse in a car depends on the model of the vehicle. Also, note that in some cars there is no fuse linked with the alternator. So, it all depends on the model of your vehicle.
- Pull out the blown fuse using a fuse plier.
- Take a digital multimeter (DMM) and set it to ohms setting.
- Connect one meter lead of DMM to one of the fuse’s terminals. Connect the other meter lead to the other fuse terminal.
- If your meter reads out of limits, the fuse is bad.
- You need to identify the fuse of the same type, size, and current rating. Avoid replacing a 10-amp fuse with a 30-amp fuse. The 10-amp is designed to blow at a lesser current rate. If a higher current passes through the fuse with a lower current rating, the component will damage.
You can check out the below video to learn about how to identify blown fuse in the fuse box.
In some cars, the alternator fuse is not found in the fuse box as you can see in the video below:
Note: If there is no faulty fuse, check the wire to the fuse that is connected with the alternator and battery. If the wire is corroded, you need to replace it.
3. Corroded and Dirty Connection/Wiring At Battery Terminals
The electrical link between the positive and negative terminals can become loose when corrosion and dirt accumulate, causing the terminal to become dirty. This can make your newly installed alternator and battery unable to properly charge or power the car.
Typically, three to four wires connect to the car battery, varying by model. The positive terminal usually has two wires attached. One wire comes from the alternator to supply current to the battery.
The other wire goes from the positive terminal to the starter motor to provide power. The negative terminal wires connect to the engine block and chassis to complete the circuit.
When the terminal is corroded or dirty, the wires are unable to make a solid connection for delivering charge and power even with new parts installed. Checking and cleaning the battery terminals can get your electrical system working properly again.
How to detect?
Here is how to detect the issue of corroded terminals of a car battery:
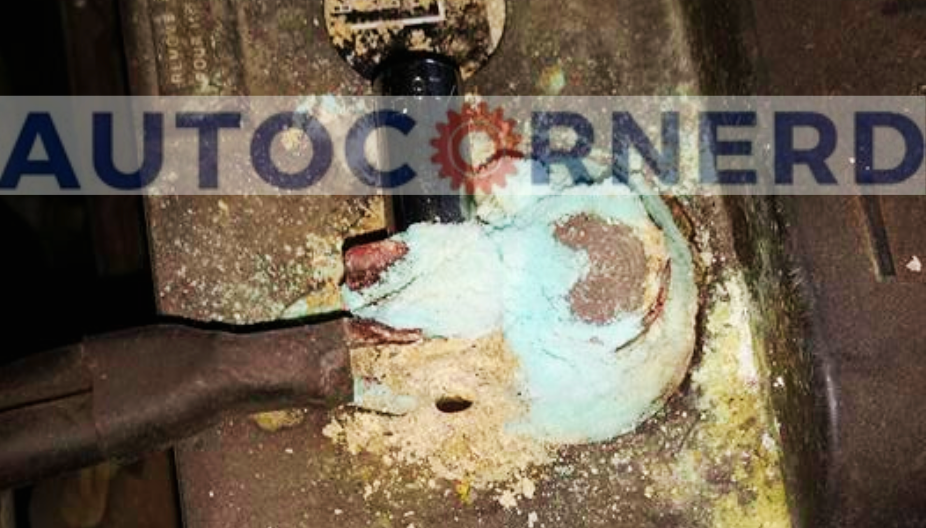
- Start by visually inspecting the battery-terminal connections.
- Use wire brush to scrap off the rust on the battery terminals.
- Clean the white or green deposits on the car battery terminals. If it is a lead acid battery, clean the terminals with a solution of baking soda formulated by a teaspoon of baking soda mixed with a cup of water. You can also use this cleaning spray to remove the dust off the battery terminal.
- If the terminal connectors of a battery are damaged, get a new one.
- Tighten all the wiring connections to a battery. Turn the bolts or screws clockwise using an adjustable wrench until they no longer move.
- Also, inspect the nut holding the battery cable to the starter stud.
- Next, look for wear and tear on battery wirings. Carefully examine them for breaks or brittleness that could expose the wires within the casing.
- Lastly, don’t forget to check if the grounded connection of battery is corroded.
4. Poor Voltage Regulator Causing New Alternator Not Charging Battery
The voltage regulator operates as the gateway that ensures your battery is adequately charged through a controlled transfer of power from the alternator.
Visualize the voltage regulator like a watchman responsible for maintaining a specific voltage flow directed toward the battery. It regulates the incoming energy from the alternator, sustaining an ideal level that saturates the battery without risking overcharge.
In many modern vehicles, engineers have included the voltage regulator within the alternator’s integrated design. Previous designs housed the regulator as a separate structural component.
In the absence of a working regulator, the alternator loses its capacity to sufficiently replenish the battery. Here, inadequate power limits the battery’s ability to generate the required energy for ignition. Thus, any regulator defect obstructs the alternator in producing sufficient strength.
Your car might keep killing your new alternator due to which voltage regulator is also fried up.
Here is how to detect degraded poor voltage regulator issues:
- Set the gear position of your vehicle to neutral
- Open the bonnet
- Find the car battery
- For a voltage drop test, take a digital multimeter. Connect its red probe with positive terminal of a battery and black probe with negative terminal.
- While the car is not running, the voltage across the battery should be slightly over 12 volts.
- Now start the car. The voltage should now jump to 13.5 to 14.2 volts.
- Now increase the car rpm. If the voltage across the battery peaks above 15V, the regulator has failed.
- If you turn on the headlights while the car is running and the voltage drops very much, it might be a battery problem as well.
5. Broken Serpentine Belt Causing Alternator Not Charging Battery
The alternator is the heart of a vehicle’s electrical system, converting the engine’s mechanical spin into an electrical pulse to recharge the battery. Like a serpentine belt looping around pulleys, the two are intertwined.
Smooth power transfer is essential for:
- Reliable charging
- Preventing battery drain
- Accessory function
- Overall electrical health
The alternator relies on the crankshaft spinning a serpentine belt, which embraces a pulley connected to the alternator. This synchronizes their motion to channel engine power for conversion to electricity.
The belt-pulley interface is vital. The serpentine belt must maintain tension to efficiently relay rotational velocity from the crankshaft to the alternator through aligned pulleys. This drives the alternator’s internal components to generate alternating current.
Check the below video for a better insight into the serpentine belt role in the engine.
When the serpentine belt breaks, the alternator will not run and stop charging the battery. If you do not repair the problem, it will damage the engine and cause severe problems in the future.
How to detect?
You can easily spot a damaged serpentine belt by looking for any unusual noises coming from the engine. The most common noise you might hear is squealing noise.
Check out the below video to learn about the failure models of the serpentine belt.
You can follow these steps to solve the damaged serpentine belt issue:
- Park the vehicle on a flat surface.
- Turn off the ignition switch and open the bonnet.
- Wear protective gloves.
- Find the serpentine belt spring tensioner that offers the amount of force against the belt to keep it tight.
- Grab a serpentine belt tool to loosen the serpentine tensioner. It is a long thin wrench with different sockets.
- Replace the damaged serpentine belt.
- Make sure that the new serpentine belt has the same diameter, thickness and tooth shape. Moreover, it should follow the same route as the previous serpentine belt.
You can also check out this in depth guide on replacing serpentine belt.
Why Is My Car’s Battery Light On With New Battery and Alternator?
The battery light of your car is on due to the following reasons:
- The light circuit is faulty if it is not controlled by ECU
- The wiring of the alternator is bad
- Very slipping or broken alternator belt
- Your car has different circuits for battery sensing, alternator excitation, and warning lamps. Different car models/makes/years use different methods to turn on and off the battery lights. If the excitation circuit is working, but the warning lamp circuit is faulty, the alternator will charge the battery with no problems. Moreover, you have to consult a vehicle model’s manual to understand the car’s electric system.
Before troubleshooting the electrical parts and connections of the battery and alternator, first make sure the alternator is charging properly. To test this, take a multimeter and set it on DC volts.
Check the battery voltage. With the engine off, a fully charged battery will be around 12.6 volts. Ensure the voltage rises to at least 13.5 volts at a minimum when the engine is running at idle and the lights are off.
With the engine at higher revolutions, the volts must be around 14.2 volts. With lights etc switched on and the engine running at higher revolutions the volts must never drop below 13.5.
If the voltage of a car battery is between 13.5 and 14.2 with the car running and the battery light is still on, your car might have an indicator problem. That could be due to a wiring problem or ground connection.
Furthermore, several vehicles implement a charging system that is monitored by the Powertrain Control Module. When a fault is detected, the battery light is illuminated, and a fault code is stored. This is a non-emissions code, so it will not cause a check engine light. More importantly, that code can’t be read with a simple OBD II code reader.
You must utilize an OBD2 scan tool to diagnose any trouble codes stored. There are various faults that can take place that would still allow some function of the charging system.
Final Thoughts
In summary, reliable charging system function relies on proper electrical system maintenance and timely diagnostics. Corroded or loose battery connections prevent sufficient contact for power transfer. Conduct periodic inspections of connections and clean as required to sustain conductivity.
Additionally, blown fuses disconnect circuits and should be replaced immediately after faults are identified to restore continuity. Fraying wiring insulation fails to properly transmit charges and requires repair or replacement.
Worn serpentine belts can lose tension, failing to adequately rotate the alternator so it cannot generate its full electrical output. Tightening belts to specified tension ensures the alternator turns appropriately and produces expected voltage levels.
Furthermore, a malfunctioning voltage regulator provides inaccurate signals to the alternator, preventing it from charging at optimal capacity over time. Testing and replacing faulty regulators helps sustain proper charging levels.
By regularly examining components like battery cables, wires, fuses and drive belts for damage and completing maintenance as needed, disruption to the vehicle’s electrical flow can be minimized.