
Car Loses Power When Turning Corners: 9 Causes
Why does car lose power when turning corners? A car losing power during cornering could be due to insufficient power steering fluid, causing harder turns and compromised vehicle performance. Other causes include a faulty power steering pressure switch, malfunctioning power steering pump, low or contaminated transmission oil, stuck brake calipers, flawed wiring connections, bad fuel pump, a weak battery (particularly impacting electrically-assisted steering), loose battery terminals, or an improperly secured battery.
Are you tired of experiencing that frustrating moment when your car loses power just as you’re turning a corner either left or right?
In this article, we will delve into the causes behind why a car loses power when turning corners and explore potential solutions to get you back on the road smoothly.
Bonus Read: Car loses power when AC is on
In the last section, I’ve included comments from forums where users share firsthand experiences with car losing power when turning corners. Be sure to check out that section for real insights.
- Low power steering fluid can make turning corners harder, causing the engine to work extra hard and lose power.
- A faulty power steering pressure switch can fail to properly assist with steering while cornering, resulting in power loss.
- Slipping transmission or contaminated fluid reduces power transfer to wheels, especially during cornering.
- Bad fuel pump struggles to supply consistent fuel flow, worsening during sloshing fuel in turns and causing power loss.
- Loose battery cables or bad electrical grounds get further disturbed in turns, temporarily cutting power.
Causes of Car Losing Power When Turning Corners
Here are the causes of car losing power when turning corners:
1. Power Steering Fluid Level Impacts Corner Turning

The power steering system uses hydraulic pressure to assist the driver in turning the wheels. It consists of various components such as the power steering pump, hoses, and a steering gear or rack.
When the power steering fluid level is low, the power steering system cannot generate enough hydraulic pressure to assist with turning the wheels.
As a result, the driver experiences an increase in steering effort. Cutting corners becomes more challenging as the wheels resist turning, requiring the driver to exert more force on the steering wheel.
Another consequence of low power steering fluid level is the occurrence of unusual noises and vibrations while turning.
When the power steering fluid level is low, air can enter the power steering system, causing bubbles to form.
These air bubbles interfere with the smooth flow of the fluid and create aeration. The result is a whining noise and vibrations that can be felt through the steering wheel, negatively impacting the driving experience.
Furthermore, the power steering pump will also suck the air, due to which cavitation will occur and the pump will starve and will have to draw more power from the engine to push the steering fluid. This will also cause overheating of power steering pump.
Due to this reason, the power steering pump will exert more stress on the engine while taking a turn. As a result, your engine RPM will drop and the car will lose power when cutting corners.
What are the common symptoms of low power steering fluid?
Here are some common signs to look out for:
- Noises While Turning: These noises can range from squeaking or whining sounds to grinding or moaning noises.
- Jerky Steering Wheel: A jerking motion in the steering wheel while turning can also be a red flag for low-power steering fluid. This jerking motion may be accompanied by a stiff or resistant feel in the steering wheel. It’s important not to ignore such symptoms as they can affect your driving control and safety.
- Hard to Turn Steering Wheel: If you find it increasingly difficult to turn the steering wheel, it could be due to low power steering fluid. The power steering system relies on an adequate level of fluid to assist in maneuvering the wheels easily. When the fluid level is low, you might experience resistance while trying to turn the wheel.
How to check low power steering fluid?
To begin inspecting your power steering fluid, follow these simple steps:
- Safety First: Before starting any vehicle maintenance task, it’s essential to ensure your safety. Put on a pair of nitrile gloves and safety goggles to protect yourself from potential hazards. Additionally, make sure your vehicle is turned off, parked securely on a level surface, and the emergency brake is activated.
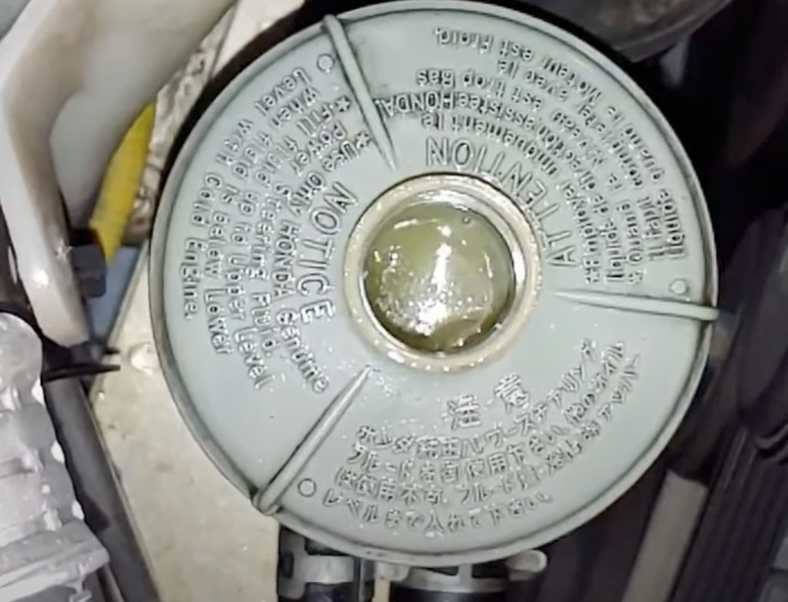
- Locate the Power Steering Fluid Cap: The power steering fluid reservoir is typically located near the engine bay. It is often labeled with a cap indicating “Power Steering” or with the power steering pump symbol. Take a moment to find this cap.
- Remove the Cap: Once you’ve located the power steering fluid cap, carefully remove it. Be cautious not to let any dirt or contaminants fall into the reservoir.
- Check the Fluid Level: Look inside the reservoir, and you will notice three lines: low, medium, and high. These lines indicate the minimum and maximum fluid levels. It’s important to have the fluid level within the acceptable range for optimal performance.
- Wipe Down the Dipstick: Take a clean cloth or paper towel and wipe the dipstick clean. This ensures an accurate reading of the fluid level.
- Reinsert and Remove the Dipstick: After wiping the dipstick, reinsert it back into the reservoir and then remove it again. Take note of where the fluid level reaches on the dipstick.
- If power steering fluid level is below the minimum mark, you will need to add power steering fluid.
Note: Some steering fluid reservoirs are see-through. In that case, they have markings indicating the minimum and maximum levels.

What can cause low power steering fluid?
Any cracks or holes in power steering fluid hoses can cause leakage and result in low power steering fluid.
Some of the common causes of power steering fluid leakage are:
- Old or damaged hoses: The hoses that connect the pump to the rack are made of rubber or plastic and can deteriorate due to heat, pressure or exposure to contaminants. They can also get punctured by debris or sharp objects on the road.
- Loose or faulty connections: The connections between the hoses and the steering pump or rack can become loose or corroded due to vibration, moisture or dirt. They can also get damaged by improper installation or repair.
- Worn or broken seals: The seals that prevent fluid from leaking out of the pump or rack can wear out or break due to age, heat or pressure. They can also get damaged by contamination or improper fluid type.
- Faulty or cracked pump: The power steering pump pump itself can leak fluid due to cracks in its housing or internal parts. It can also malfunction due to electrical or mechanical problems.
It is important to know that holes in the power steering fluid system can be small enough to not allow fluid to leak through but they are big enough to suck air in the power steering system via a vacuum produced by the engine.
How to know if there is air in power steering system?
If you hear unusual noises coming from your power steering system, such as a whining or moaning sound, it could indicate the presence of air. These noises are typically more noticeable when you turn the steering wheel.
Inspecting the power steering fluid can also help you determine if there is air in the system. If you notice bubbles or foaming in the fluid, it suggests the presence of air in power steering system.
To detect air in power steering system, you need following tools:
- A stopper that fits inside the power steering reservoir
- A small vacuum hose
- Vacuum pump
Here are the steps of detecting air in the power steering system:
- Insert the stopper into the steering fluid reservoir opening and attach the other end of the vacuum hose to the radiator pressure tester.
- Apply a few psi of pressure to the reservoir and the hose using the tester. This will create a slight pressure on the suction side of the system.
- Inspect the reservoir, the hose, and the pipe fittings that attach to the pump for any signs of fluid leaks. If there is air in the system, it will likely leak out from these points.
- Fix any leaks that you find and bleed the system.
How to bleed air from power steering system?
There are two ways to bleed air from the power steering system. The first one is with a vacuum pump and bleeder valve (also called a steering fluid reservoir adapter). The second one is without that kit.
Here’s how you can bleed air from the power steering system without a bleeder valve:
- Locate the Power Steering Fluid Reservoir: Begin by locating the power steering fluid reservoir tank. This tank is usually located near the power steering pump. Remove the cap to check the fluid levels. Ensure that the fluid levels are properly filled up, but not overfilled. If you need to add more fluid, do so in small amounts and check the levels frequently.
- Start the Vehicle and Let the Air Escape: With the reservoir cap removed, start the vehicle. Turn the steering wheel all the way to the right, and then all the way to the left. Repeat this process several times to let the air bubbles escape through the open reservoir. This motion helps the air work its way out of the system.
- Monitor the reservoir tank: As you continue turning the wheel back and forth, keep an eye on the reservoir tank. You may notice air bubbles surfacing as the air is released. It’s important to keep turning the wheel until all the air bubbles are gone and the steering becomes quieter.
- Check the fluid levels and test drive: After approximately 20 minutes of turning the wheel and allowing the air to escape, check the fluid levels once again. Top up the fluid as needed. Take the vehicle for a test drive to ensure the whining noise is gone and the steering is smooth and quiet.
https://youtu.be/nfHoqSbFwGk
To bleed air from the steering system using a bleeder valve, you can watch the following video:
How do I know if I need to flush the power steering fluid?
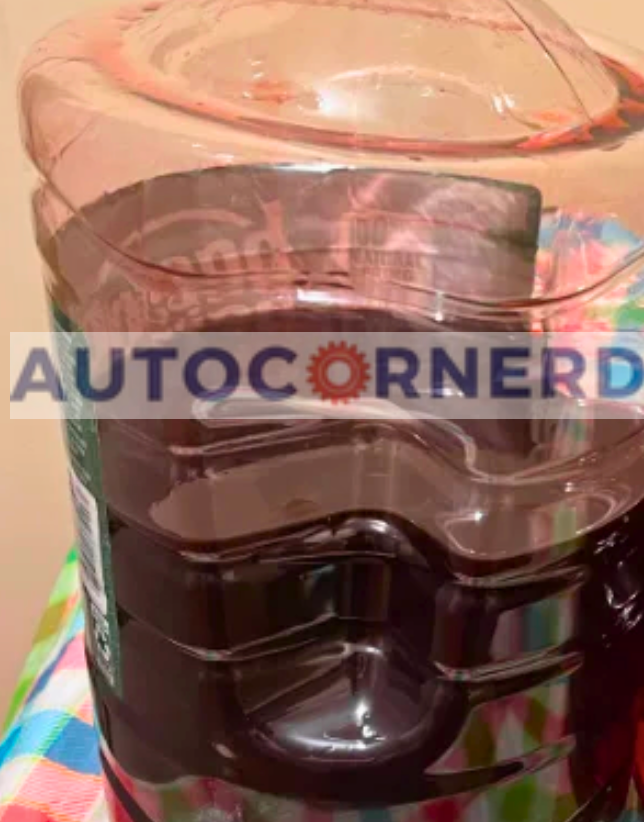
If the fluid is dark brown or black, smells burnt, or has shiny metallic bits in it, it means that it is contaminated or degraded and needs to be flushed.
Here is how to flush a power steering fluid:
- Remove the cap from the power steering fluid reservoir and insert the hose from your vacuum pump.
- Use the vacuum pump to suck out the old fluid from the reservoir. This process is quick and easy and will only take a few seconds once you start pumping the handle. Emptying the reservoir allows you to move on to the next step.
- Identify the return line feeding into the power steering fluid reservoir. It is typically the higher-mounted line among the in and out lines present in all reservoirs.
- Remove the clamp securing the return line and detach the hose. Since you have already drained the reservoir, there will be no fluid leakage. The lines should detach easily due to the lubricating properties of power steering fluid.
- Temporarily plug off the open end of the hose with a piece of tubing or a rubber plug. This step ensures no fluid leaks during the process.
- Connect the hose from the vacuum pump to the return hose of the power steering fluid system. This connection allows you to vacuum out all the old fluid, ensuring a thorough replacement.
- Refill the reservoir with clean power steering fluid. The fluid level does not matter at this point, as you will be pulling it out later. Adjust the level as needed after completing the process.
- Begin pumping the vacuum pump to start the fluid change process. As you do so, the dirty fluid will be expelled, replaced by the clean fluid you added. This method ensures that all the old fluid is completely flushed out of the power steering rack.
- Once you are satisfied with the cleanliness of the expelled fluid, disconnect the hose from the return line. The vacuum pump will prevent any spills as you remove the hose.
- Reconnect the return hose to the reservoir. To avoid making a mess, quickly cap the open end of the hose with your finger as you pull the hose off temporarily. Then, insert it back into place.
- Tighten the clamp on the return line to secure the hose.
- Check the steering fluid level in the reservoir and adjust if necessary, following the cold mark on the dipstick.
- Finally, start the engine and let it idle for about a minute to allow the power steering fluid to circulate through the system. Rotate the steering wheel fully to the right and left several times to ensure everything feels normal.
- Turn off the engine and recheck the power steering fluid level. Ensure it’s at the correct position, as indicated for cold levels.
Must Read: How to bypass reduced engine power
2. Malfunctioning Pressure Switch Interrupts Power Steering
The power steering pressure switch has two main functions:
- It tells the ECU when the power steering system exceeds its normal operating hydraulic pressure. This can happen when you turn the steering wheel sharply or at low speeds. If the pressure is too high, the computer will raise the idle speed of the engine to prevent it from stalling or hesitating.
- It tells the ECU when the power steering system is operating normally. This can happen when you drive straight or at high speeds. If the pressure is normal, the computer will lower the idle speed of the engine to save fuel and reduce emissions.
One of the most noticeable symptoms of a faulty power steering pressure switch is a loss of power when turning corners.
This occurs because the switch fails to communicate the additional load on the engine during cornering, leading to a decrease in engine power output. As a result, the car may feel sluggish or unresponsive, making it difficult to navigate turns smoothly.
Moreover, a malfunctioning faulty switch may not accurately monitor the pressure in the power steering system, causing the power steering to work improperly. This can result in stiff or heavy steering, making it challenging to steer the vehicle, especially during tight turns.
How to diagnose?
If there is an issue with the power steering pressure sensor, it can throw OBD2 codes like P0552 or P0053. You can check using BlueDriver OBD2 Scan Tool.
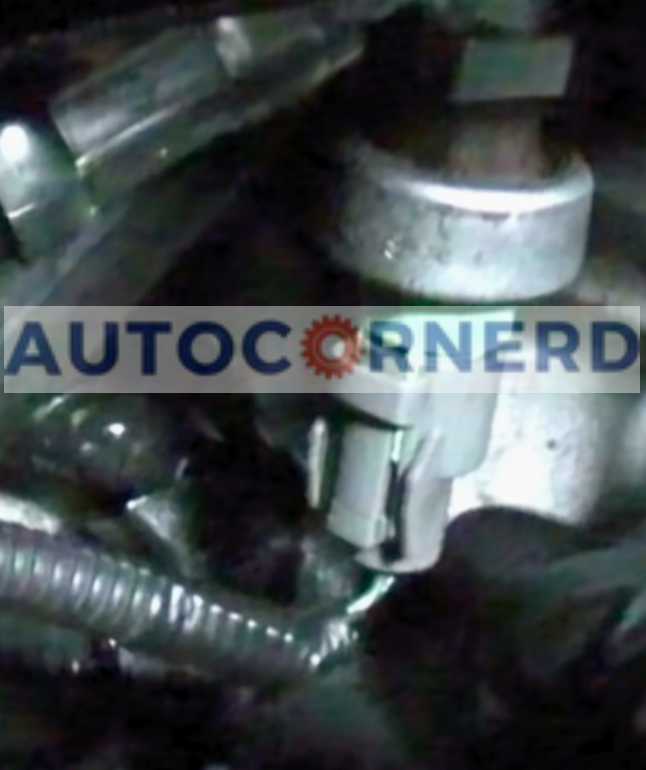
You will find a power steering pressure switch on the pressure hose (the lower one) just before the connections to the rack and pinion steering system.
Here is how to test a faulty power steering pressure switch:
- Locate the power steering pressure switch on your vehicle. It will have a two-wire connector, with a green wire and a black wire.
- Start by testing the ground wire, which is the black wire. Insert the T-pin into the back of the connector, taking care not to puncture the wire insulation. Gently run the T-pin alongside the wire until you feel resistance. Reinsert the pin into the switch.
- Attach the multimeter leads. Take the red lead from your multimeter, flip it to the end of the T-pin, and clip the other lead to a clean, unpainted metal surface that will provide a good ground, referred to as the engine block.
- Set your multimeter to measure DC volts.
- Turn the key on and check the meter reading. If the T-pin is properly inserted and making contact with the ground lead, you will notice a stable reading. Shaking the leads should not cause any variations in the reading, indicating a good connection. (Tip: A sensor ground reading should ideally be within 100 millivolts. Anything higher than this suggests excessive resistance in the ground wire.)
- Next, it’s time to test the signal wire that goes to the ECU. Remove the switch connector and insert the T-pin into the hole with the green wire. Reinsert the connector.
- Keep the red lead on the block ground and switch the polarity of the meter leads. Place the red lead on the T-pin and the black lead on the block ground. With the key on, you should observe the switch being closed, pulling the battery voltage to the ground. This indicates a proper signal wire connection. (Note: A normally closed switch means that when the engine is off or the power steering pressure is normal, the switch is closed. The signal wire is connected to the ground wire, causing battery voltage to be pulled to the ground.)
- To confirm the signal wire’s integrity, disconnect the connector from the switch to remove the ground connection from the switch. Check the meter reading, which should show the battery voltage (around 12.03 volts). This suggests that the signal wire from the PCM to the switch is functioning correctly.
- With the lead still on the green wire, start the vehicle and turn the steering wheel, holding it at full lock. As you do this, the switch should open, and you should observe battery voltage on the meter. In a running vehicle, the voltage might reach around 14 volts due to the alternator charging the battery. Listen closely, and you might hear the power steering pump whine, accompanied by a drop in engine RPM when the wheel is at full lock.
- When the power steering fluid pressure reaches a high level, the switch opens, disconnecting the signal wire from the ground wire. Consequently, the signal wire returns to battery voltage. The PCM continuously monitors this voltage. If the signal voltage is high (equivalent to battery voltage), it indicates high power steering pressure. Conversely, if the signal voltage is low (around ground voltage), the power steering pressure remains normal.
The following video to test faulty power steering switch is quite helpful:
3. Low or Contaminated Transmission Fluid
In an automatic transmission, the transmission fluid provides hydraulic pressure and actuation for shifting gears in addition to providing lubrication and preventing transmission from overheating.
A fresh transmission fluid is typically red, slightly translucent, and viscous like motor oil.
Low or contaminated transmission fluid can cause several problems for your car’s performance and efficiency. Some of these problems are more noticeable when you’re cutting corners because of the increased stress and demand on the transmission system.
Here are some of the effects of low or contaminated transmission fluid on your car:
- Slipping Transmission: One of the most obvious effects of low or contaminated transmission fluid is a slipping transmission. This means that the gears slip during a change, causing a loss of power and acceleration. You might also notice sudden shifting, RPM spikes, and grinding noises. This happens because there’s not enough pressure or lubrication to keep the clutches engaged. When you’re cutting corners, you need more power and precision from your transmission to maintain speed and control. If your transmission slips, you’ll feel like your car is lagging behind or jerking.
- Overheated Transmission: When transmission temperature rises above its normal range, it can become damage. You might notice smoke coming from your car or a burning smell. You might also experience erratic shifting, loss of power, and dashboard warning lights. This happens because there’s not enough cooling or lubrication to prevent friction and wear of the metal parts.
- Delayed or Irregular Shifting: A third effect of low or contaminated transmission fluid is delayed or irregular shifting. This means that the gears take longer to engage or change, causing a lack of responsiveness and smoothness. This happens because there’s not enough pressure or fluid to activate the valves and solenoids that control the shifting. When you’re cutting corners, you need quick and accurate shifting to adapt to changing road conditions. If your shifting is delayed or irregular, you’ll feel like your car is out of sync or rough.
How does transmission fluid become bad?
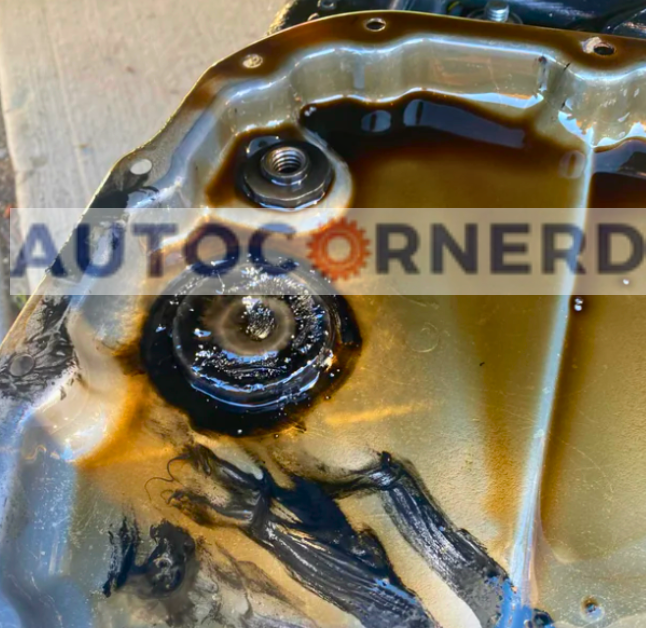
One common culprit behind transmission fluid going bad is the presence of metal shavings. Within the transmission system, various gears and components move together to facilitate power transfer.
Over time, wear and tear can cause tiny metal fragments, or shavings, to be released into the fluid. When your transmission fluid becomes contaminated with these metal shavings, it can spell trouble.
The transmission pan, equipped with a magnet, captures these tiny particles, preventing them from circulating further. However, if left unchecked, an excess of metal shavings can degrade the fluid’s performance.
You can learn more about this in my guide on transmission flush.
How does transmission fluid become low?
Transmission fluid becomes low due to leaks in the transmission. Transmission leaks through the transmission pan, transmission filter, seals and transmission cooler hoses. You can learn more about it in my guide on cost of fixing transmission leaks.
4. Bad Fuel Pump or Broken Fuel Pump Housing
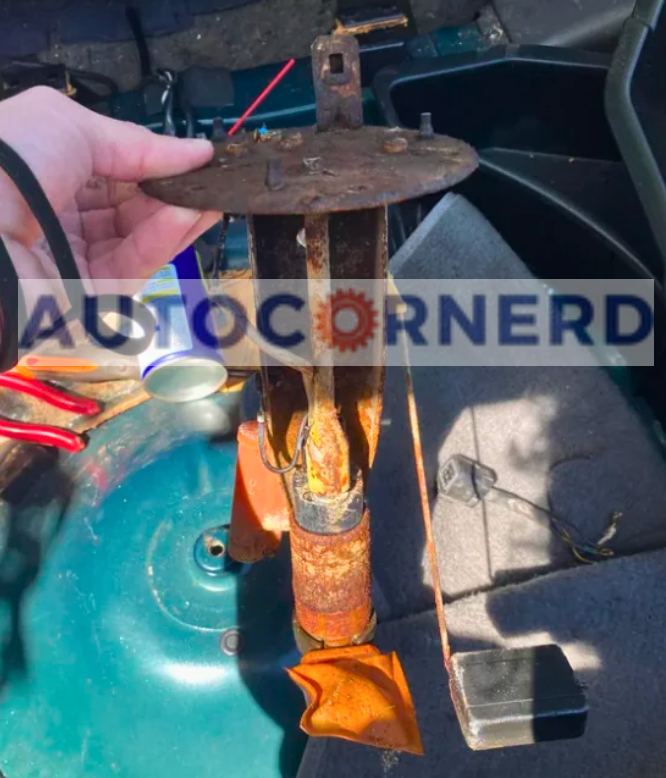
The fuel pump is responsible for transferring fuel from the gas tank to the engine. The fuel pump is powered by an electric motor that creates necessary pressure to ensure a consistent flow of fuel to the injectors, which then distribute fuel into the combustion chambers.
If the fuel pump is not working properly, it can affect the performance and efficiency of the engine. A bad fuel pump can cause low fuel pressure, which can lead to poor combustion, misfires, stalling, surging, or even engine failure.
Furthermore, when you cut corners, the fuel inside the tank tends to slosh around (more on this later). If the fuel pump is already struggling to maintain adequate pressure, this sudden movement can exacerbate the problem. The fuel pump may not be able to keep up with the demand, leading to a momentary loss of power.
Moreover, electrical issues with the fuel pump wiring can also contribute to power loss during turns. Loose connections, damaged wires, or corroded terminals can disrupt the flow of electricity to the fuel pump, leading to inconsistent fuel delivery. When you make a turn, the movement of the wires can exacerbate the problem, causing momentary power loss.
You can learn more in my guide on common problems after changing fuel pump.
How cracked fuel pump housing can cause problems?
A fuel pump housing is a plastic casing that protects the fuel pump from damage and corrosion. It also helps to seal the fuel line and prevent leaks.
A cracked or broken fuel pump housing can cause several problems, such as:
- Fuel leaks that can create fire hazards or damage other parts
- Air leaks that can disrupt the fuel pressure and flow
- Dirt and debris that can clog the filter screen or damage the pump
- Loss of power when turning corners
How can a bad fuel pump cause your car to lose power when turning?
A bad fuel pump can cause your car to lose power when turning due to cavitation. Cavitation happens when tiny bubbles form in the fuel pump because of low pressure or high speed. These bubbles collapse when they encounter higher pressure, creating shock waves that can damage the fuel pump.
When you turn your car, the fuel pump relies on the surrounding fuel to maintain smooth operation. However, the fuel can shift away from the pump during turns, causing it to draw in air instead of fuel. This leads to cavitation.
The sudden change in direction or speed during turns can create turbulence in the fuel flow, causing pressure to drop or spike in the pump. This can result in the fuel vaporizing and forming bubbles that harm the fuel pump.
A damaged or worn-out fuel pump can reduce fuel pressure or volume to the engine, causing power loss or stalling. If the fuel pump has mechanical issues like a worn-out impeller or damaged components, it may need professional repair or replacement.
To check if a fuel pump is bad, listen for a fuel pump sound near the gas cap. When you turn the ignition key without starting the car, the fuel pump turns on briefly to prime fuel lines. Ask someone to help you with this step. If the fuel pump produces a whining sound, it indicates a problem.
Lastly, check for any dirt, debris, or objects inside the fuel tank. These can obstruct the fuel pump and prevent a sufficient amount of fuel from reaching it.
A simple test to inspect a failing fuel pump:
By doing a fuel pressure test, you can inspect whether your fuel pump is supplying sufficient pressure or not.
Here’s how to perform a fuel pressure test:
- Ensure Fuel Pump Priming: The first step is to ensure that the fuel pump is working correctly and priming fuel to the system. When you turn the ignition to the “run” position (without starting the engine), you should hear the fuel pump prime. This confirms that power is reaching the fuel pump.
- Locate the Fuel Rail and Schrader Valve: Next, locate the fuel rail in your car’s engine bay. It should have a Schrader valve, which looks similar to a tire valve. This is where you will connect the fuel pressure tester.
- Connect the Fuel Pressure Tester: Attach the fuel pressure tester to the Schrader valve securely. It’s a simple connection, and once it’s properly attached, you are ready to proceed.
- Check Fuel Pressure: With the fuel pressure tester in place, turn the ignition to the “run” position again, and observe the fuel pressure gauge. The pressure should read around 40 PSI or within the acceptable range mentioned earlier.
- Perform a Leak Down Test: Now, leave the engine running for a minute or two and ensure that the fuel pressure remains stable. A significant drop in pressure within a short time could indicate potential issues, such as a faulty fuel pressure regulator, fuel injectors, or the fuel pump’s check valve.
- Inspect the Fuel Pressure Regulator: If you suspect a problem with the fuel pressure regulator, locate it on the fuel rail. Most fuel pressure regulators have a vacuum line attached to them. Check for any signs of gasoline smell or dripping around the regulator and vacuum line.
- Test the Fuel Pressure Regulator: Start the engine and let it idle. Then, pull off the vacuum line from the fuel pressure regulator. If you hear a sucking sound and see no fuel coming out, the diaphragm in the regulator is likely functioning correctly. I have also written a detailed guide on bad fuel pressure regulator symptoms.
- Check for Fuel Injector Issues: If the fuel pressure drops slowly when the car is off, the issue may lie with the fuel injectors. O-rings around the injectors may be damaged or worn out, allowing fuel to leak past them. To learn more, you can read my guide on car won’t start after replacing fuel injectors.
- Check fuel pump and fuel pump check valve: If the fuel injectors are fine, the last step should be to check fuel pump and its check valve. A faulty check valve will allow fuel to flow back into the tank too quickly, causing a loss of fuel pressure. In such a case, the fuel pump check valve may need to be replaced to maintain the required fuel pressure
5. Electric Issues (Bad Ground Wires and Connections)
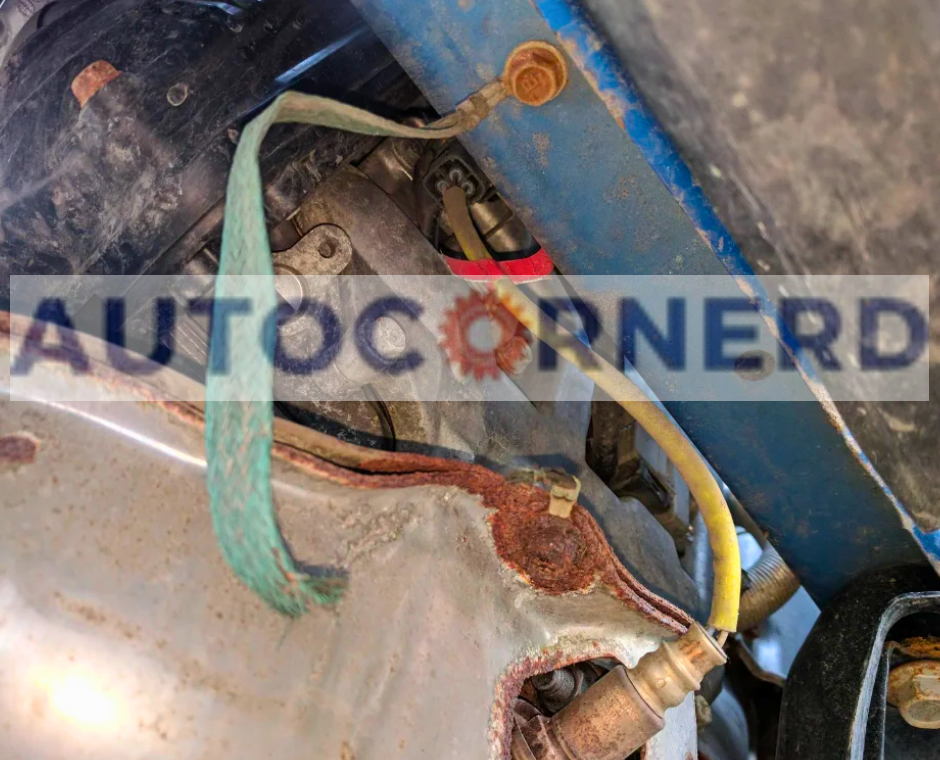
In a car’s electrical system, ground wires provide a direct path for electrical currents to flow back to the battery after flowing through various components. These wires ensure that all electrical components have a solid connection to the vehicle’s chassis, allowing for proper functioning.
Similarly, ground connections are the points where these ground wires are connected to various electrical components in the car. These connections ensure that there is a stable and reliable pathway for the electrical current to flow between the component and the battery.
The negative terminal of a battery is grounded. The location of ground connections varies with the make and model of a vehicle.
One common ground location is the engine ground strap (a copper braided wire). This strap connects the engine block to the vehicle’s chassis and helps eliminate static electricity buildup and voltage disparities between the engine and chassis.
Other ground locations in a vehicle include the engine block, firewall transmission housing, starter casing, and vehicle chassis. The ground connections tend to look like bolts or metal studs.
How Bad Ground Wires and Connections Affect Cornering?
When a car turns a corner, it experiences lateral forces that can shift and jostle its components. If there are loose or corroded ground wires and connections, these forces can exacerbate the problem.
As the wires and connections move, the electrical circuit can be intermittently broken, resulting in power loss to certain components. This power loss can affect crucial systems such as the engine, fuel pump, or ignition, leading to momentary or sustained power loss during cornering.
How to inspect and fix?
To diagnose and fix bad ground wires and connections causing power loss during cornering, follow these steps:
- Visual Inspection: Start by inspecting the visible ground wires and connections for signs of damage, corrosion, or looseness. Look for frayed or exposed wires, rusted connections, or any signs of wear and tear.
- Cleaning and Tightening: If you identify loose or corroded connections, disconnect them and clean the mating surfaces using a wire brush or sandpaper. Apply a specialized electrical contact cleaner to remove any dirt or corrosion. Make sure to tighten the connections securely afterward.
- Checking Ground Wires: Inspect the ground wires for any breaks, fraying, or disconnection. If necessary, replace the damaged wires with new ones of the appropriate gauge.
Another method to check ground connections is to measure the voltage between the negative terminal of the battery and the ground connection using a voltmeter. If everything is fine, the voltage should be less than 0.2V.
If the voltage is greater than 0.2V, you should find all possible ground connections in your car. Check if the insulation of the cables is broken at some point.
Moreover, the contact points of ground cables should be clean and smooth. You can apply a thin film of petroleum jelly to the ground contact points to prevent corrosion.
Also Read: My car sometimes starts sometimes it doesn’t
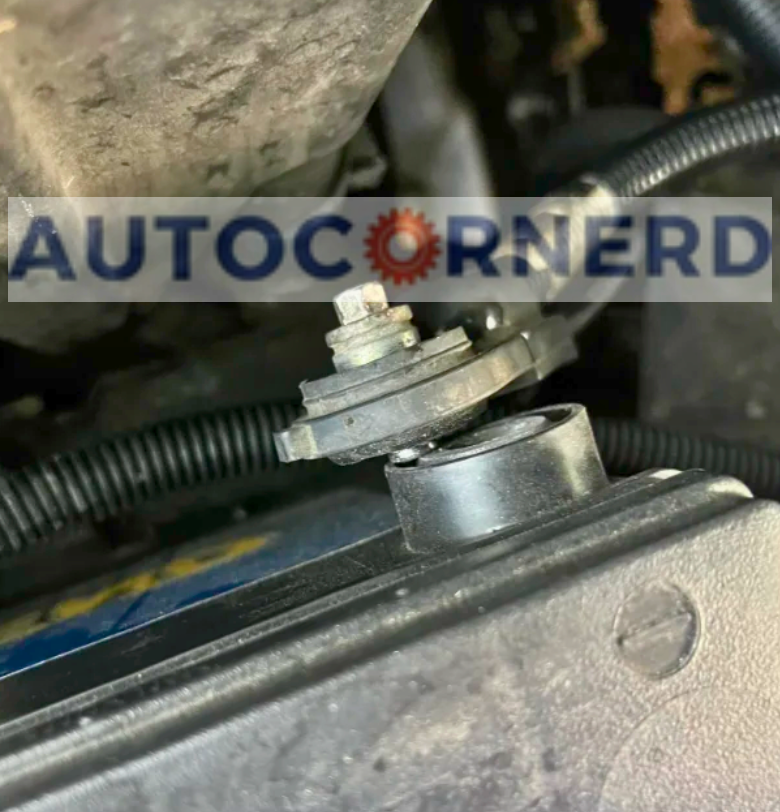
6. Failing Alternator Unable To Meet High Power Demand

The alternator is a crucial component responsible for generating electricity while your engine is running. The alternator is responsible for charging your vehicle’s battery so that it continuously supplies power to the electrical components of your vehicle. The alternator is run by an engine via a serpentine belt.
Electric power-assisted steering (EPAS) has become increasingly popular in modern cars due to its numerous benefits.
EPAS uses an electric motor to assist with steering. This electric motor receives power from the battery, allowing it to provide varying levels of steering assistance based on the speed and driving conditions.
As you approach a corner and turn the steering wheel, the EPAS system engages the electric motor to provide the necessary assistance. However, if the alternator is unable to supply enough power, it will not charge the battery with enough capacity.
As a result, the electric motor of power steering system may not receive the required energy to function optimally. This can result in a decrease in power assistance during cornering, making it feel like your car is losing power.
How to inspect a failing alternator?
You can follow these steps to inspect a bad alternator:
- Make sure that the serpentine belt, which is driving the pulley of the alternator, is in good condition. The belt is not frayed and it should not be overtight or loose.
- A failing alternator can sometimes produce strange noises. Listen for any grinding, whining, or squealing sounds coming from under the hood. These noises could be indicative of a failing alternator bearing.
- To get a more accurate assessment of your alternator’s health, you can perform a voltage test. Using a multimeter, set it to the DC voltage setting and connect the positive and negative leads to the corresponding battery terminals. With the engine running, the multimeter should read between 13.8 and 14.2 volts. Anything significantly lower or higher could indicate a failing alternator or a weak battery.
- You should also check if the alternator is seized. The pulley of the alternator should be freely turnable by hand.
To fix a seized alternator, you should put a breaker bar on the nut of the alternator pulley, and try to force it to turn, forward and backward. You can also spray a wicking coil into the winding of the alternator from the pulley side to fix a seized alternator.
7. Loose Battery Terminals Causing Voltage Drops
When the battery terminals are loose, it means that they are not securely connected to the battery posts. This can occur due to a variety of reasons, such as vibration from driving or simply wear and tear over time.
When the car takes a turn, the centrifugal force generated can further exacerbate the problem. The force can cause the loose terminals to move or disconnect momentarily, disrupting the flow of electricity.
Since the battery is responsible for powering the electric motor of the steering system and supplying power to the fuel injectors and other important sensors of your vehicle, your car will start losing power when cornering.
Moreover, if the battery is not properly secured through a hold-down clamp, the forces from vibrations, as you drive your vehicle, can cause an improperly secured battery to shift or move within the engine bay.
When you cut corners or make sharp turns, the centrifugal force can exacerbate the battery’s movement in its tray, making the loose terminals move or wiggle even more. This leads to a temporary disruption in the electrical connection and causes your car to lose power when cornering.
How to fix?
When inspecting the battery terminals, it’s essential to begin by removing the negative terminal first. The reason for this is that the negative terminal is connected to the car chassis, engine block, and other metal components, establishing the ground for the electrical system.
If you were to remove the positive terminal first and accidentally let it come into contact with the vehicle’s body while using a metal spanner or wrench, there is a higher risk of generating a significant spark.
Use a small wire brush or sandpaper to clean the dust and scrap the corrosion particles around the battery post and terminals. After that, clean the battery terminals with a mixture of water and baking soda.
To prevent corrosion on the terminals, apply a thin coat of petroleum jelly to the battery terminals after reconnecting the battery cables.
After cleaning the terminals of the battery, make sure to connect the positive terminal first. Make sure the battery terminal is fully seated against the post of the battery. You can use a rubber mallet to lightly tap the battery terminal.
Then, snug the terminals’ bolts until they are tight. If the battery terminal is still loose, you can install a shim.
Do not overtight battery terminals like a lug nut. If you overtighten, the metal will expand when hot. When it shrinks after cooling down, the battery terminals will become loose.
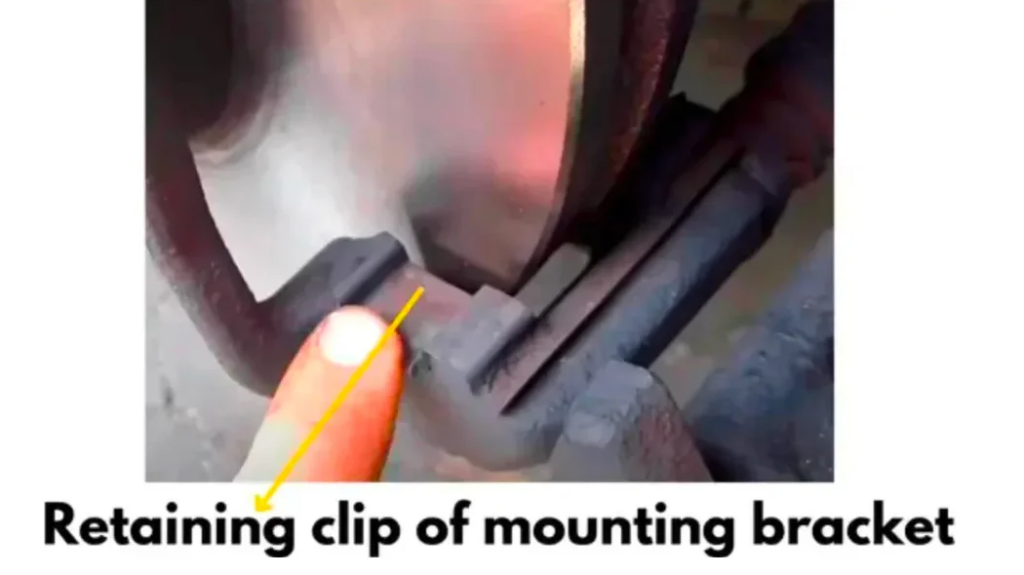
8. Brake Caliper Sticking
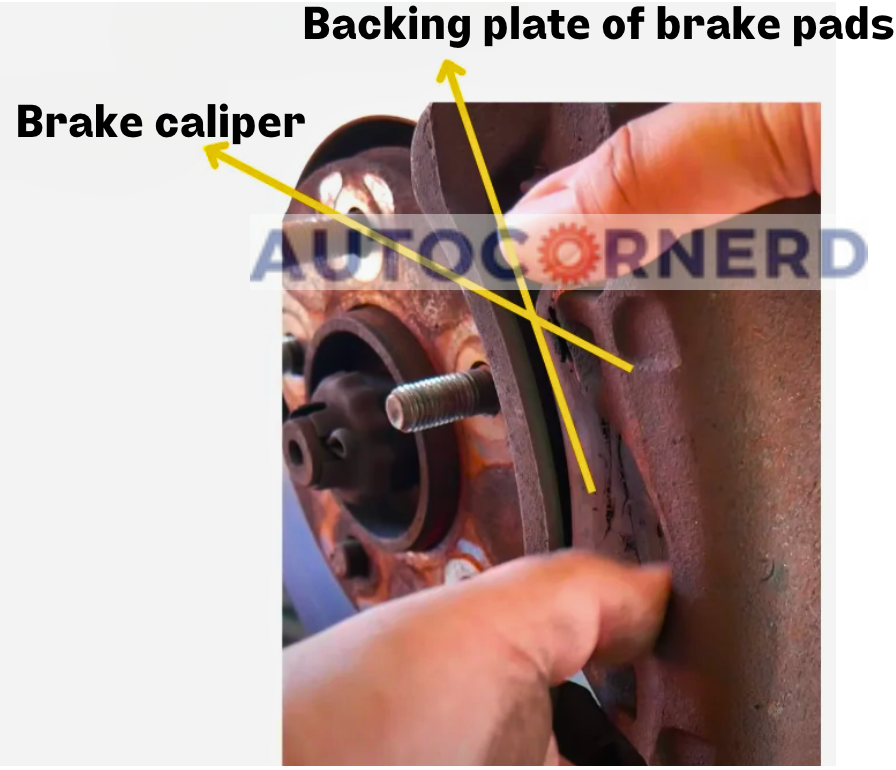
A brake caliper encloses a brake piston that applies pressure on the brake pads. The brake pads are seated against the retaining clips. The retaining clips are housed in a brake caliper mounting bracket.
When a brake pads gets stuck, it fails to retract fully, causing the brake pad to remain in contact with the rotor even when the brake pedal is released.
The friction generated between the brake pad and the rotor due to the stuck caliper creates additional resistance.
When you try to take a turn, this resistance becomes more pronounced. The increased friction from the stuck caliper hampers the free rotation of the wheels, resulting in a loss of power.
Moreover, the engine’s power is transferred to the wheels through the drivetrain, which includes components such as the transmission, driveshafts, and differential.
When a stuck brake caliper exerts excessive resistance on the wheel, it interrupts the smooth transfer of power from the engine to the wheels. This interruption causes the engine to strain and work harder to maintain the desired speed while navigating corners, leading to a noticeable loss of power.
What are the indicators of a stuck brake caliper?
Identifying the signs of a stuck brake caliper is vital to address the issue promptly. Some common symptoms include:
- Pulling or drifting: A car with a stuck brake caliper may pull or drift to one side when driving, especially during cornering. This occurs because the stuck caliper causes uneven braking, resulting in uneven deceleration and steering response.
- Uneven brake pad wear: A stuck brake caliper can cause uneven wear on the brake pads. Inspecting the brake pads regularly for uneven wear patterns can help detect a stuck caliper.
- Overheating: When a brake caliper remains partially engaged, it generates excessive heat due to continuous friction. Over time, this heat can lead to brake fluid boiling, brake fade, and diminished braking performance.
- Squeaking or grinding noise when braking: A stuck brake caliper can produce unusual noises, such as squealing or grinding while driving. These noises indicate that the brake pad is continuously rubbing against the rotor, even when the brakes are not applied.
How to fix?
Stuck brake calipers can be fixed by lubricating the caliper sliding pins and ends of the brake calipers that slide in the brake caliper retaining clips. You can read my guide on grinding noise when braking to learn more.
9. Serpentine Belt Slippage
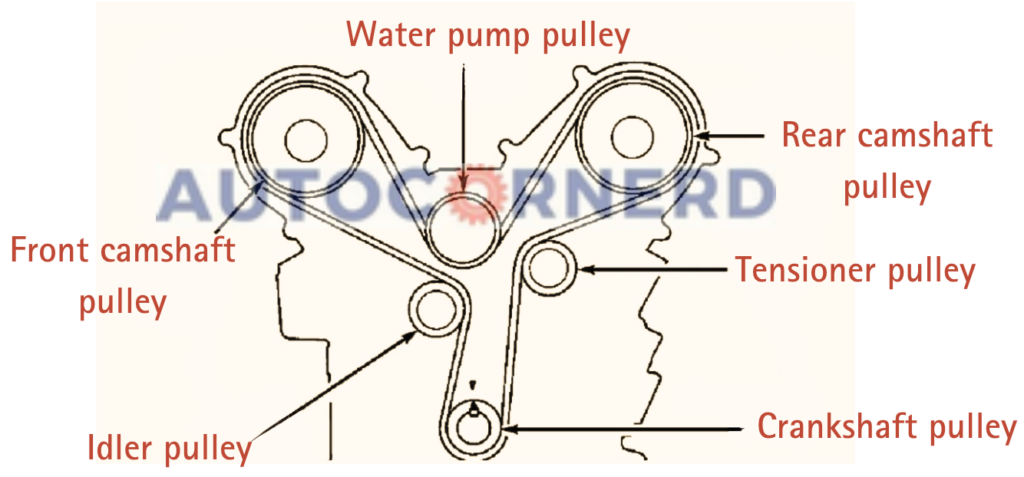
The serpentine belt is a long, winding belt that connects several important components of your vehicle’s engine. Its primary function is to transfer power from the engine’s crankshaft to various accessory systems.
These systems include the hydraulic steering pump, alternator, air conditioning compressor, water pump, and more. Without the serpentine belt, these crucial components would not be able to function properly.
When the serpentine belt starts slipping, it fails to deliver the necessary power to the hydraulic steering pump, resulting in decreased assistance. As a result, when turning corners, the steering may feel heavier, making it more challenging to maneuver the vehicle effectively.
Another critical component driven by the serpentine belt is the alternator. The alternator generates electrical power that is used to charge the vehicle’s battery and power various electrical systems, including lights, radio, and other electronics.
If the serpentine belt slips, it can cause the alternator to spin at a slower speed than what is required to produce sufficient electrical power. Consequently, the battery may not receive an adequate charge, leading to a potential loss of power when turning corners.
Why does it happen?
The tensioner pulley is responsible for maintaining the proper tension of the serpentine belt. It ensures that the belt stays in place and is properly aligned with the accessories it drives. When the tensioner pulley goes bad, it can cause the serpentine belt to slip.
A faulty tensioner pulley may not apply enough tension to the belt, allowing it to loosen or misalign. This can lead to belt slippage, resulting in a loss of power to the hydraulic steering pump and alternator, ultimately affecting your car’s performance when cornering.
How to spot?
You can inspect a bad tensioner pulley by listening its sound. A bad tensioner pulley produces a squealing noise. Moreover, a bad tensioner pulley also has some play in it.
Final Thoughts
In summary, there are several potential causes behind a car losing power when turning corners. Insufficient power steering fluid is a common culprit, as it reduces hydraulic pressure in the system and makes steering more difficult. A faulty power steering pressure switch can also interrupt power steering assistance while cornering.
Low or contaminated transmission fluid affects shifting performance, leading to loss of power during turns. Issues with the fuel delivery system, like a failing fuel pump, can disrupt fuel flow to the engine when the fuel sloshes around in the tank during cornering.
Electrical problems like bad ground wires and loose battery terminals cause momentary power loss as the car’s components shake while turning. If the alternator cannot supply enough power, electric steering assist can be compromised.
Stuck brake calipers create friction that resists the wheels’ rotation, overworking the engine. Serpentine belt slippage fails to provide consistent power to crucial systems like power steering and the alternator.
Some First Hand Experiences Shared By Users In Different Communities
Our team conducted research across various online communities, forums, and subreddits to gather user comments and opinions on car losing power when taking a turn.
User 1 says:
My Sonata had a similar issue. I noticed it especially during sharp turns. My mechanic found that the problem was a loose connection in the fuel pump relay. Securing it solved the problem.
User 2 says:
I experienced this in my CX-5. The culprit was low transmission fluid. After topping it up and fixing a minor leak, the issue was resolved.
User 3 says:
In my Charger, it was an issue with the power steering fluid being low. Topped it off and the car’s been handling turns smoothly ever since.
User 4 says:
Had a similar scare in my Tiguan. Turns out, it was a failing alternator. Replaced it and haven’t had the issue since.